Unity 4.3 2D Tutorial: Getting Started
Learn how to make a cool 2D zombie game using Unity’s new built-in tools in this Unity 4.3 2D Tutorial! By Chris LaPollo.
Sprite Packing – For Professionals Only (Sort of)
Note: This section describes a feature that is only available in Unity Pro. You can certainly still use texture atlases in the free version of Unity, but you’ll need to use separate tools to create and support them. You could also use sprite slicing like you did with zombie.png to achieve the same runtime benefit you’d get from texture atlases, because all of the Sprites you create from a single art asset will use the same texture by default, but it would require you to organize and access your assets in ways that may not be intuitive and therefore will not be covered here.
Note: This section describes a feature that is only available in Unity Pro. You can certainly still use texture atlases in the free version of Unity, but you’ll need to use separate tools to create and support them. You could also use sprite slicing like you did with zombie.png to achieve the same runtime benefit you’d get from texture atlases, because all of the Sprites you create from a single art asset will use the same texture by default, but it would require you to organize and access your assets in ways that may not be intuitive and therefore will not be covered here.
Play your scene and check out its rendering statistics by clicking the Stats button in the Game view’s control bar, as shown below:
![]()
Notice that the game is currently making four draw calls and saving none by batching. Not cool!

Of course, this makes sense, because it’s rendering exactly four Sprites in the scene, and each one uses a unique texture. While a real game with only four draw calls would probably be fine, that number will likely grow as the number of objects and effects in your scene increases. Too many draw calls hurts performance, so you’ll probably need to be a bit more careful about how you organize your Sprite textures. Fortunately, there’s a basic technique you can use to help: pack your sprite images into texture atlases.
Texture atlases — large textures made up of several smaller textures, used to optimize rendering calls to the GPU — aren’t anything new, but before now you had to create them yourself. Now Unity can build them for you!
Note: As of Unity 4.3.2, Unity’s ability to create texture atlases, which they refer to as Sprite Packing, is still in Developer Preview mode. But it’s a great tool, so why not learn about it right now?
Note: As of Unity 4.3.2, Unity’s ability to create texture atlases, which they refer to as Sprite Packing, is still in Developer Preview mode. But it’s a great tool, so why not learn about it right now?
In order to pack your Sprites into texture atlases, you first need to modify their Import Settings.
Select the top level cat in the Project browser to open the Import Settings for cat.png. Notice the property named Packing Tag. Packing Tag defines the name of the texture atlas to which you want this asset’s sprites added, and it can be any string you’d like.
Set Packing Tag to toons by typing in the text field, as shown below:

Don’t forget to hit Apply whenever you make changes to any asset’s Import Settings, or the changes will not take effect. Don’t worry: you’ll get a warning dialog if you select another object in your project while you have uncommitted changes.
Now repeat that process to set the Packing Tag to toons for the enemy and zombie assets as well.
Open the Sprite Packer window by choosing Window\Sprite Packer. The menu item may read Window\Sprite Packer (Developer Preview) if it’s still in beta, but you get the idea.
What’s this, an error?
![]()
As you can see, Sprite packing is disabled by default. To enable it, go to Edit\Project Settings\Editor and set the Mode for Sprite Packer to Always Enabled, as shown below:
![]()
Choosing Always Enabled packs your Sprites when you play the game from within Unity as well as when you export a build of your project; you also have the option of only packing your Sprites for builds.
Choose Window\Sprite Packer again, and this time you see an empty Sprite Packer window, like this:
![]()
It currently warns you that Sprite packing is a developer preview feature.
Note: If Sprite packing is no longer in beta, than you won’t see the yellow message shown in the above image.
Note: If Sprite packing is no longer in beta, than you won’t see the yellow message shown in the above image.
Press Pack in the upper left and you’ll see a new texture with your sprites arranged within it, as shown below:
![]()
Play your game again and check the stats in the Game view. As you can see in the following screenshot, Unity is now using only two draw calls, saving two by batching. It all adds up!
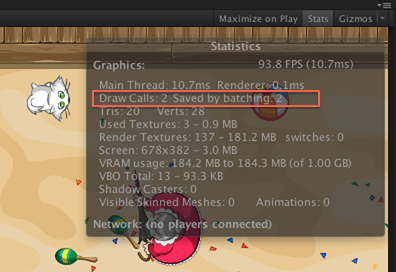
This makes sense, because even though you still have four Sprites in the scene, three of them are now sharing the same texture! And to get that performance savings, which would be more evident with more Sprites on screen simultaneously, you barely had to do anything at all! Sweet.
Sprite Packer — Options and Issues
There are a few other things you may run into when packing Sprites. The top of the Sprite Packer window contains a control bar, shown below:
![]()
It shows:
- The current atlas you’re viewing. This drop down contains each of the Packing Tags you’ve used in your project, allowing you to choose which one to view.
- The current page in the atlas. The atlas you created only contains one page, but if it had more, this dropdown would let you choose which one to view. More on this in a bit.
- The packing policy used to arrange the sprites in the atlas. There is only one policy available at this time – DefaultPackerPolicy – but you can create your own by implementing the
IPackerPolicyinterface. This is an advanced feature beyond the scope of this tutorial.
The notion of a current atlas makes sense, but what you might not expect is that Unity sometimes splits up the atlas you intended to create into multiple atlases, appending group numbers to their names. This occurs when the Import Settings for the component textures don’t match.
For example, the following image shows what the toons texture atlas would look like if zombie.png had been imported with a color Format of 16 bits while cat.png and enemy.png used a Format of Compressed. Notice how it results in two atlases, named toons (Group 1) and toons (Group 2):
![]()
Even though all three Sprites have the same Packing Tag, Unity created multiple atlases out of them. To ensure you’re getting the best performance from your atlases, be sure you don’t use incompatible import settings for sprites that you intend to store in the same atlas.
As for the current page, Unity creates multiple pages for an atlas if there are too many to fit within its texture size limit. If you end up with an atlas with multiple pages, Unity has basically created different texture atlases. You generally want to arrange your textures in such a way to ensure the ones most likely to be used together end up on the same page to reduce draw calls.
Note: I must admit, I haven’t figured out how Unity decides the size limit for a texture atlas, or if you can modify it. If anyone knows, please post in the comment section and I’ll update this text. Thanks!
Note: I must admit, I haven’t figured out how Unity decides the size limit for a texture atlas, or if you can modify it. If anyone knows, please post in the comment section and I’ll update this text. Thanks!