Unity 4.3 2D Tutorial: Getting Started
Learn how to make a cool 2D zombie game using Unity’s new built-in tools in this Unity 4.3 2D Tutorial! By Chris LaPollo.
Controlling Draw Order
You still can’t see the cat or the enemy sprites because the scene is drawing them behind the background sprite. You could adjust the Z positions of your game objects, so that objects closer to the camera render in front of objects that are further away from it. In fact, that’s a perfectly good way to do things and is self explanatory. However, Unity now supports a great feature for ordering sprites that you should try: Sorting Layers.
Select cat in the Hierarchy and notice its Sprite Renderer’s Sorting Layer value is set to Default, as shown below:

Click the Sorting Layer drop down box and you’ll be presented with a list of all the sorting layers defined in your project, which right now is only Default.
You’ll also see an option called Add Sorting Layer…. Click it.
This brings up the same Tags & Layers editor that you can get to from various other places in Unity, but with the Sorting Layers group open while the Tags and Layers groups are conveniently closed. See the following image:

Click + in the Sorting Layers group to create a new sorting layer and name it Cats. Do that two more times to create a sorting layer named Enemies and one named Zombie. Your editor should now look like the following screenshot:

These layers define the draw order – Layer 0, named Default, is the furthest in the back, with Layer 1, named Cats, in front of it, and so on.
Right now, each of the GameObjects you’ve added is using the Default Sorting Layer. For the background object, that’s fine because you want it in the back anyway, but you need to change the Sorting Layer for the other sprites.
Select cat in the Hierarchy and set its Sorting Layer to Cats. You’ll immediately notice that the cat is now visible in both the Scene and Game views.
With the cat on the Cats sorting layer…

With the cat on the Cats sorting layer…
…the cat is now visible in the scene

…the cat is now visible in the scene
Select enemy in the Hierarchy and set its Sorting Layer to Enemies. This way, the old ladies will walk on top of the cats. Who knows, maybe they’ll trip?
Finally, select zombie in the Hierarchy and set its Sorting Layer to Zombie to ensure your player renders on top of all the other sprites. Your Game view now looks like this:

Note: The Sprite Renderer also has a property named Order in Layer. You can use this to set a specific sort order to GameObjects within the same Sorting Layer.
You won’t use this in Zombie Conga because I haven’t seen any Z-fighting problems in my tests. It seems that Unity renders the sprites within the layer based on when they were added to the scene, so the newest sprite added to a layer is always on top. A sprite displayed on top of another sprite in one frame won’t suddenly appear behind it in the next frame, and that behavior is good enough for this game.
Using Scripts with Sprites
You’ve got some sprites strewn about the beach, but they don’t do anything. To finish up this part of the tutorial series, you’ll write two small scripts: one to animate the zombie and one to allow the player to control the zombie’s movement. You’ll add the rest of the game behavior in later installments of this series.
Note: You’ll write your scripts using C# (pronounced “see-sharp”), but it should be easy to convert this code to Unity’s variant of JavaScript if you prefer that language. Feel free to ask questions in the comments section if you need any help. (I’ve never used Boo, the other language Unity supports, so you’re on your own with that one.)
Note: You’ll write your scripts using C# (pronounced “see-sharp”), but it should be easy to convert this code to Unity’s variant of JavaScript if you prefer that language. Feel free to ask questions in the comments section if you need any help. (I’ve never used Boo, the other language Unity supports, so you’re on your own with that one.)
Animating Sprites
First you’ll add a simple script to animate the zombie. Select zombie in the Hierarchy and click Add Component in the Inspector. Choose New Script in the menu that appears, then name the script ZombieAnimator, choose CSharp as the Language, and click Create and Add. The following animation demonstrates these steps:
Note: You’ll replace this script-based animation with a Unity Animator in Part 2 of this tutorial series, but this example demonstrates how to access a SpriteRenderer from your scripts.
Note: You’ll replace this script-based animation with a Unity Animator in Part 2 of this tutorial series, but this example demonstrates how to access a SpriteRenderer from your scripts.
Open ZombieAnimator.cs in MonoDevelop, the code editor that ships with Unity. There are several ways to do so, but it’s easiest to double-click ZombieAnimator wherever happens to be most convenient, either in the Inspector with zombie selected or in the Project browser, as shown in the following images:
SpriteAnimator script in Inspector.
SpriteAnimator script in Inspector.
SpriteAnimator in Project browser.
SpriteAnimator in Project browser.
In Zombie Conga your zombie will simply walk, mindlessly, undeterred; much like you’d expect a good zombie to do. To achieve this simple animation, you’ll need a list of Sprites and a speed at which to cycle through them. To store that information, add the following public instance variables to ZombieAnimator:
public Sprite[] sprites;
public float framesPerSecond;
Note: In C# you place instance variables within the bounds of the curly braces that mark the class definition, but outside of any function. While it technically doesn’t matter, it’s usually good practice to place them at the top of the class before any function definitions.
Note: In C# you place instance variables within the bounds of the curly braces that mark the class definition, but outside of any function. While it technically doesn’t matter, it’s usually good practice to place them at the top of the class before any function definitions.
Public variables are exposed within Unity’s editor, so you’ll be able to modify their values in the GUI without changing your code – even while running the scene! You’ll see in a moment how easy that makes it to tweak in-game values and get them just right.
You’re going to render the animation by assigning different Sprites to your GameObject‘s SpriteRenderer component. Rather than getting the component in every call to Update, you’ll cache it in an instance variable when the script first starts running.
Add the following private variable to ZombieAnimator:
private SpriteRenderer spriteRenderer;
Private variables are not exposed within Unity’s editor. In this case, you’ll initialize the variable in code by adding the following line to Start:
spriteRenderer = renderer as SpriteRenderer;
Your script subclasses MonoBehaviour, which gives it access to a variable named renderer. For GameObjects that display Sprites, renderer will be a SpriteRenderer object. Therefore, you cast renderer to type SpriteRenderer before storing it.
Note: While it’s always better to test your game’s performance to see what optimizations are necessary, it is often a good idea to store references to objects that you’re script will access frequently. Common examples of this are a GameObject‘s Transform, the scene’s main Camera, or any objects you might have to otherwise use a command like GameObject.Find to access. To keep things easier to understand, this is the only time you’ll cache an object in this tutorial, even in cases where it would make sense.
Note: While it’s always better to test your game’s performance to see what optimizations are necessary, it is often a good idea to store references to objects that you’re script will access frequently. Common examples of this are a GameObject‘s Transform, the scene’s main Camera, or any objects you might have to otherwise use a command like GameObject.Find to access. To keep things easier to understand, this is the only time you’ll cache an object in this tutorial, even in cases where it would make sense.
To finish this short script, add the following few lines to Update:
int index = (int)(Time.timeSinceLevelLoad * framesPerSecond);
index = index % sprites.Length;
spriteRenderer.sprite = sprites[ index ];
This takes the number of seconds since the level loaded (consult the Time class docs for more info) and multiplies it by the number of frames that should render per second. If the frames were stored in an infinitely long array, that would give you the index into the array for the current frame.
However, since you know your array won’t be infinite, you need to loop back to the start when you reach its end. You do that by performing a modulus (%) operation, which performs an integer division between two numbers and returns the remainder.
In other words, you’re getting a whole number between 0 and one less than the size of the array, which will be a valid index into the sprites array (assuming the array doesn’t have a length of zero, of course).
You’re done with MonoDevelop for now, so save your script (File\Save) and switch back to Unity.
Note: Unity compiles your scripts automatically, so if any errors appear in the Console, correct them before moving on.
Note: Unity compiles your scripts automatically, so if any errors appear in the Console, correct them before moving on.
Select zombie in the Hierarchy and notice the Zombie Animator (Script) component now displays fields for your two public variables. Thanks, Unity!
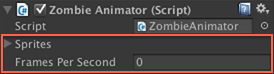
Right now, the Sprites array field (Unity capitalizes your variable names, and adds spaces between words) has no items. Your Sprite assets are named zombie_0 through zombie_3. These images are meant to be displayed in a specific order, so you’ll want the Sprites array to contain the necessary Sprites for a single cycle of animation, and then your script will loop through those Sprites forever.
In order to define that single animation cycle, you’ll need to add the following six elements to the Sprites array: zombie_0, zombie_1, zombie_2, zombie_3, zombie_2, zombie_1. There are several different ways you can do this, but here is my favorite:
With zombie still selected in the Hierarchy, click the lock button in the upper right of the Inspector so that it displays as locked, as shown below:

This will keep the current Inspector information displayed even if you select another object in the project, which is useful in cases like this.
With the zombie texture expanded in the Project browser, left click zombie_0 to select it, then shift+left click zombie_3. That selects all four zombie Sprites.
Now drag your selected objects over to the Inspector and hover anywhere over the Sprites row in the Zombie Animator (Script) component. You should see a green plus icon appear under your cursor when you are in a good spot, as shown below:
![]()
Release the mouse button and Unity automatically increases the size of the Sprites array and adds your selected items to it.
Note: It doesn’t matter whether or not you have the Sprites item expanded when you perform the previous steps. The screenshot above shows it expanded only because Unity automatically expands any closed item if you hover over it for long enough during a drag action. If you were trying to take a timed screenshot, for example. :]
Note: It doesn’t matter whether or not you have the Sprites item expanded when you perform the previous steps. The screenshot above shows it expanded only because Unity automatically expands any closed item if you hover over it for long enough during a drag action. If you were trying to take a timed screenshot, for example. :]
Your Zombie Animator (Script) component now looks like this:
![]()
Now select only zombie_2 in the Project browser and drag it over in the same way. Unity increases the size of the Sprites array again and appends your new element.
Do this one more time for zombie_1, and your Sprites array should now contain all six elements in the correct order, like this:
![]()
Before you move on, click the lock button in the upper right of the Inspector again so that it displays as unlocked, as shown below:

If you had forgotten to do that, you’d get annoyed later when Unity started ignoring all your selections. ;]
Finally, set Frames Per Second to 10, as shown below:

Run the scene and marvel at your shuffling zombie!

Note: You can adjust Frames Per Second in the Inspector while playing the scene to find a speed you like, but Unity resets your values when you stop running. Therefore, be sure to remember what value you liked so you can change it for real after you’ve stopped playing.
Note: You can adjust Frames Per Second in the Inspector while playing the scene to find a speed you like, but Unity resets your values when you stop running. Therefore, be sure to remember what value you liked so you can change it for real after you’ve stopped playing.
Now that you’ve managed to animate (or is it reanimate?) the zombie, he’ll be looking to party. The next section shows you how to create a simple controller script so you can point him point him in the right direction.