Unity 4.3 2D Tutorial: Getting Started
Learn how to make a cool 2D zombie game using Unity’s new built-in tools in this Unity 4.3 2D Tutorial! By Chris LaPollo.
Controlling Sprites
Select zombie in the Hierarchy and add a new C# script component named ZombieController, just like how you added ZombieAnimator.
Do you like an old school, plodding zombie, or one of those new-fangled runners? To get it just right, you’ll want to tweak your zombie’s movement speed while you test your scene, which calls for a public variable in your script.
Open ZombieController.cs in MonoDevelop and add the following variable to it:
public float moveSpeed;
moveSpeed will store the number of units – not pixels – that the zombie should move per second. Because you’re Sprite sizes are 1 unit for every 100 pixels, you’ll probably want to keep this value fairly low.
As you can see in the following animations, you’ll make the zombie in Zombie Conga move in a straight line toward, and then past, the location of the latest mouse click (or the latest mouse location in cases where the user holds down the mouse button while dragging):
Zombie walking toward and then past where you click. “Over here, zombie! No, over here!”

Zombie walking toward and then past where you click. “Over here, zombie! No, over here!”
Zombie following the cursor as it is dragged. “Who’s the good little zombie who wants to bite the yummy cursor? You are! Yes, you are.”

Zombie following the cursor as it is dragged. “Who’s the good little zombie who wants to bite the yummy cursor? You are! Yes, you are.”
You most likely won’t have an input event every frame, so you’ll need to store the direction in which the zombie is headed whenever the destination changes. To accomplish this, you’ll calculate a normalized vector (a vector of length 1) that points toward the input location from the zombie.
Add the following variable to ZombieController:
private Vector3 moveDirection;
You’re making a 2D game, but Unity is still working with a 3D coordinate system. As such, Transforms store their positions as Vector3 objects. While you could use a Vector2 here because you know the zombie will never change its position on the z-axis, you’re storing the zombie’s direction of movement in a Vector3 to avoid having to cast between the two types later in the script. It’s really a matter of personal preference.
Add the following code to Update in order to update moveDirection whenever the game receives an input event:
// 1
Vector3 currentPosition = transform.position;
// 2
if( Input.GetButton("Fire1") ) {
  // 3
  Vector3 moveToward = Camera.main.ScreenToWorldPoint( Input.mousePosition );
  // 4
  moveDirection = moveToward - currentPosition;
  moveDirection.z = 0;
  moveDirection.Normalize();
}
Here’s what you’re doing with the preceding code:
- Since you’ll be using the zombie’s current position a few times in this method, you copy the position to a local variable.
- Then you check to ensure the
Fire1button is currently pressed, because you don’t want to calculate a new direction for the zombie otherwise. See the upcoming note for more information aboutInputandFire1. - Using the scene’s main (and in this case, its only)
Camera, you convert the current mouse position to a world coordinate. With an orthographic projection, thezvalue in the position passed toScreenToWorldPointhas no effect on the resultingxandyvalues, so here it’s safe to pass the mouse position directly. - You calculate the direction to move by subtracting the zombie’s current position from the target location. Because you don’t want the zombie changing its position along the z-axis, you set
moveDirection‘szvalue to0, meaning, “Move zero units along the z-axis.” CallingNormalizeensuresmoveDirectionhas a length of1(also known as “unit length”). Unit length vectors are convenient because you can multiply them by a scalar value (likemoveSpeed) to make a vector pointing in the same direction, but a certain length (like amoveSpeed-long vector pointing from the zombie in the direction toward the mouse cursor). You’ll use this next.
Note: You use methods on Input to access input data in a generic way. A project defines various input names by default, referred to as axes, such as Horizontal, Vertical, and Jump. Horizontal monitors the joystick’s position along its x-axis, as well as the state of the left and right arrow buttons on the keyboard. If you needed to know when your game received input in a horizontal direction, you could simply check for the value of the Horizontal axis without concerning yourself with the specifics of where the input originated.
Fire1 is one of the virtual button axes defined by default. It registers events for button 0 on a joystick or mouse, and the left control key on the keyboard. Input.GetButton returns true while the specified virtual button is down, so the code you wrote will update moveDirection every frame that the mouse button is down (not just on the frame when it was initially pressed). Yes, this also means you’ll be able to change the zombie’s direction by pressing your keyboard’s left control key, as long as you remember that you still need the mouse to steer!
If you want to see or customize your project’s input options, go to Edit\Project Settings\Input to bring up the InputManager‘s settings in the Inspector.
Now start the zombie walking by adding the following code to the end of Update:
Vector3 target = moveDirection * moveSpeed + currentPosition;
transform.position = Vector3.Lerp( currentPosition, target, Time.deltaTime );
The first line calculates a target location that is moveSpeed units away from the zombie’s current position. That is, it finds the point the zombie would reach if it traveled from its current position in the direction pointed to by moveDirection for a duration of one second.
The second line uses Vector3.Lerp to determine the zombie’s new location along the path between its current and target locations. Lerp is a convenient method that interpolates between two values based on a third value. Lerp clamps the third value between zero and one and interprets it as a fraction along the path between the two points. That means a value of 0 would return currentPosition, a value of 1 would return target, and a value of 0.5 would return the midpoint between them.
In your case, you use Time.deltaTime as the third value because it is a fraction of one second and you know it will most likely be less than one, giving you some point along the path that is not quite at the end point. Your game would need to be running horrendously for Time.deltaTime to be anywhere near 1, so you should get nice, smooth motion.
Save your script in MonoDevelop and switch back to Unity.
Run the scene and click somewhere to get the zombie walking. Or not. You never set ZombieController‘s moveSpeed, so it’s “moving” at a rate of zero!
While the scene is still running, select zombie in the Hierarchy and find the Zombie Controller (Script) component in the Inspector. Change Move Speed to 2, click on the beach, and your zombie should be on his way!

Adjust Move Speed in the Inspector until you’re happy with it. Depending on the speed you choose, you may want to adjust the Frames Per Second on the Zombie Animator (Script) component, too. Otherwise his animation may not match his motion.
When you find values you like, remember them and stop the scene. Then set the values in the Inspector again so they’ll be correct the next time you run.
While you were busy tweaking his ambulatory system, you probably noticed a few things wrong with your zombie.
- When you start playing, his legs are moving but he’s not going anywhere.
- He happily walks right off the screen.
- He doesn’t look where he’s going.
You’ll fix the zombie so he no longer wanders off screen in a later installment of this tutorial series, so ignore that issue for now. Besides, if he leaves the screen, simply click on the beach again and he’ll come strolling back eventually. Zombies are good like that.
Go back to ZombieController.cs in MonoDevelop.
The script uses moveDirection when moving the zombie, but you only assign it a value when you get an input event. To spur the zombie forward when the scene starts, you simply need to initialize moveDirection to point him in the right direction.
Add the following line inside Start:
moveDirection = Vector3.right;
This points in the direction of the positive x-axis. In other words, it points toward the right side of the screen.
Save ZombieController.cs and then play your scene again in Unity. Now your zombie is off and running! Next you’ll make sure he faces the right direction so he doesn’t trip.
Back inside ZombieController.cs in MonoDevelop, add a public variable to ZombieController so you can tweak the rate at which the zombie turns.
public float turnSpeed;
You’ll use turnSpeed in your calculations to control how quickly the zombie reorients himself to a new direction.
Unity uses quaternions internally to represent rotations. If you’re curious about the details of the math, check out this info. Then, after you’ve cleaned up the mess from your head exploding, take solace in the fact that you really don’t need to know anything about quaternions when working with 2D.
That’s because the Quaternion.Euler method lets you create a Quaternion object from an Euler angle. Euler angles are the ones most people are accustomed to, consisting of individual x, y and z rotations. While they aren’t ideal for 3D work because of problems like gimbal lock, Euler angles are just fine for 2D games where you probably only want to rotate around the z-axis.
Note: To learn more about Quaternions, check out our OpenGL ES Transformations with Gestures tutorial.
Note: To learn more about Quaternions, check out our OpenGL ES Transformations with Gestures tutorial.
Add the following code to the end of Update:
float targetAngle = Mathf.Atan2(moveDirection.y, moveDirection.x) * Mathf.Rad2Deg;
transform.rotation =
  Quaternion.Slerp( transform.rotation,
                    Quaternion.Euler( 0, 0, targetAngle ),
                    turnSpeed * Time.deltaTime );
First you use Mathf.Atan2 to find the angle between the x-axis and moveDirection. Mathf.Atan2 returns the angle in radians, so you convert it to degrees by multiplying by Mathf.Rad2Deg.
You use Quaternion.Slerp to turn towards the target angle you calculated. Quaternion.Slerp performs a spherical linear interpolation between the two angles you specify. It’s similar to what you did earlier with Vector3.Lerp, except you’re calculating a new rotation instead of a new position.
Earlier, when you called Vector3.Lerp, you used moveSpeed to adjust the distance the zombie traveled. In this case, you’re using turnSpeed to do something similar; the larger its value, the faster the zombie will arrive at the target angle.
Note: Some of you might be thinking to yourselves, “Hey, that math’s no good! I want the zombie to take the shortest path to the new angle, and just finding the arctangent doesn’t guarantee that! You, sir, are a charlatan!”
To you I would suggest some calming yoga and maybe a bit more fiber in your diet. I would then point out that Quarternion.Slerp is awesome and always interpolates through the shortest route between two angles.
That’s it for ZombieController.cs. Save it and switch back to Unity.
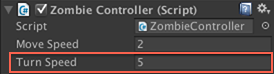
Select zombie in the Hierarchy. Set Turn Speed to 5, as shown below:
Run the game and click around on the beach. No matter how hard you try, zombies never get dizzy!

That’s all the work you’ll do for Zombie Conga in this tutorial. Save your scene by going to File\Save Scene as…. Name the scene CongaScene and click Save.
The next section describes a feature useful for 2D games that is only available in the paid version of Unity. It isn’t necessary for Zombie Conga, but it’s something you’ll probably want to know about for more complex projects — Sprite Packing.