Recreating the Apple Music Now Playing Transition
A common visual pattern in many iPhone apps are stacks of cards sliding in from the screen edge. You’ll recreate the Apple Music Now Playing Transition By Warren Burton.
Animating the Controls
The next effect will raise the controls from the bottom of the screen to join the cover image at the end of the animation.
Open MaxiSongCardViewController.swift in the standard editor and Main.storyboard in the assistant editor.
Add the following property to the main class of MaxiSongCardViewController:
//lower module constraints
@IBOutlet weak var lowerModuleTopConstraint: NSLayoutConstraint!
Attach the outlet to the constraint separating the image container and the Container View.

Close the assistant editor and add the following extension to the end of MaxiSongCardViewController.swift:
//lower module animation
extension MaxiSongCardViewController {

  //1.
  private var lowerModuleInsetForOutPosition: CGFloat {
    let bounds = view.bounds
    let inset = bounds.height - bounds.width
    return inset
  }

  //2.
  func configureLowerModuleInStartPosition() {
    lowerModuleTopConstraint.constant = lowerModuleInsetForOutPosition
  }

  //3.
  func animateLowerModule(isPresenting: Bool) {
    let topInset = isPresenting ? 0 : lowerModuleInsetForOutPosition
    UIView.animate(withDuration: primaryDuration,
                   delay:0,
                   options: [.curveEaseIn],
                   animations: {
      self.lowerModuleTopConstraint.constant = topInset
      self.view.layoutIfNeeded()
    })
  }

  //4.
  func animateLowerModuleOut() {
    animateLowerModule(isPresenting: false)
  }

  //5.
  func animateLowerModuleIn() {
    animateLowerModule(isPresenting: true)
  }
}
This extension performs a simple animation of the distance between SongPlayControlViewController‘s view and the Image container as follows:
- Calculates an arbitrary distance to start from. The height of the view less the width is a good spot.
- Places the controller in its start position.
- Performs the animation in either direction.
- A helper method that animates the controller into place.
- Animates the controller out.
Now to add this animation to the timeline. First, add the following to the end of viewDidAppear(_:):
animateLowerModuleIn()
Next, add the following to the end of viewWillAppear(_:).
stretchySkirt.backgroundColor = .white //from starter project, this hides the gap
configureLowerModuleInStartPosition()
Next, add this line to dismissAction(_:) before the call to animateImageLayerOut(completion:), for the dismissal animation:
animateLowerModuleOut()
Finally, add the following to MaxiSongCardViewController.swift to pass the current song across to the new controller.
override func prepare(for segue: UIStoryboardSegue, sender: Any?) {
  if let destination = segue.destination as? SongSubscriber {
    destination.currentSong = currentSong
  }
}
This checks if the destination conforms to SongSubscriber then passes the song across. This is a simple demonstration of dependency injection.
Build and run the app. Present the maxi player and you’ll see the SongPlayControl’s view rise into place.

Hiding the Tab Bar
The last thing to do before you finish is to deal with the Tab bar. You could possibly hack the frame of the tab bar, but that would create some messy interactions with the active view controller frame. Instead, you’ll need a bit more smoke and a few more mirrors:
- Take a snapshot image of the Tab bar.
- Pass it through to the
MaxiSongCardViewController. - Animate the tab bar snapshot image.
First, add the following to MaxiSongCardViewController:
//fake tabbar contraints
var tabBarImage: UIImage?
@IBOutlet weak var bottomSectionHeight: NSLayoutConstraint!
@IBOutlet weak var bottomSectionLowerConstraint: NSLayoutConstraint!
@IBOutlet weak var bottomSectionImageView: UIImageView!
Next, open Main.storyboard and drag an Image View into the MaxiSongCardViewController view hierarchy. You want it to be above the scroll view in the view hierarchy (which means below it, in Interface Builder’s navigator).

Using the Add Constraints popover, Untick Constrain to margins. Pin its leading, trailing and bottom edges to the superview with size 0. This will, in fact, pin to the safe area. Add a height constraint of 128, and press Add 4 Constraints to commit the changes.
Next, open MaxiSongCardViewController.swift in the assistant editor and connect the three properties you added to the Image view.
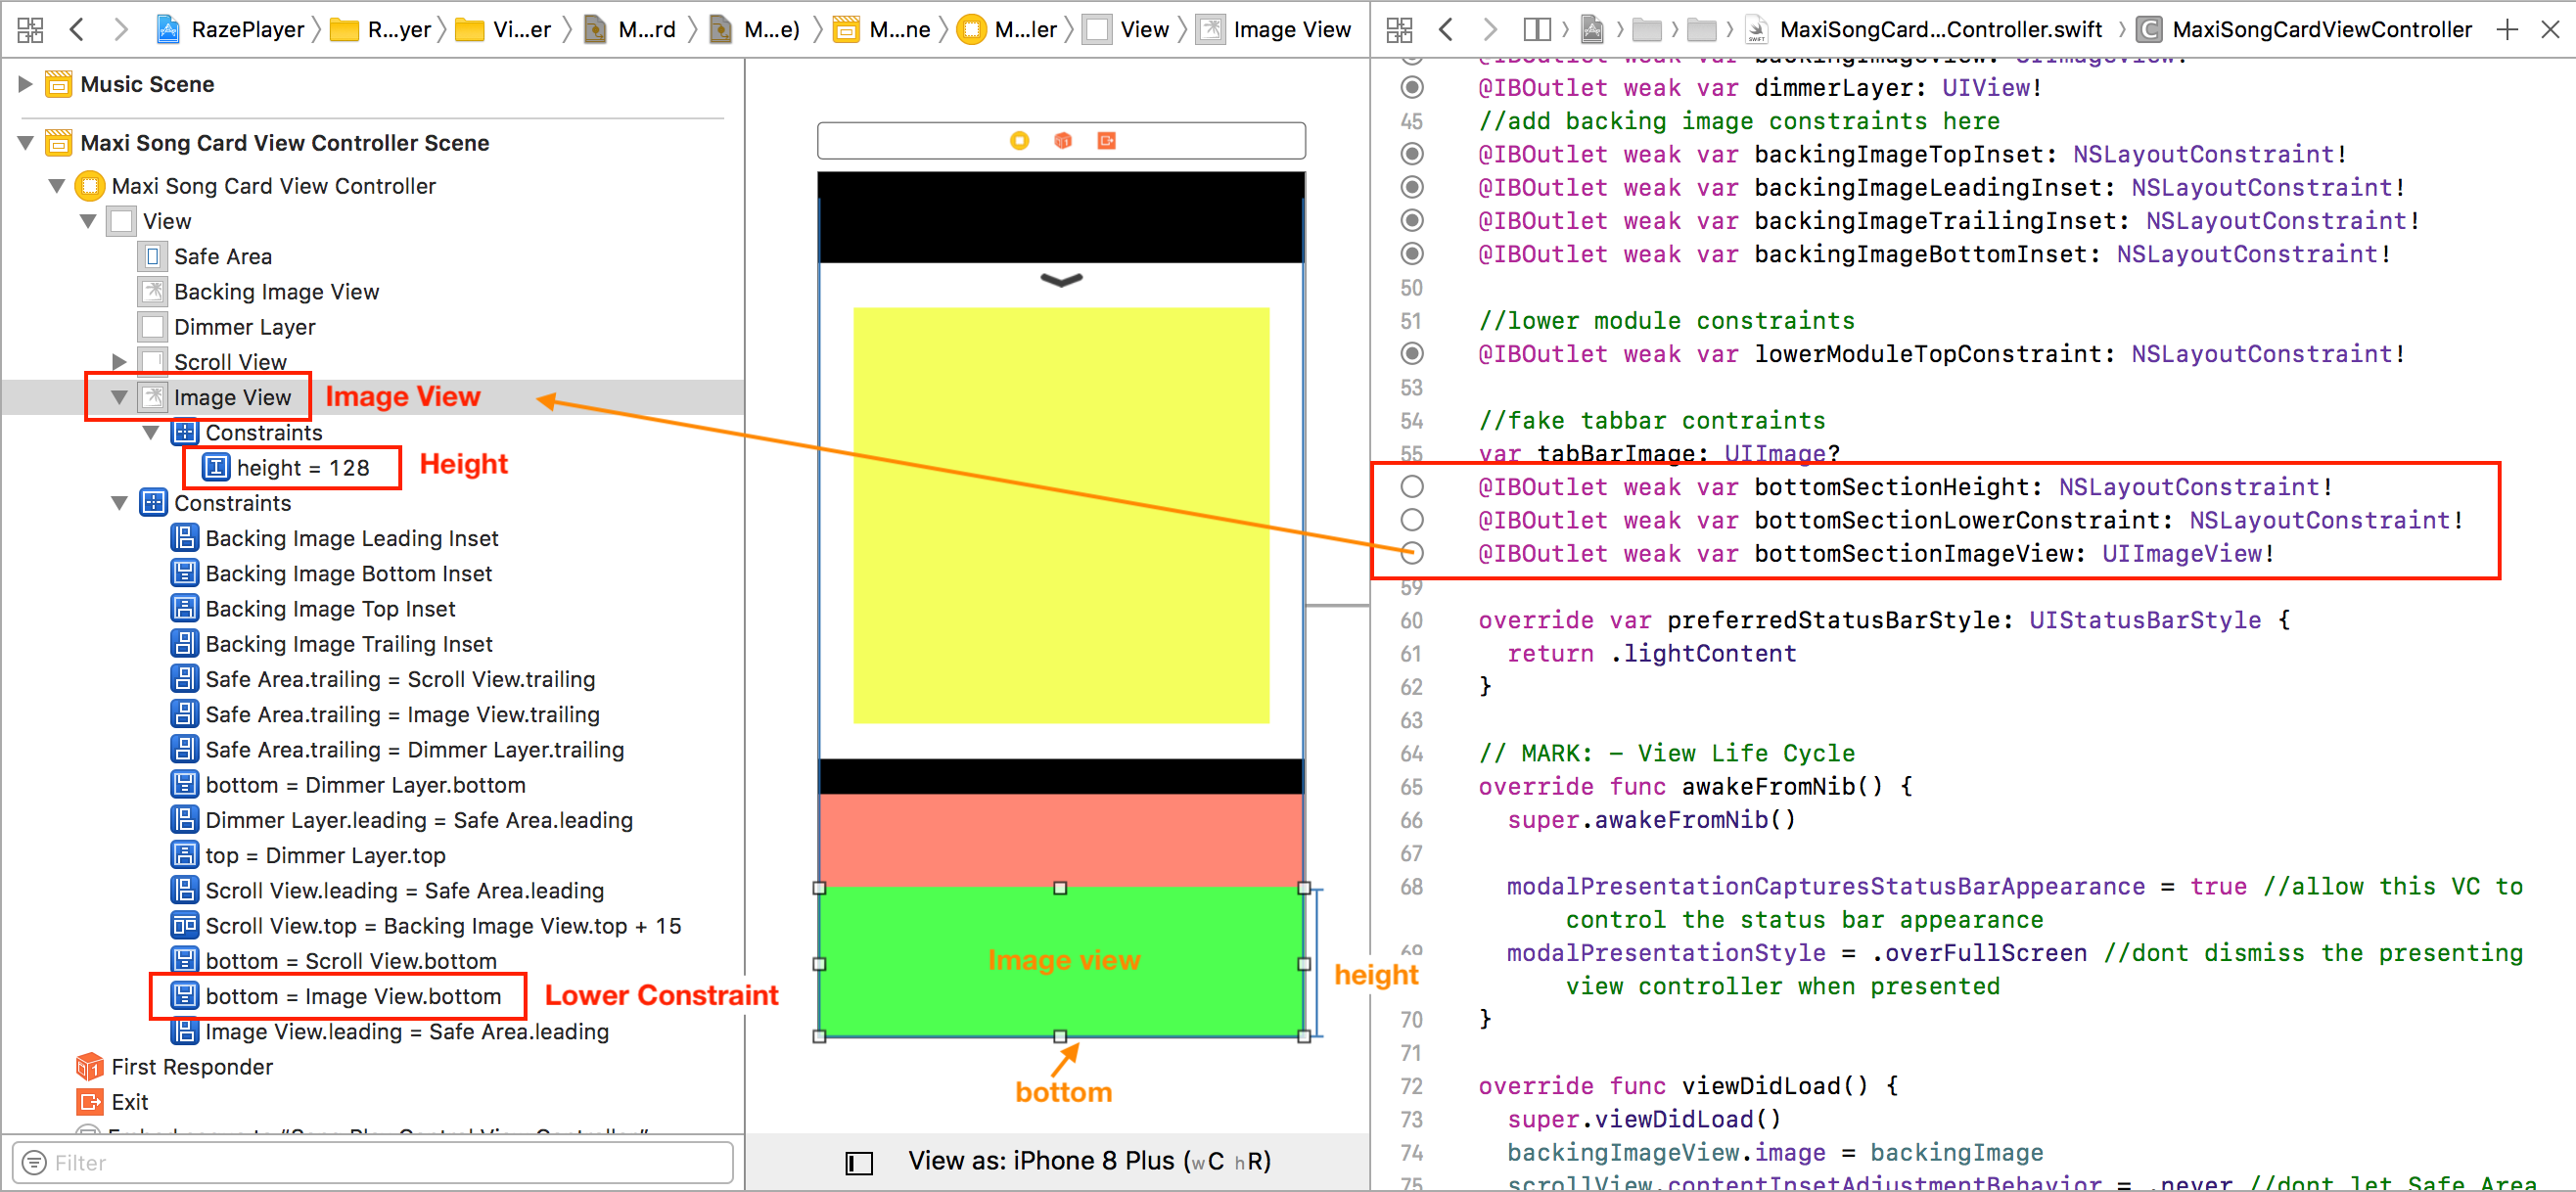
- bottomSectionImageView connects to the Image View.
- bottomSectionLowerConstraint connects to the Bottom constraint.
- bottomSectionHeight connects to the height constraint.
Finally, close the assistant editor, and add the following extension to the end of MaxiSongCardViewController.swift:
//fake tab bar animation
extension MaxiSongCardViewController {
  //1.
  func configureBottomSection() {
    if let image = tabBarImage {
      bottomSectionHeight.constant = image.size.height
      bottomSectionImageView.image = image
    } else {
      bottomSectionHeight.constant = 0
    }
    view.layoutIfNeeded()
  }

  //2.
  func animateBottomSectionOut() {
    if let image = tabBarImage {
      UIView.animate(withDuration: primaryDuration / 2.0) {
        self.bottomSectionLowerConstraint.constant = -image.size.height
        self.view.layoutIfNeeded()
      }
    }
  }

  //3.
  func animateBottomSectionIn() {
    if tabBarImage != nil {
      UIView.animate(withDuration: primaryDuration / 2.0) {
        self.bottomSectionLowerConstraint.constant = 0
        self.view.layoutIfNeeded()
      }
    }
  }
}
This code is similar to the other animations. You’ll recognize all the sections.
- Set up the image view with the supplied image, or collapse to zero height in the case of no image.
- Drop the image view below the edge of the screen.
- Lift the image view back into the normal position.
The last thing to do in this file is add the animations to the timeline.
First, add the following to the end of viewDidAppear(_:):
animateBottomSectionOut()
Next, add the following to the end of viewWillAppear(_:):
configureBottomSection()
Next, add the following to dismissAction(_:) before the call to animateImageLayerOut(completion:):
animateBottomSectionIn()
Next, open SongViewController.swift and add the following code before the call to present(animated:) in expandSong(song:):
if let tabBar = tabBarController?.tabBar {
  maxiCard.tabBarImage = tabBar.makeSnapshot()
}
Here you take a snapshot of the Tab bar, if it exists, and then pass it through to MaxiSongCardViewController.
Finally, open MaxiSongCardViewController.swift and change the primaryDuration property to 0.5 so you don’t have to be tortured by the slow animations anymore!
Build and run the app, present the maxi player, and the tab bar will rise and fall into place naturally.
Congratulations! You’ve just completed a recreation of the card animation that closely resembles the one in the Music app.
Where to Go From Here
You can download the finished version of the project here.
In this tutorial, you learned all about the following:
- Animating Auto Layout constraints.
- Placing multiple animations into a timeline to composite a complex sequence.
- Using static snapshots of views to create the illusion of change.
- Using the delegate pattern to create weak bindings between objects.
Note that the method of using a static snapshot would not work where the underlying view changes while the card is being presented, such as in the case where an asynchronous event causes a reload.
Animations are costly in terms of development time, and they’re hard to get just right. However, it’s usually worth the effort, as they add an extra element of delight and can turn an ordinary app into an extraordinary one.
Hopefully this tutorial has triggered some ideas for your own animations. If you have any comments or questions, or want to share your own creations, come join the discussion below!