Recreating the Apple Music Now Playing Transition
A common visual pattern in many iPhone apps are stacks of cards sliding in from the screen edge. You’ll recreate the Apple Music Now Playing Transition By Warren Burton.
Animating in From the Source
In this section, you’re going to glue all your hard work together and animate the image view into place.
Open MaxiSongCardViewController.swift. Add the following extension to the file:
//Image Container animation.
extension MaxiSongCardViewController {

  private var startColor: UIColor {
    return UIColor.white.withAlphaComponent(0.3)
  }

  private var endColor: UIColor {
    return .white
  }

  //1.
  private var imageLayerInsetForOutPosition: CGFloat {
    let imageFrame = view.convert(sourceView.originatingFrameInWindow, to: view)
    let inset = imageFrame.minY - backingImageEdgeInset
    return inset
  }

  //2.
  func configureImageLayerInStartPosition() {
    coverImageContainer.backgroundColor = startColor
    let startInset = imageLayerInsetForOutPosition
    dismissChevron.alpha = 0
    coverImageContainer.layer.cornerRadius = 0
    coverImageContainerTopInset.constant = startInset
    view.layoutIfNeeded()
  }

  //3.
  func animateImageLayerIn() {
    //4.
    UIView.animate(withDuration: primaryDuration / 4.0) {
      self.coverImageContainer.backgroundColor = self.endColor
    }

    //5.
    UIView.animate(withDuration: primaryDuration, delay: 0, options: [.curveEaseIn], animations: {
      self.coverImageContainerTopInset.constant = 0
      self.dismissChevron.alpha = 1
      self.coverImageContainer.layer.cornerRadius = self.cardCornerRadius
      self.view.layoutIfNeeded()
    })
  }

  //6.
  func animateImageLayerOut(completion: @escaping ((Bool) -> Void)) {
    let endInset = imageLayerInsetForOutPosition

    UIView.animate(withDuration: primaryDuration / 4.0,
                   delay: primaryDuration,
                   options: [.curveEaseOut], animations: {
      self.coverImageContainer.backgroundColor = self.startColor
    }, completion: { finished in
      completion(finished) //fire complete here , because this is the end of the animation
    })

    UIView.animate(withDuration: primaryDuration, delay: 0, options: [.curveEaseOut], animations: {
      self.coverImageContainerTopInset.constant = endInset
      self.dismissChevron.alpha = 0
      self.coverImageContainer.layer.cornerRadius = 0
      self.view.layoutIfNeeded()
    })
  }
}
Let’s go over this step-by-step:
- Get the start position based on the location of the source view, less the vertical offset of the scroll view.
- Place the container in its start position.
- Animate the container to its finished position.
- The first animation fades in the background color to avoid a sharp transition.
- The second animation changes the top inset of the container and fades the dismiss button in.
- Animate the container back to its start position. You’ll use this later. It reverses the
animateImageLayerInsequence.
Next, add the following to the end of viewDidAppear(_:):
animateImageLayerIn()
This adds the animation to the timeline.
Next, add the following to the end of viewWillAppear(_:):
configureImageLayerInStartPosition()
Here you set up the start position before the view appears. This lives in viewWillAppear so the change in start position of the image layer isn’t seen by the user.
Build and run the app, and tap the mini player to present the maxi player. You’ll see the container rise into place. It won’t change shape just yet because the container depends on the height of the image view.

Your next task is to add the shape change and animate the image view into place.
Animating From the Source Image
Open MaxiSongCardViewController.swift and add the following extension to the end of the file:
//cover image animation
extension MaxiSongCardViewController {
  //1.
  func configureCoverImageInStartPosition() {
    let originatingImageFrame = sourceView.originatingCoverImageView.frame
    coverImageHeight.constant = originatingImageFrame.height
    coverImageLeading.constant = originatingImageFrame.minX
    coverImageTop.constant = originatingImageFrame.minY
    coverImageBottom.constant = originatingImageFrame.minY
  }

  //2.
  func animateCoverImageIn() {
    let coverImageEdgeContraint: CGFloat = 30
    let endHeight = coverImageContainer.bounds.width - coverImageEdgeContraint * 2
    UIView.animate(withDuration: primaryDuration, delay: 0, options: [.curveEaseIn], animations:  {
      self.coverImageHeight.constant = endHeight
      self.coverImageLeading.constant = coverImageEdgeContraint
      self.coverImageTop.constant = coverImageEdgeContraint
      self.coverImageBottom.constant = coverImageEdgeContraint
      self.view.layoutIfNeeded()
    })
  }

  //3.
  func animateCoverImageOut() {
    UIView.animate(withDuration: primaryDuration,
                   delay: 0,
                   options: [.curveEaseOut], animations:  {
      self.configureCoverImageInStartPosition()
      self.view.layoutIfNeeded()
    })
  }
}
This code is similar to the image container animation from the previous section. Let’s go over this step-by-step:
- Place the cover image in its start position using information from the source view.
- Animate the cover image into its end position. The end height is the container width less its insets. Since the aspect ratio is 1:1, that will be its width as well.
- Animate the cover image back to its start position for the dismissal action.
Next, add the following to the end of viewDidAppear(_:):
animateCoverImageIn()
This fires off the animation once the view is on screen.
Next, add the following lines to the end of viewWillAppear(_:):
coverArtImage.image = sourceView.originatingCoverImageView.image
configureCoverImageInStartPosition()
This uses the UIImage from the source to populate the image view. It works in this particular case, because the UIImage has sufficient resolution so the image will not appear pixelated or stretched.
Build and run the app, the image view now grows from the source thumbnail and changes the frame of the container view at the same time.

Adding the Dismissal Animations
The button at the top of the card is connected to dismissAction(_:). Currently, it simply performs a modal dismiss action with no animation.

Just like you did when presenting the view controller, you want MaxiSongCardViewController to handle its own dismiss animation.
Open MaxiSongCardViewController.swift and replace dismissAction(_:) with the following:
@IBAction func dismissAction(_ sender: Any) {
  animateBackingImageOut()
  animateCoverImageOut()
  animateImageLayerOut() { _ in
    self.dismiss(animated: false)
  }
}
This plays out the reverse animations that you set up previously in animating from source image. Once the animations have completed, you dismiss the MaxiSongCardViewController.
Build and run the app, bring up the maxi player and touch the dismiss control. The cover image and container view reverse back into the mini player. The only visible evidence of the dismissal is the Tab bar flickering in. You’ll fix this soon.
Displaying Song Information
Have a look at the Music app again and you’ll notice the expanded card contains a scrubber and volume control, information about the song, artist, album and upcoming tracks. This isn’t all contained in one single view controller — it’s built from components.
Your next task will be to embed a view controller in the scroll view. To save you time, there’s a controller all ready for you: SongPlayControlViewController.
Embedding the Child Controller
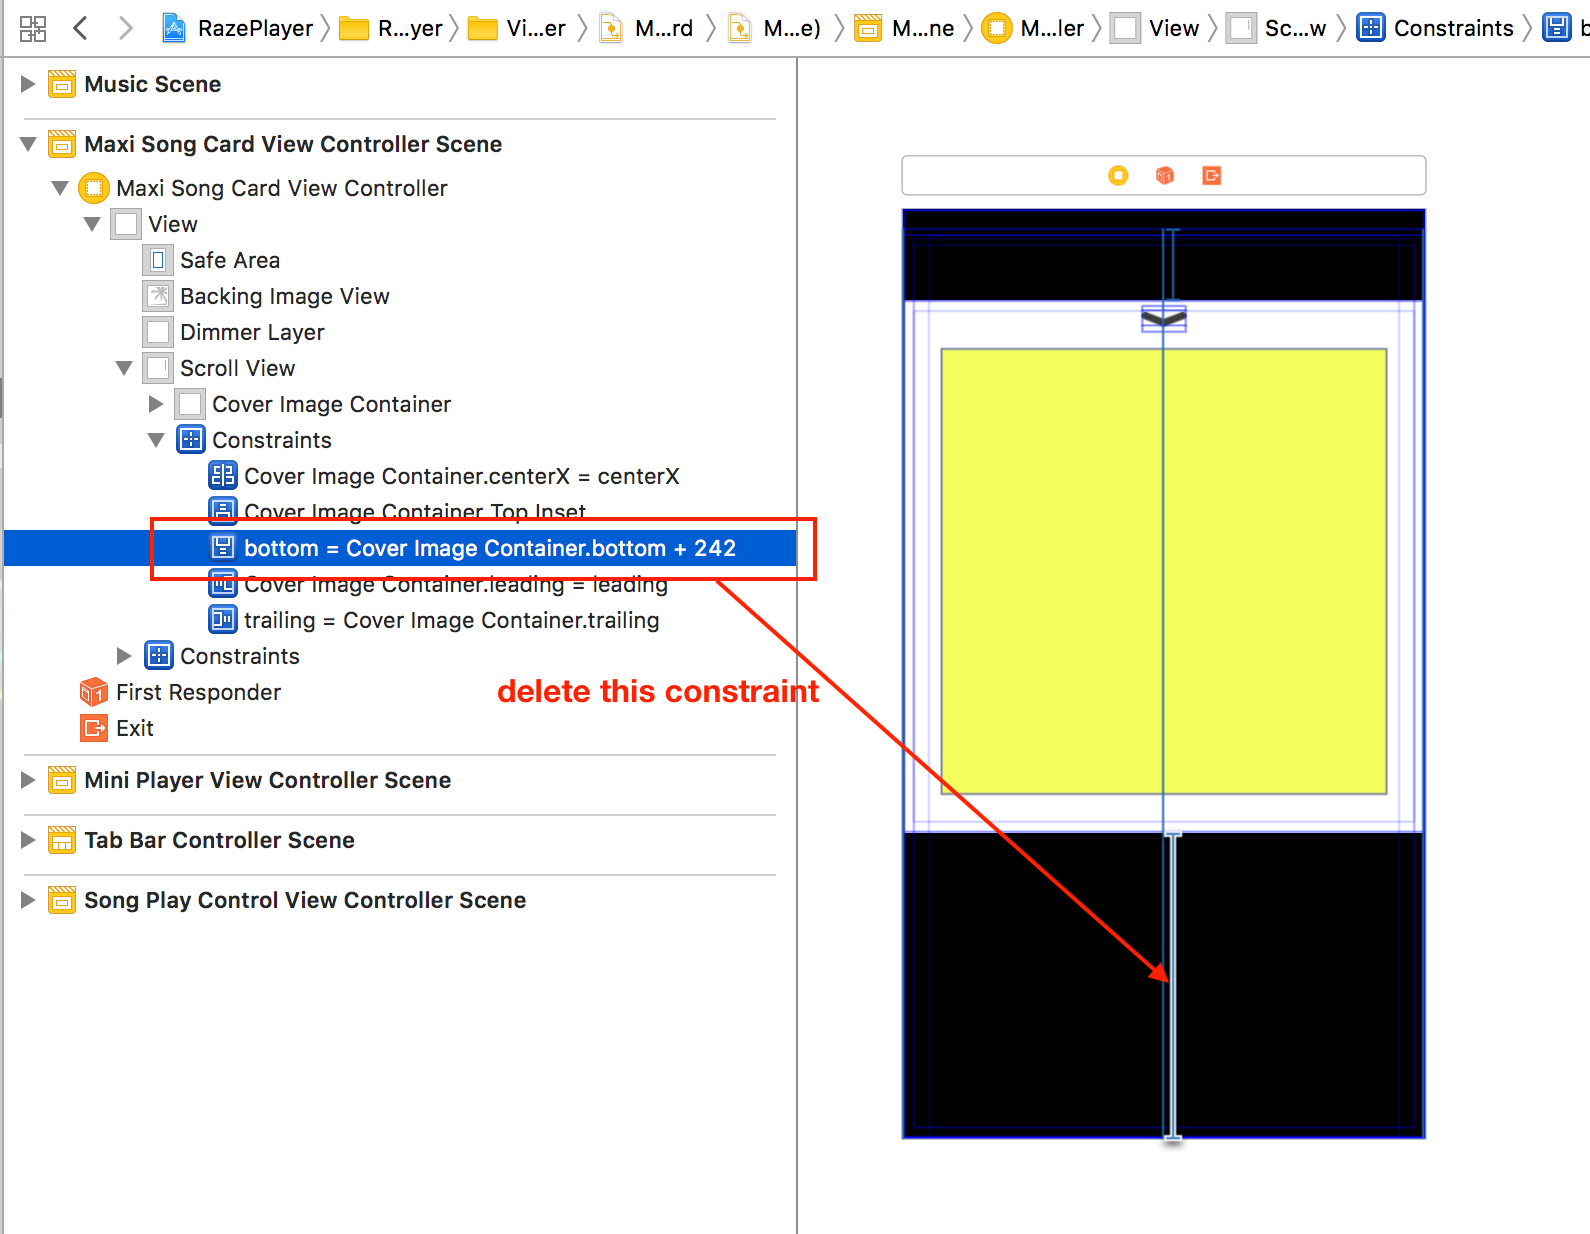
The first task is to detach the bottom of the image container from the scroll view.
Open Main.storyboard. Delete the constraint which binds the bottom of the cover image container to the bottom of the superview. You’ll get some red layout errors that the scroll view needs constraints for Y position or height. That’s OK.
Next, you’re going to setup a child view controller to display the song details by following the instructions below:
- Add a Container View as a subview of Scroll View.
- Ensure the Container View is above Stretchy Skirt in the view hierarchy (which requires it be below the Stretchy Skirt view in the Interface Builder Document Outline.
- Another view controller will be added with a segue connection. Delete that new view controller.

Now add the following constraints to the new container view:
- Leading, trailing and bottom. Pin to the scroll view and make them equal to 0.
- Top to Cover Image Container bottom = 30
You may find it helpful to first adjust the view’s Y position, so that it is positioned below the image container view where it will be easier to define the constraints.

Lastly, bind the Container View embed segue to the SongPlayControlViewController. Hold down Control and drag from the container view to SongPlayControlViewController.

Release the mouse, and choose Embed from the menu that appears.

Finally, constrain the height of the Container view within the scroll view to unambiguously define the height of the scroll view’s content.

- Select the Container View.
- Open the Add New Constraints popover.
- Set Height to 400. Tick the height constraint.
- Press Add 1 Constraint.
At this stage, all the Auto Layout errors should be gone.