Extend the Unity3d Editor
In this tutorial, you’ll learn to extend the Unity editor to customize it for the needs of your game. By Barbara Reichart.
Create a New Editor window to provide Your Own Editing Tools
In Unity, you have several cool Editor window, such as Animator, Inspector and Hierarchy. And of course, you can even make your own.
In this section, you’ll implement an Editor view that allows you to place and delete OpenSpots with one click.

In the Project Browser, navigate to Assets/Editor and create a new C# Script named LevelEditorWindow. Open it in MonoDevelop. Then replace the entire contents with this:
using UnityEngine;
//1
using UnityEditor;

//2
public class LevelEditorWindow : EditorWindow {
  //3
  int selectedAction = 0;
}
- Import
UnityEditor - Make
LevelEditorWindowa subclass ofEditorWindowto allow access to methods and fields available toEditorWindow. - Keep track of which action the user currently has selected with the variable
selectedAction.
Right now, you couldn’t open this level editor inside of Unity even if your life depended on it, so add the following method to change that:
[MenuItem ("Window/Level Editor")]
static void Init () {
  LevelEditorWindow window = (LevelEditorWindow)EditorWindow.GetWindow (typeof (LevelEditorWindow));
  window.Show();
}
In the first line, you tell Unity to create a MenuItem named Level Editor below the Window menu, and you just click it to run Init.
With GetWindow inside, you get an existing open window or create a new one if none exists. Then you display it with Show.
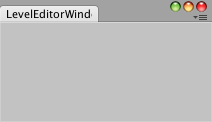
Save your changes and go back to Unity. You’ll see a warning. That’s alright — you’ll fix it in a minute. Just go and click on the main menu Window/Level Editor to bring up an empty editor view.
Now to fill that empty view with content. Switch back to MonoDevelop and add the following code to LevelEditorWindow:
void OnGUI() {
  float width = position.width - 5;
  float height = 30;
  string[] actionLabels = new string[] {"X", "Create Spot", "Delete Spot"};
  selectedAction = GUILayout.SelectionGrid (selectedAction, actionLabels, 3, GUILayout.Width (width), GUILayout.Height (height));
}
First you get the width and height. For the width, you deduct 5 to leave a little bit space. Next, you create a string array with the label for each action — “X” stands for no action. This lets you select GameObjects instead of creating or deleting open spots.
From this array, you create a SelectionGrid, which creates a grid of buttons where only one can be selected at once. The return value of SelectionGrid is the index of the currently selected button, so you store it in selectedAction.
Save your changes and have a look at your creation in Unity.
You want to have a different reaction to clicks that’s dependent on selected button in the scene, so add the following method:
void OnScene(SceneView sceneview) {
  Event e = Event.current;
  if (e.type == EventType.MouseUp) {
    Ray r = Camera.current.ScreenPointToRay (new Vector3 (e.mousePosition.x, Camera.current.pixelHeight -e.mousePosition.y));
    if (selectedAction == 1) {
      // TODO: Create OpenSpot
      Debug.Log("Create OpenSpot");
    } else if (selectedAction == 2) {
      // TODO: Delete OpenSpot
	Debug.Log("Delete OpenSpot");
    }
  }
}
First you store the current event in a variable. If its type is equal to MouseUp, you react to the mouse click.
For this, you need to figure out which GameObject was selected, and you’re using Raycasting to do it. But first, you need to create a ray that points towards the scene.
To make a ray, you use the helper method ScreenPointToRay(), which you call with the mouse position stored in the event. As the y-coordinate is reversed between camera and event coordinate system, you transform it by deducting the original y-coordinate from the height of the current view.
Lastly, you split by selectedAction and log a short message.
Make sure the method is actually called with:
void OnEnable() {
  SceneView.onSceneGUIDelegate -= OnScene;
  SceneView.onSceneGUIDelegate += OnScene;
}
This adds OnScene as delegate.
Save your changes and switch back to Unity. Select the Create Spot or Delete Spot button inside of the LevelEditorWindow, and then click inside of the Scene. The log message will appear in the Console.

In the Hierarchy, select Background. In the Inspector, set its Layer to Background. Then add a component Physics 2D / Box Collider 2D.

Set the Layer of Prefabs/Openspot to Spots. Now you can determine where a ray collided with the background or an open spot.

Go back to MonoDevelop and replace TODO: Create OpenSpot in LevelEditorWindow with this code:
RaycastHit2D hitInfo2D = Physics2D.GetRayIntersection (r, Mathf.Infinity, 1 << LayerMask.NameToLayer ("Background"));
if (hitInfo2D) {
  GameObject spotPrefab = AssetDatabase.LoadAssetAtPath<GameObject> ("Assets/Prefabs/Openspot.prefab");
  GameObject spot = (GameObject)PrefabUtility.InstantiatePrefab (spotPrefab);
  spot.transform.position = hitInfo2D.point;
  Undo.RegisterCreatedObjectUndo (spot, "Create spot");
}
Here’s what you’re doing in there:
It starts by checking whether the ray intersects with the background image. If yes, then hitInfo2D isn’t null and you create a new
You get the prefab with LoadAssetPath. From this instance, you create a new instance of this prefab with PrefabUltility.InstantiatePrefab.
InstantiatePrefab() creates a prefab connection, which makes it more suitable in this case then Instantiate. Then you set the position of the spot to the point of the collision.
Unity always lets you undo actions, so remember that when you create custom editor scripts. To allow undo with a custom action, simply register the action used to create a GameObject with Undo.RegisterCreatedObjectUndo.
Now to handle deleting spots. Replace // TODO: Delete OpenSpot with this:
RaycastHit2D hitInfo2D = Physics2D.GetRayIntersection (r, Mathf.Infinity, 1 << LayerMask.NameToLayer ("Spots"));
if (hitInfo2D) {
  GameObject selectedOpenSpot = hitInfo2D.collider.gameObject;
  Undo.DestroyObjectImmediate (selectedOpenSpot);
}
This detects collisions between your ray and any object inside the Spots layer. If yes, you get the GameObject that was hit. Then you delete it with Undo.DestroyObjectImmediate, which removes the spot and registers the action with the undo manager.
Go back to Unity, and check out how quickly you can create and delete spots. Best of all, undo and redo work as expected.

Draw Into the Scene with Gizmos
Gizmos let you to draw into the Scene view, allowing you to provide information to use as a visual debugging or editing aid.
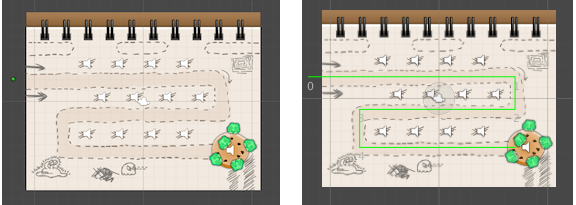
For example, the game contains a set of waypoints for the enemies to follow, but they are invisible during the game and while editing. You simply can't tell which path they'll follow without doing some serious investigative work. If you wanted to create another level, you still wouldn't be able to see the path.
Before: Without - After: A line between the spots shows how enemies will move
Before: Without - After: A line between the spots shows how enemies will move
Fortunately, Gizmos allow you to see this invisible path.
Open Assets/Scripts/SpawnEnemy, which stores all waypoints, and add the following method:
// 1
void OnDrawGizmos() {
  // 2
  Gizmos.color = Color.green;
  // 3
  for (int i = 0; i < waypoints.Length - 1; i++) {
    // 4
    Vector3 beginPosition = waypoints[i].transform.position;
    Vector3 endPosition = waypoints[i+1].transform.position;
    // 5
    Gizmos.DrawLine(beginPosition, endPosition);
    // 6
    UnityEditor.Handles.Label (beginPosition, i + "");
  }
  // 7
  Vector3 lastWaypointPosition = waypoints[waypoints.Length - 1].transform.position;
  UnityEditor.Handles.Label (lastWaypointPosition, (waypoints.Length - 1) + "");
}
Here are explanations for each step:
- You can only use methods for gizmo drawing in
OnDrawGizmos()or inOnDrawGizmosSelected(). You always want the path to draw, so you implementOnDrawGizmos(). - You set the color for the gizmo's drawing. Every draw call will use this color until you change it.
- Iterate over all waypoints, except the last one that doesn't have successor to draw a line to, so you stop at
waypoints.Length - 1. - You store the position of waypoint i, and its successor i+1. into a variable with every iteration.
- With the static method
Gizmos.Drawline(Vector3, Vector3), you draw a line from the current waypoint to the next waypoint. - With
UnityEditor.Handles.Label(string), you write the index of the waypoint adjacent to it to display the path and visualize the direction that enemies move. - You get the position of the last waypoint and display its index next to it.
Switch back to Unity to see the path. Play with it a bit by moving waypoints around and you'll see the path follows along.
Aside from DrawLine(), Gizmos provide several drawing functions. You can find the full list in the documentation. There is even a DrawRay:
Hmmm, that's definitely a Ray, but something seems off...

Hmmm, that's definitely a Ray, but something seems off...