Extend the Unity3d Editor
In this tutorial, you’ll learn to extend the Unity editor to customize it for the needs of your game. By Barbara Reichart.

The Unity Editor is (undeniably) an awesome engine for building games, but often gets this close to actually fitting your needs. At times, you probably find yourself wishing for a “do what I mean” button.
Although Unity isn’t quite capable of interpreting brainwaves through some mystical button, there ways to extend this tool to make it more useful and user-friendly.
In this Unity tutorial, you’ll learn how to extend and customize the engine. Aside from the accomplishment of being master of your domain, your changes should have the domino effect of speeding up game development by making the process a little (or a lot) leaner. :]
In particular, you’ll focus on how to use the following:
- Attributes for basic customization
- ScriptableObject to create custom assets and reduce memory usage
- Customize the Inspector using
PropertyDrawerandEditor - Create a new editor window to provide your own editing tools
- Draw in a scene with gizmos
Are you doubtful that customizing Unity can be helpful? On Gamasutra, you can find a cool article about Unity and editor tools that show a number of examples of how a custom editor can benefit your game design and creation efforts.
Prerequisites
You need Unity version 5.3 or newer to load the starter project successfully. If you don’t have it, then download Unity from Unity3D.com.
This tutorial is intended for advanced Unity developers, meaning you should know basic scripting and feel comfortable working in the Unity editor. If you’re not quite there, try honing your knowledge with our other Unity tutorials.
Getting Started
Download the starter project, unpack the zip file and open the resulting TowerDefenseEditor folder with Unity. As the folder name suggests, the project is a tower defense game.
Although the game runs smoothly, it’s difficult to edit. For example, the process for adding new open spots for the purpose of placing new “towers” is a bit annoying. Also, you can’t see the path the enemies follow.
In this tutorial, you’ll extend the Unity Editor to add those and a few more features so that it looks a lot like this:
The Editor After Customization
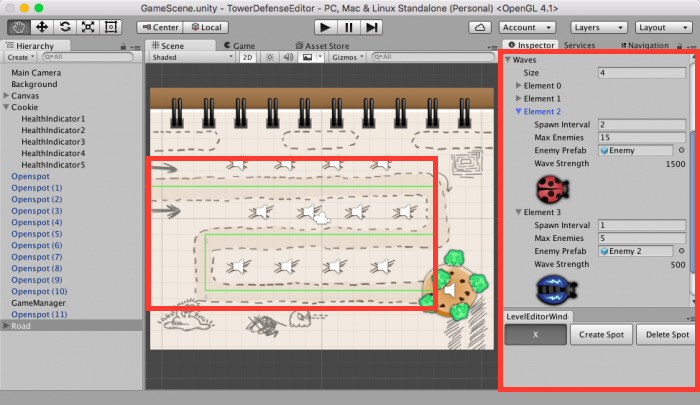
The Editor After Customization
This tutorial goes from smaller to bigger changes. Each section is self-contained, so you may skip around and work with the Editor extensions that pique your interest.
Basic Customizations with Attributes
These give you the power to drastically reorganize the Unity3D editor, but all you need are some minor adjustments, e.g., hiding a field, showing a tooltip or adding a headline. Hiding unwanted fields and protecting others are two strong use cases for attributes.
Hide Public Fields – [HideInInspector]
As per the default, all public fields of a MonoBehavior are exposed in Inspector, but sometimes you don’t want all that. Sometimes, you just want to:
- Remove clutter from Inspector
- Avoid accidental changes to a variable that could mess up your game

Time to get your hands dirty!
Go to the Assets/Prefabs folder and select Bullet1, and then look at Inspector. You should see the following:
Before: Lots of fields you should not touch
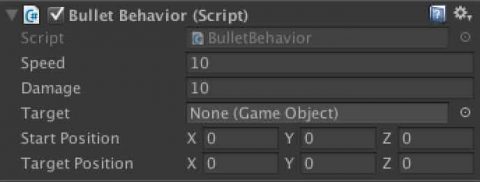
Before: Lots of fields you should not touch
You can see the fields Target, Start Position and Target Position. Those variables are public because they need to be assigned by the ShootEnemies script.
However, they don’t need to be editable in Inspector because bullets always fly from the monster to its target; you don’t need these fields exposed.
Open the script BulletBehavior.cs in the Assets/Scripts folder. Import using System; by inserting it into line 2.
Before:
using UnityEngine;
using System.Collections;
After:
using UnityEngine;
using System;
using System.Collections;
Add the [HideInInspector] and [NonSerialized] attributes before the lines that contain the definitions of the fields target, startPosition and targetPosition. [NonSerialized] is part of the System NameSpace, hence why you inserted using System; above.
Before:
public GameObject target;
public Vector3 startPosition;
public Vector3 targetPosition;
After:
[HideInInspector]
[NonSerialized]
public GameObject target;
[HideInInspector]
[NonSerialized]
public Vector3 startPosition;
[HideInInspector]
[NonSerialized]
public Vector3 targetPosition;
Save your changes.
HideInInspector removes the field from Inspector and successfully hides the field. However, if you edit the value of the variable in Inspector before you hide things, Unity will remember the value you set. This can be confusing.
To avoid this, use the attribute [NonSerialized] to stop Unity from remembering the value of the variable.
After: Fields are hidden
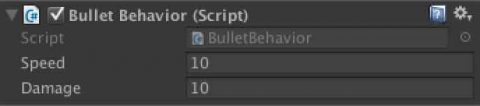
After: Fields are hidden
Note: Using attributes is simple. You just put them above the field, method or class they should influence, and you also have the option to combine several attributes.
Note: Using attributes is simple. You just put them above the field, method or class they should influence, and you also have the option to combine several attributes.
[RequireComponent]: Avoid Accidentally Removing a Component
Try this on the OpenSpot prefab to make the placement always work as expected.
Open the file PlaceMonster.cs from the folder Assets/Scripts. Edit the code as follows:
Before:
using System.Collections;

public class PlaceMonster : MonoBehaviour {
After:
using System.Collections;

[RequireComponent (typeof (AudioSource))]
[RequireComponent (typeof(Collider2D))]

public class PlaceMonster : MonoBehaviour {
Save your changes.
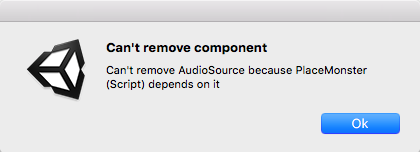
In Inspector, try to remove either the Collider2D or the AudioSource component from the OpenSpot prefab found in the Assets/Prefabs folder. A dialog appears when you try to delete it because of RequireComponent, it says you can’t remove it and also tells you which script requires it. Neat!
Other Interesting Tags
In addition to the ones you worked with above, there are plenty more cool attributes. Here’s a short overview:
ScriptableObject: Create Custom Assets and Reduce Memory Usage
In this section, you’ll store a bullet’s configuration in a ScriptableObject instead of inside the GameObject.
You’re probably thinking: But it worked perfectly fine with GameObject! Why should I change it? To understand why you would want to do this, simply look into the basics of scriptable objects.