iOS 12 Password Tools: Improving User Security and Experience
Learn how iOS password and security tools can help you generate and securely save passwords, and synchronize passwords between your mobile apps and website. By Lyndsey Scott.
Adding App Identifiers to the Web App (Locally)
Now, open Terminal and cd into UltraMotivator-starter/Motivational-Server. For example, if you’ve unzipped the UltraMotivator files onto your desktop, you can enter:
cd ~/Desktop/UltraMotivator-starter/Motivational-Server
This sets Motivational-Server — the directory containing the server app — as the working directory.
Within Motivational-Server, create a Public directory and then a nested .well-known directory within it by entering the terminal command:
mkdir -p Public/.well-known/
Then, while replacing with your Team ID and with your App ID, enter the following:
echo '{"webcredentials": {"apps": ["<#Team Identifier#>.<#App Bundle ID#>"]}}' \
  > Public/.well-known/apple-app-site-association
It’s important to use the exact filename apple-app-site-association as iOS will be looking for a file with this precise name.
It’s important to use the exact filename apple-app-site-association as iOS will be looking for a file with this precise name.
Switch to Finder and navigate to UltraMotivator-starter/Motivational-Server/Public/.well-known/apple-app-site-association. If you’re unable to see .well-known, use the shortcut Command+Shift+. to toggle hidden file visibility. Open the association file in a text editor to confirm that it contains the specified JSON.
Setting Up Heroku CLI
Now that your mobile app’s IDs are in place, you’ll upload these to your web app. To do this, you’ll need the help of Heroku’s command line interface tools — Heroku CLI.
You’ll need Homebrew to install Heroku CLI. If Homebrew isn’t already installed on your computer, install it by entering the following into Terminal:
/usr/bin/ruby -e \
  "$(curl -fsSL https://raw.githubusercontent.com/Homebrew/install/master/install)"
Now, you can install Heroku CLI via Homebrew with terminal command:
brew install heroku/brew/heroku
Once you’ve installed Heroku CLI, log in to your account by entering the following into your terminal:
heroku login
Then, enter your Heroku credentials, when prompted.
Once you’ve signed in, confirm your login was successful by entering:
heroku auth:whoami
This confirms that whoami outputs the correct email address.
Deploying the Server App
Heroku will deploy your Vapor app via Git, so you’ll need to put your server app into a Git repository.
In Terminal, confirm that Motivational-Server is still your working directory. To do so, enter the command pwd for the full directory address. Then, enter these commands while replacing
git init
git add .
git commit -m "Vapor server"
heroku git:remote -a <Heroku app name>
With these commands, you’ve added your remote server app as a local Git repository.
Heroku uses a Buildpack to provide the recipe for building your app when you deploy it. Enter the following in Terminal:
heroku buildpacks:set https://github.com/vapor-community/heroku-buildpack
This sets the Buildpack for your app.
Finally, to deploy your app to Heroku, enter:
git push heroku master
This pushes your master branch to your Heroku remotely. You’ll have to wait several minutes as everything builds.
Follow the instructions in the error message, then repeat the push command.
heroku stack:set heroku-16 -a <your-application-name>
Follow the instructions in the error message, then repeat the push command.
heroku stack:set heroku-16 -a <your-application-name>
Heroku normally starts your app automatically when it finishes building. But, for safe measure, to manually start running your app, enter:
heroku ps:scale web=1
Then, to open your web app, enter heroku open. You can also find your web app URL listed in the Heroku dashboard underneath Settings ▸ Domains and certificates.

Congrats! You’re now the proud owner of a website capable of recognizing your iOS app via apple-app-site-association file. You can view your apple-app-site-association file at https://[your domain]/.well-known/apple-app-site-association. You’ve conquered the first half of your two-way association: Take a moment to bask in the glory!

Completing the Two-Way Association
OK, bub, that’s enough basking! Now, it’s time to configure your iOS app to recognize your website, thus completing the two-way association. Before moving on, make note of your Heroku app domain in your browser’s Location bar, as you’ll need it in a moment.
Open UltraMotivator in Xcode, select your target at the top of the left-hand Project navigator, and click on the General tab.
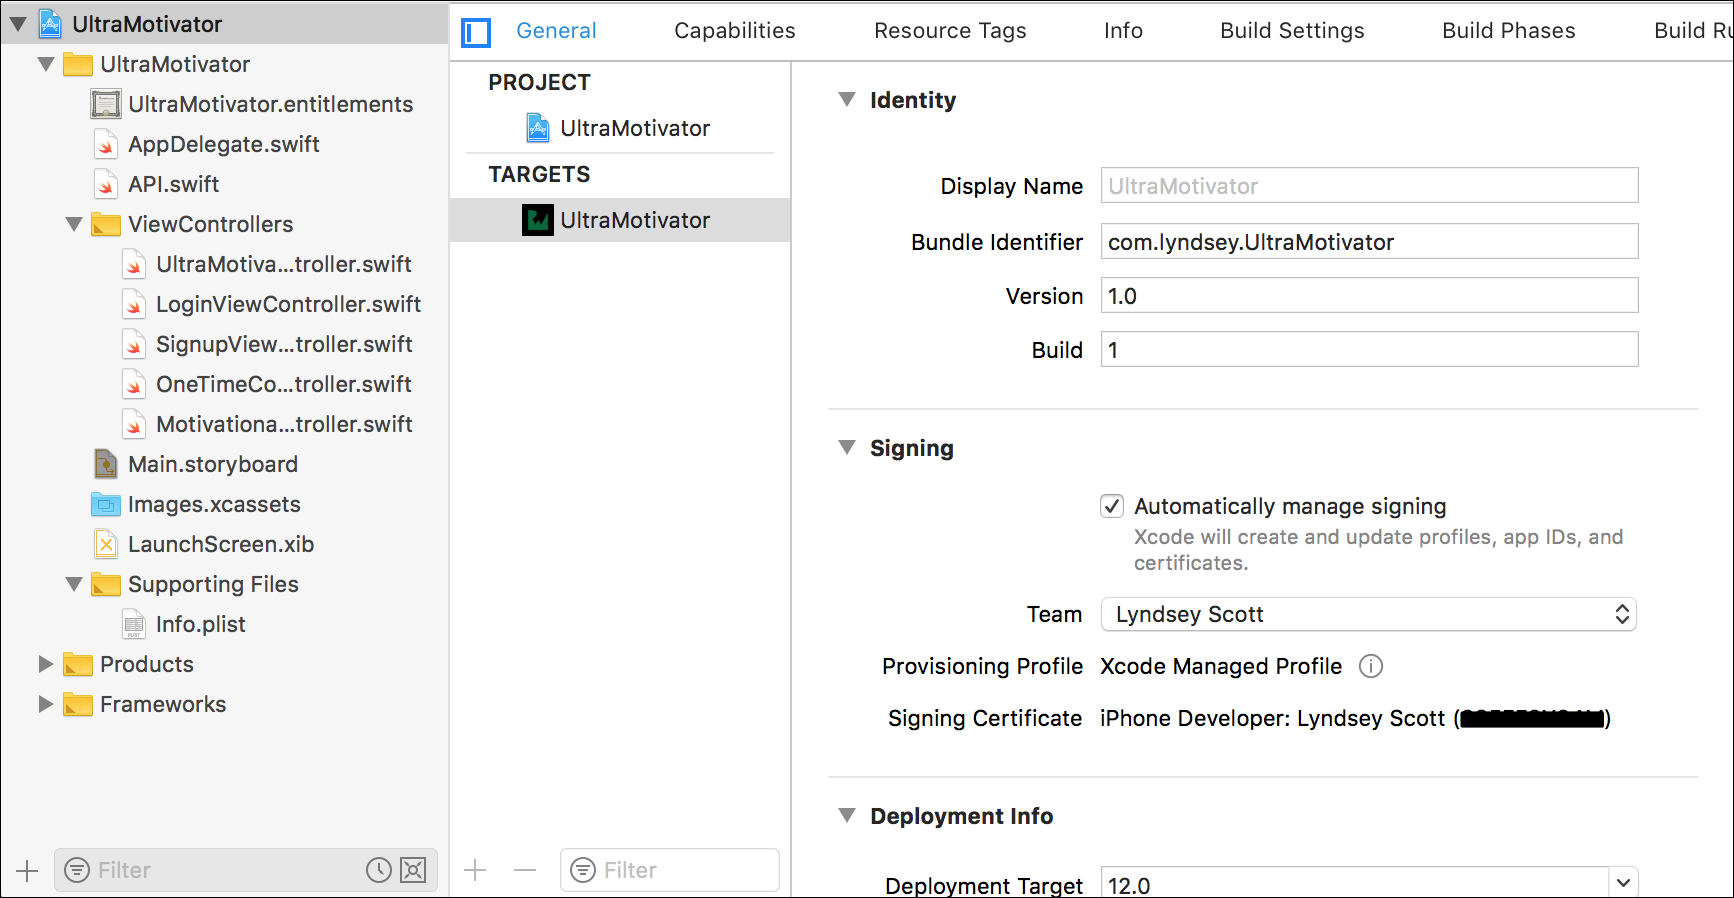
In the Identity section, set the Bundle Identifier to your App ID. In the Signing section, check Automatically manage signing, then select the Team associated with the app: Xcode should now generate a provisioning profile and signing certificate. Any errors on your General page should now vanish.
At the bottom of the page, add AuthenticationServices.framework to Linked Frameworks and Libraries. You’ll need AuthenticationServices to integrate iOS password autofill.

Next, click the Capabilities tab. Find the option for Associated Domains and switch it ON to activate this capability.

Now, click +, then add your Heroku app’s domain to the list using the following format:
webcredentials:[your domain]
Assuming you’ve set up your App ID’s capabilities correctly, check-marked labels should appear below your listed domain. These check marks confirm that you’ve added the associated domain feature to both your entitlement file and app ID.

You should now be able to see UltraMotivator.entitlements in the left-hand Project navigator. This entitlements file contains the data you just entered, wrapped in a property list.

iOS uses this Entitlements File to check your code-signing identity and provisioning profile.
Return to Target ▸ Capabilities, locate Autofill Credential Provider, and switch it to ON.

Once again, check marks should appear — this time, confirming that you’ve added the autofill credential provider feature to both your App ID and entitlements file. It also confirms that you’ve included the AuthenticationServices.framework.
Putting It All Together
Phew! That’s a lot of micro steps! Happily, now it’s time to wire everything up. :]
Return to UltraMotivator.xcodeproj in Xcode, open API.swift and find the following code on line 46:
static let baseURL = URL(string: "https://[your domain]")
Replace “[your domain]” with the Heroku app name that you copied and used previously.
[your app name].herokuapp.com
API.swift contains API calls capable of communicating with the server app at your domain. These calls help perform user log in, registration, log out, password changes and random motivational-quote generation. Most of these calls are already integrated into the iOS app. Now that you’ve added your domain, authentication should work as intended.
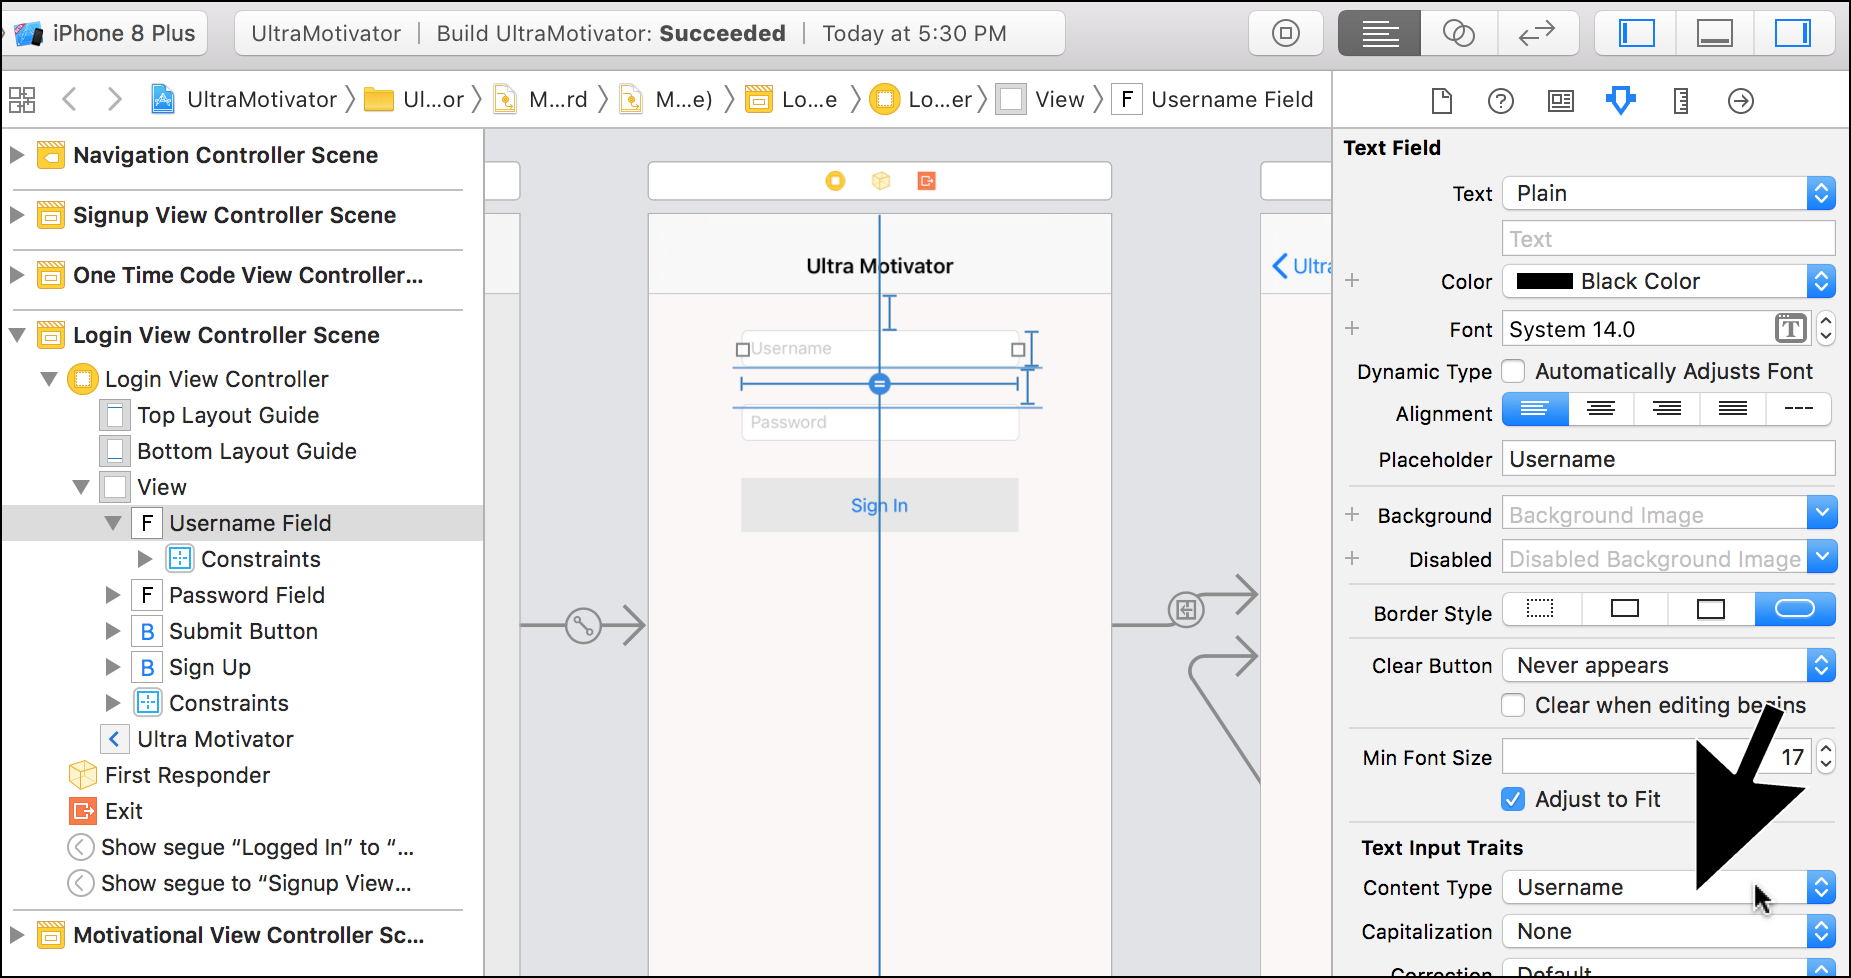
Next, you’ll add iOS password autofill, strong password generation and security code autofill in Interface Builder. Open Main.storyboard to get started.
Select the Username field on the Login view controller. Open the Attributes inspector tab in the right-hand Inspector pane. Locate the Text Input Traits section and set Content Type to Username.
Now, select the Password field and set its Content Type to Password.
Similarly, on the Signup view controller, change the Username field’s Content Type to Username. Then, change the New Password field’s Content Type to New Password so that this field will now autofill a strong password suggestion.
Finally, open OneTimeCodeViewController.swift. Insert the following at line 42:
oneTimeCodeField.textContentType = .oneTimeCode
By setting textContentType to .oneTimeCode, whenever iOS detects a security code in an incoming message while the user is viewing this two-factor authentication screen, the QuickType bar above the keyboard will autofill with the code. The user will then be able to enter this code with a single tap, without ever leaving the app.