iOS 12 Password Tools: Improving User Security and Experience
Learn how iOS password and security tools can help you generate and securely save passwords, and synchronize passwords between your mobile apps and website. By Lyndsey Scott.
Do any of the following scenarios sound familiar?
- An app requires you to create a new iOS password and you proceed to type in your cat’s name, as you’ve done with every single site and app that you’ve ever used.
- You already have an account with a website when you download its app. Your credentials autofill on web, but you can’t remember them when you try to log in on mobile.
- An app requires that new iOS passwords contain at least 99 characters — with at least one letter, five non-sequential numbers and a prime number of punctuation symbols, excluding ! and *.
- You keep leaving an app to check the two-step verification code text message it sent you, but can’t seem to remember the random string of characters each time you return.
As users, these types of scenarios make anyone see exceptionally vivid shades of red and perhaps utter equally colorful shades of blue. :]
As developers, this makes iOS password handling a balancing act: On one hand, it’s critical to make the login process as simple as possible; every password requirement you add will increase your users’ motivation to uninstall your app. At the same time, developers have a responsibility to help users stay secure; hackers and abusers stage never-ending attacks on activists, celebrities and John Q. Public.
iOS Password Tools to the Rescue!
But fear not! iOS Password AutoFill, automatic strong passwords and security code autofill are all at your service!
In this tutorial, you’ll put these iOS 12 security tools to work, enabling your users to:
- Share and synchronize passwords between your website and your app.
- Save and update iOS passwords.
- Auto-generate secure passwords.
- Access verification security codes sent via text message without leaving the app.
While this tutorial requires very little coding on your end, it assumes that you have some familiarity with Xcode and Terminal.
While this tutorial requires very little coding on your end, it assumes that you have some familiarity with Xcode and Terminal.
Getting Started
Download the materials for this tutorial using the Download Materials button found at the top and bottom of this page. Unzip the UltraMotivator files and open UltraMotivator-starter/UltraMotivator.xcodeproj in Xcode. Then, build and run the starter app on your simulator.

Starting on the login screen, tap the Sign Up button in the bottom-right corner to navigate to the sign-up page. Enter a username and password, then tap Sign Up. An Error dialog should pop up. In the app’s current state, you can’t yet log in because the app’s back end doesn’t yet exist.
Sadly, unauthenticated users can’t access on-demand encouragement, so the starter app is rather uninspiring for now. But, lucky for them, you’re about to code their path to inspirational quotation enlightenment!

A Peek at the Web App
Switch back to Finder and navigate to UltraMotivator-starter ▸ Motivational-Server. This directory contains the server app that you’ll deploy to the web to get the iOS app up and running.
Like the iOS app, the server app is written in Swift using Vapor, a modern web framework for Swift. While you won’t cover the details of Vapor here, you can check out our Video Course and book if you’d like to learn more.
Take a moment to get a bird’s-eye view of the web app’s structure. Most notably, this includes:
- Resources ▸ Views: Contains Vapor’s Leaf files, which lay out the web page templates.
- Sources ▸ App: Contains the server app logic. This logic will handle authentication and random motivational quote generation.
For this tutorial, you’ll deploy your server app to Heroku, since it offers a quick, easy and free solution. If you don’t already have a Heroku account, sign up to create one at https://signup.heroku.com/. Make note of your password, because you’ll need it later.
Creating a Heroku App
Visit https://dashboard.heroku.com and log in to Heroku.
In the upper right-hand corner, click the button labeled New, then select Create new app.

On the next screen, either enter a unique app name or leave the App name field blank. Then, choose the deployment region.

If you leave App name blank, Heroku will automatically generate a unique slug to identify the app for you. Whether you create a name or Heroku assigns you one, make note of your app name because you’ll need it later when configuring your app. Click Create app.
After creating your app, Heroku redirects you to your app’s page.

Select the Resources tab near the top of the page. Under the section entitled Add-ons, enter postgre and you’ll see an option for Heroku Postgres; select this option.

This takes you to one more screen that asks what type of database to provision.

Choose the Hobby Dev — Free Plan name. Click the Provision button, and Heroku will do the rest.
Once you’ve finished, the database will appear under the Resources tab, indicating that your web app has been successfully created.

Getting Your App’s Identifiers
Now that you’ve set up Heroku to host your web app, it’s time to share Ultra Motivator’s credentials between web and mobile. To do this, you’ll need to set up a two-way association between your iOS app and the web server.
First, you’ll make your iOS app identifiable and grant it the necessary permissions. Sign in to Apple’s Developer Portal. In Member Center, select Certificates, Identifiers & Profiles.
Go to Identifiers ▸ App IDs and select the Add button. Enter an App ID Description, then scroll down to the App ID Suffix ▸ Explicit App ID section and create a Bundle ID; this will be your App ID. Scroll down to the App Services section and enable the Associated Domains and AutoFill Credential Provider services.

Scroll down and click Continue to save. On the summary page, you’re presented with next, confirm that Associated Domains and AutoFill Credential Provider are both enabled. Then, scroll to the bottom and click Register. You should then see a Registration Complete page confirming that you’ve successfully completed this step.
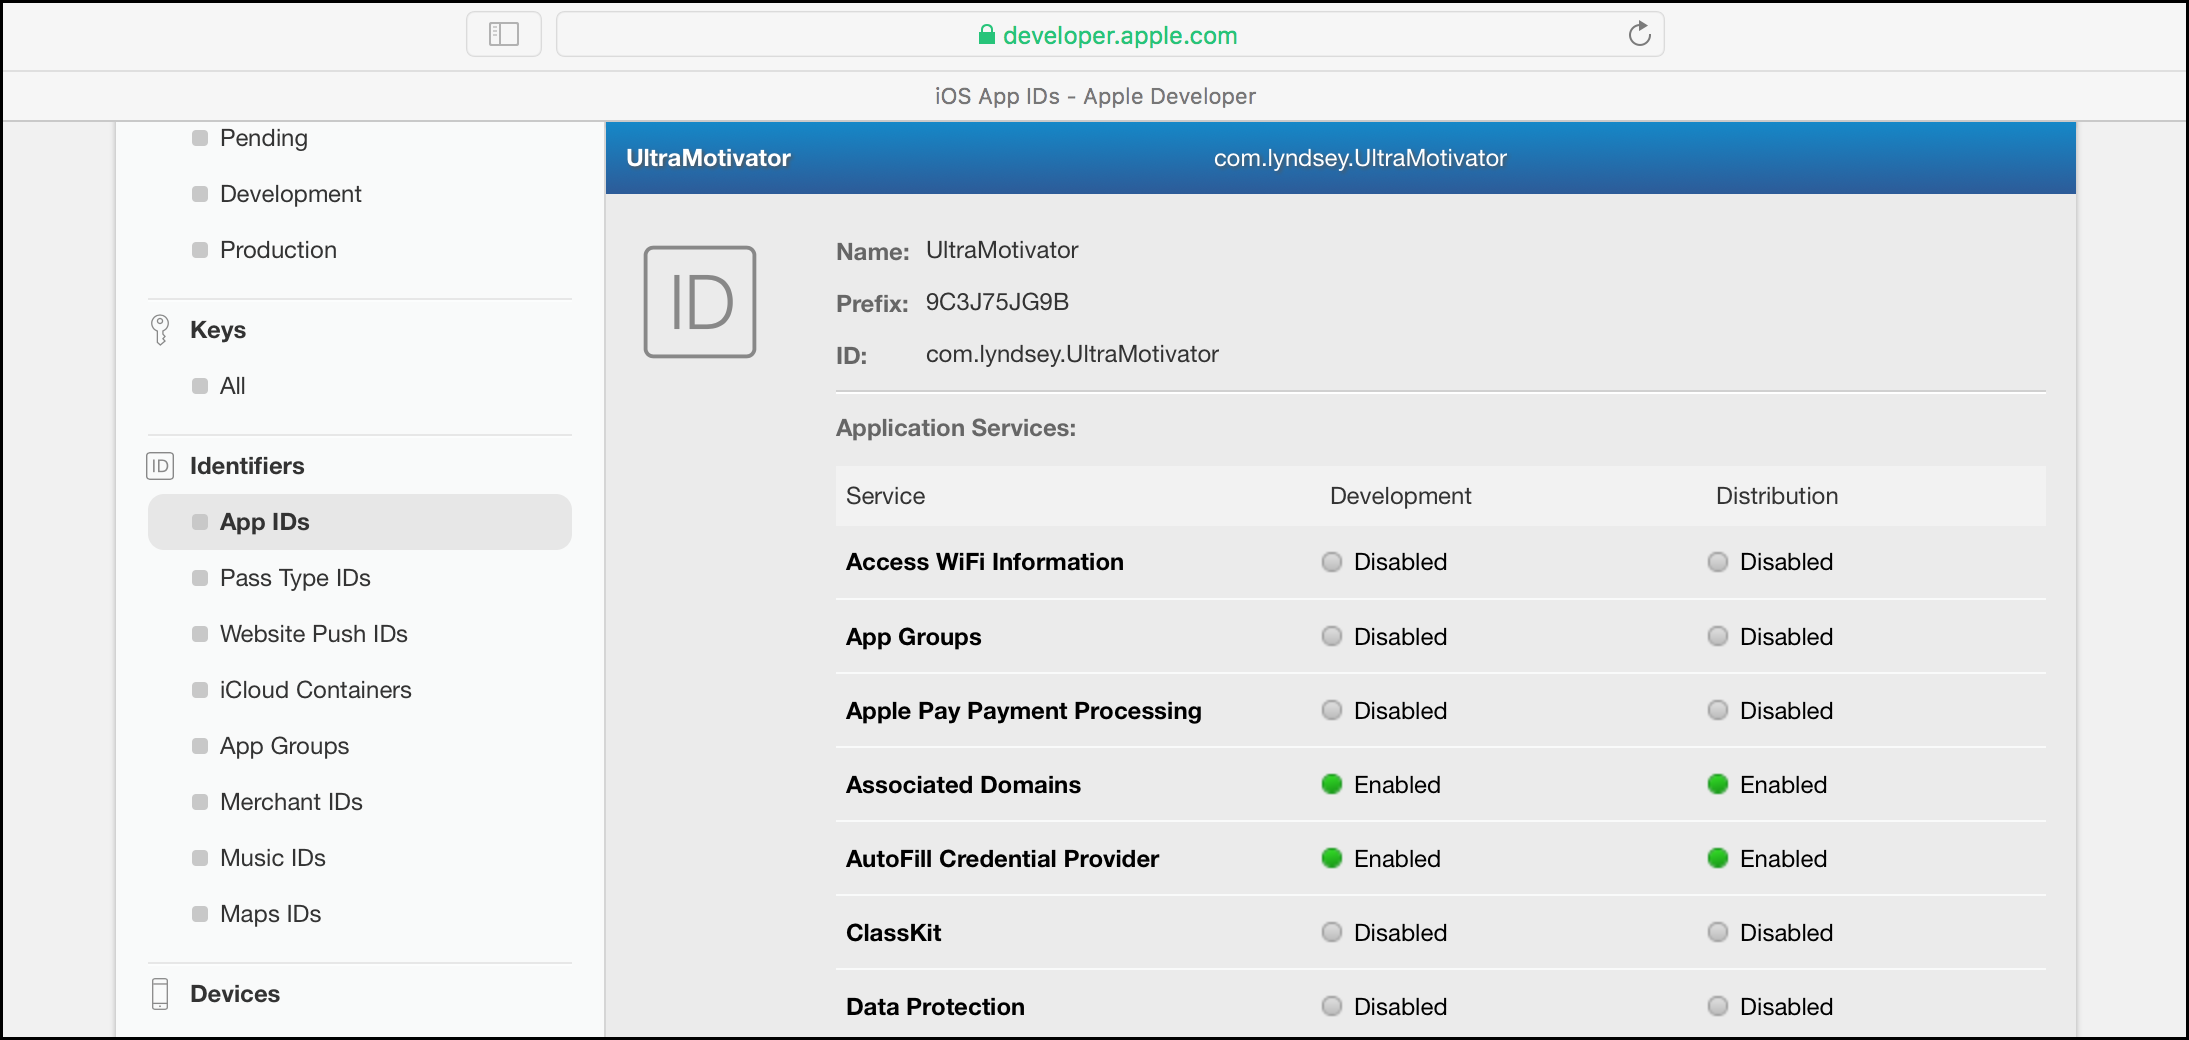
Make note of the Prefix in the app’s header information display, to the right of the ID icon. This is your Team ID.