SwiftUI Tutorial for iOS: Creating Charts
In this SwiftUI tutorial, you’ll learn how to build a variety of custom charts to effectively model your iOS app data to your users. By Bill Morefield.
Adding a drop more detail
You've built a good bar chart by taking advantage of the functionality that SwiftUI provides. The outer HStack equally spaces the bars of the chart, which helps readability. The height of the bars shows the proportional amounts of rain over the year.
However, the chart doesn't clearly indicate the exact amounts of precipitation. Add the following code after the Spacer in body to show that data:
Text("\(self.sumPrecipitation(month).stringToOneDecimal)")
  .font(.footnote)
  .rotationEffect(.degrees(-90))
  .offset(y: 35)
  .zIndex(1)
You’ve added a text view to each bar. It displays the total precipitation for that month rounded to one decimal using an extension method on the Double type. You can find it in DoubleExtension.swift.
The text view’s font is set to match the month label and rotates the text counterclockwise by 90 degrees so it flows parallel to the bar. The view is then offset by 35 points downward, placing it inside the bar.
SwiftUI renders views in the order they’re read. This means the rainfall amount would normally be behind the bar since it occupies the same space.
Setting the zIndex property to something other than the default zero value tells SwiftUI to override that default order. Setting it to one tells SwiftUI to draw the Text on top of views with the default zIndex including the bar.

Build and run the app to test this new text view out. Then go to the Cherokee, NC station and select the precipitation tab to see an interesting little bug. Little rain fell in July of 2018 making the bar too short to contain its text.
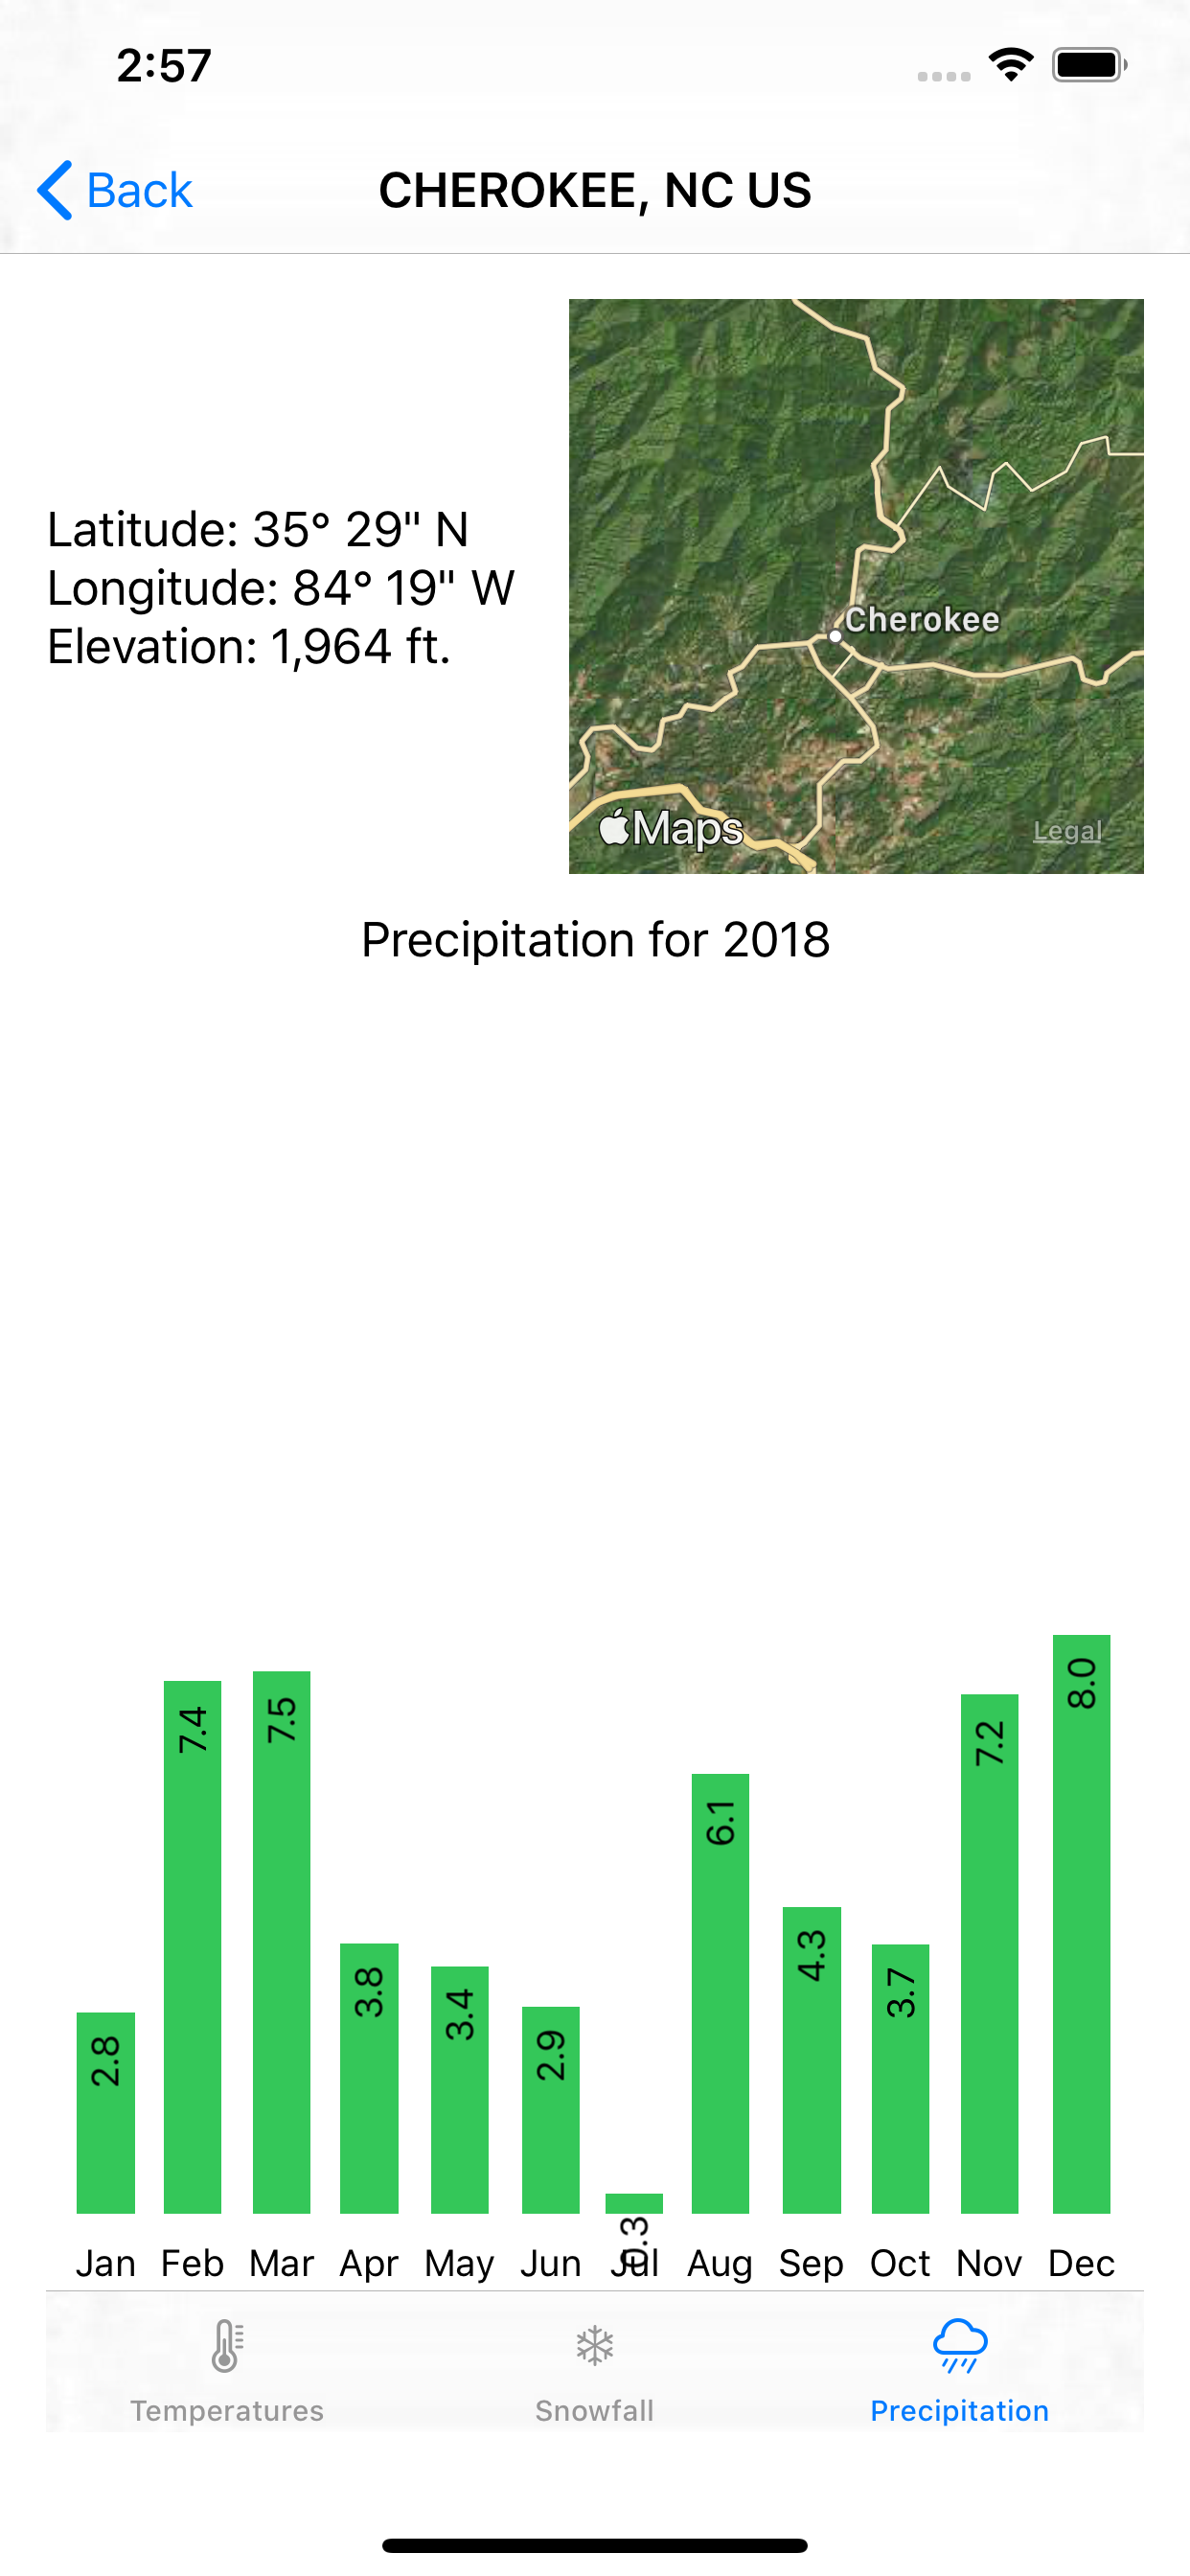
To fix this bug, you need to add a check to the offset by replacing the offset in the text view with the following:
.offset(y: self.sumPrecipitation(month) < 2.4 ? 0 : 35)
If the amount of precipitation for a month is less than 2.4 inches, which would result in a bar 36 points long, the text remains at the top of the bar.

Beautiful! You've now successfully replaced a list with a bar chart. This chart lets the viewer see all the original list data with a clearer visual guide to the differences in precipitation for each month.
Now that you have a precipitation chart, you're ready to create a horizontal bar chart for snowfall.
Building a Horizontal Bar Chart
The Smoky Mountains contain some of the highest elevations in the eastern United States. But, outside of those higher elevations, they receive less snow than you might expect.
The scarcity of snow means a chart grouping by month, as the precipitation chart did, would show bumps at the start and end of the year with nothing in the middle. Instead, you'll graph the snow using a horizontal bar chart that only shows the days of the year receiving snowfall.
Right click the Charts group in Xcode and select New File. Select SwiftUI View and click Next.
Name the new view SnowfallChart and ensure the group is set to Charts. Click Create and open the new file.
You need to pass measurements to this view again by adding the following code to the top of the struct:
var measurements: [DayInfo]
You'll use Mount LeConte for the preview because it has the most days with snowfall and the largest amounts of snow. Change the preview to:
SnowfallChart(measurements: WeatherInformation()!.stations[2].measurements)
Next, change body to the following:
// 1
List(measurements.filter { $0.snowfall > 0.0 }) { measurement in
  HStack {
    // 2
    Text("\(measurement.dateString)")
      .frame(width: 100, alignment: .trailing)
    // 3
    Rectangle()
      .fill(Color.blue)
      .frame(width: CGFloat(measurement.snowfall * 10.0), height: 5.0)
    // 4
    Spacer()
    Text("\(measurement.snowfall.stringToOneDecimal)\"")
  }
}
Here’s a step by step breakdown:
You align the text to the .trailing side of the frame next to the start of the bar showing the amount of snowfall.
- You create a
Listwith an entry for each measurement with snowfall. - You start each row with the date the snow fell. By default, a
Textview sizes to fit the text it contains leaving the rows with varying widths. Applying a constant width ensures the bar begins at the same horizontal position for each row.You align the text to the
.trailingside of the frame next to the start of the bar showing the amount of snowfall. - You use a blue rectangle for the bar. Since this is a horizontal rather than vertical chart, you give the bar a constant height and set the width based on the amount of snow. Since you have less space horizontally on the view, you use fewer points to represent each inch of snow compared to the previous chart.
- After a
Spacer()that fills the empty space after the bar, you show the amount of snow in inches, again rounding to one-tenth of an inch.
Back in SnowfallTab.swift replace the List and its closure inside of body with a call to the new view:
SnowfallChart(measurements: station.measurements)
The chart now shows snowfall for the year. Look at December for a particularly impressive snowfall.

Adding Grid Lines
Because of the large variance in snowfall amounts, you can clarify the chart further by adding grid lines. These are lines placed on a chart or graph at a constant value. This makes it easier for the viewer to gauge the length of the bar.
First, change the code for the Rectangle() in SnowfallChart to:
ZStack {
  Rectangle()
    .fill(Color.blue)
    .frame(width: CGFloat(measurement.snowfall * 10.0), height: 5.0)
}
The ZStack lets you overlay multiple child views in the same space. In this case, you’ll overlay the bar and the grid lines. You'll draw grid lines at one-inch intervals out to the greatest measurement of 16 inches.
Add the following code inside the the ZStack after the Rectangle:
ForEach(0..<17) { mark in
  Rectangle()
    .fill(Color.gray)
    .offset(x: CGFloat(mark) * 10.0)
    .frame(width: 1.0)
    .zIndex(1)
}
Here you draw a rectangle filled in gray for each month of data. The offset(x:y:) modifier shifts each line to the right by the appropriate amount, then sets a frame with a width of one, turning the rectangle into a line. You set the zIndex of the Rectangle again so that it shows on top of the bar.
Notice that by not setting a height for the frame, it expands to the height of the view containing it. If you view the current state, you'll notice something a bit off.

The grid lines and bars don't always line up correctly. By default, a ZStack aligns its child views in the center, but you can explicitly specify the alignment of the child views with a little modification. Change the line declaring the ZStack to:
ZStack(alignment: .leading) {
Now the bar and grid line up as expected.

If you're using many grid lines, you can help the viewer by providing a visual cue at regular intervals. Change the call to fill(_:style:) to:
.fill(mark % 5 == 0 ? Color.black : Color.gray)
This uses the Swift ternary operator to color every fifth indicator black using the remainder operator.

Now that you've gained experience creating a couple of basic charts, you can move on to creating a more complex heat map for temperature data.