Improving Accessibility in Unity Games – Part 1
Take your games to the next level with support for a range of accessibility options. Help deal with subtitles, color blindness, audio controls and more! By Mark Placzek.
Putting Your Requirements to Work
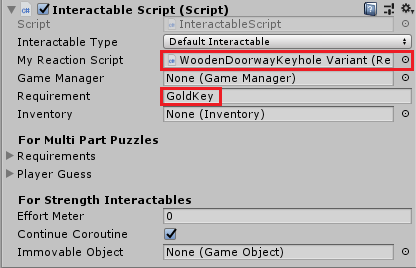
Each puzzle has a requirement. For example, the WoodenDoorwayKeyhole requires a GoldKey to open it. In this next step, you’ll use the Gem requirement to ensure that the material change only affects your completed gem puzzle.
Under myMasterInteractable.Interaction();, in the same curly braces, add the following code:
if (requirement.Contains("Gem"))
{
    Material gemMaterial = other.gameObject.GetComponentInChildren<Renderer>().material;
    StartCoroutine(LerpEmission(0.0f, 1.0f, gemMaterial));
}
You’ll get an error because you haven’t created the method you’re trying to access… yet. Your next step will be to fix that. Add the new method below, in the same script:
private IEnumerator LerpEmission(float startValue, float targetValue, Material gemMaterial)
{
    float progress = 0;
    while (progress <= 1)
    {
        float emission = Mathf.Lerp(startValue, targetValue, progress);
        gemMaterial.SetColor("_EmissionColor", gemMaterial.color * emission);
        gemMaterial.EnableKeyword("_EMISSION");
        progress += Time.deltaTime;
        yield return null;
    }
}
This method uses a Mathf function called Lerp. It gradually adjusts a value from one to another over time. Here, you'll use it to adjust the emission color of the gem, but you can use it in many other useful ways! Keep it in mind.
Back in Unity, press the Play button and test out your new, super-powerful gems.
Yeah! This is starting to feel more like a proper dungeon crawler. As you can now see, putting the correct gem down on the correct pedestal, results in the color emission brightness significantly increasing.
Addressing Hearing Impairments
When you design your games to assist players with hearing impairments, you're also making quality-of-life changes that all your players will thank you for. More players than you think will take advantage of these improvements.
Ubisoft has stated that 60% of Assassins Creed players play with the subtitles turned on. Additionally, think of the many times you've played your mobile games without volume because of others around you. Fortnight added a directional cue to sounds for mobile users for this reason. These changes level the playing field for all players, since sound is such an important aspect of the multiplayer survival game.
In this section, you'll implement the following:
- Closed captions.
- Directional cues for all sounds.
- Separate FX/music volume controls.
- Game design thoughts for sound-based puzzles.
Adding Closed Captions
Now that you have readable subtitles, you also want to make sounds easier to detect, even for people with hearing disabilities. You'll do that by adding closed captions.
First, enable a new toggle on your settings screen. Select AudioDescriptionToggleComponent in the Settings panel in the Hierarchy, under Canvas ▸ SettingsMenu. At the top of the Inspector, enable the toggle with the checkbox.
Your Settings panel should look like this:

OK, now head back into the SettingsManager script to complete the method the toggle hooks into.
First, add an instance variable at the top of the class to hold the state of the toggle:
private bool audioDescriptionEnabled = false;
This variable doesn't need to be public because the Settings Manager itself will handle sending the subtitles.
Next, find the empty ToggleAudioDescription method and add the following code:
audioDescriptionEnabled = isDescriptionEnabled;
SaveSettings("DescriptionEnabled", isDescriptionEnabled.ToString());
The setting from the toggle is simply passed to the variable in the Settings Manager for all to access!
Now save the script and pat yourself on the back, you did great. :]
Adding Scripts to Noisy GameObjects
Next up, you're going to create a new script that you'll add to all GameObjects that have an audio source. The script will watch the state of its own audio source and if played, will send a subtitle of your choice to the Game Manager.
Navigate to Assets/RW/Scripts. At the top left of the Project view, click Create ► C# Script to create a new script. Name this script AudioDescription and double-click on it to begin editing. Finally, add the following variables to the top of the class:
private SettingsManager settingsManager;
private AudioSource myAudioSource;
public string myDescription;
public bool descriptionSent = false;
The names of these variables should be self-explanatory. Here's what they do, in order:
- settingsManager: Holds a reference to the Settings Manager so that it can request a subtitle.
- myAudioSource: Holds a reference to the Audio Source attached to the GameObject so you can check if it's playing.
- myDescription: Enables you to add a string to a report, such as: "Sound of torch crackling."
- descriptionSent: Ensures a subtitle is only sent once during the playback of the sound, and not for every frame.
Now add the following code to the Start to instantiate your private variables:
settingsManager = GameObject.FindGameObjectWithTag("SettingsManager").GetComponent<SettingsManager>();
myAudioSource = gameObject.GetComponent<AudioSource>();
Next, add the following code to Update. This is where the magic happens!
if (myAudioSource.isPlaying && descriptionSent == false)
{
    settingsManager.HandleAudioDescription(myDescription);
    descriptionSent = true;
    StartCoroutine(ResetReportingDescription(myAudioSource.clip.length));
}
Here, Update checks to see if the Audio Source is playing, and whether a description for the audio has already been sent. This only happens for the first frame, when the audio starts playing.
Then, three more things happen:
- A description of the audio is sent to the method called
HandleAudioDescriptionin the Settings Manager. -
descriptionSentis set totrue. - Finally, you initiate a coroutine to reset
descriptionSentonce the audio ends by passing in the length of the audio clip.
The eagle-eyed among you may have noticed neither of these methods exists yet. It's time to fix that!
Add the following new method to the AudioDescription script:
private IEnumerator ResetReportingDescription(float clipLength)
{
    yield return new WaitForSeconds(clipLength + 0.1f);
    descriptionSent = false;
}
This first line does exactly what its name indicates. WaitForSeconds pauses execution of the method for the time you specify: The length of the clip plus a precautionary extra fraction of a second. Once that time has elapsed, the descriptionSent is set to false so that the subtitle will send again the next time the audio plays.
Next, head into the SettingsManager.cs script and add the following new method:
public void HandleAudioDescription(string subtitle)
{
    if (!audioDescriptionEnabled)
    {
        return;
    }
    else
    {
        gameManager.PublishSubtitle(subtitle);
    }
}
Save all changes to your scripts.