Improving Accessibility in Unity Games – Part 1
Take your games to the next level with support for a range of accessibility options. Help deal with subtitles, color blindness, audio controls and more! By Mark Placzek.
Adjusting the In-Game Text
While many players find that a fancy, medieval-looking font fits well with a dungeon crawler, others may find that kind of font too difficult to read. So you’re going to offer your players the option of two different font styles: a fancy font and a simple font.
To start, open SettingsManager.cs, located in the Project window under Assets/RW/Scripts.
Once your IDE has loaded the script, add the following variables to the top of the class:
//1
public TMP_FontAsset simpleFont;
public TMP_FontAsset fancyFont;
//2
public TextMeshProUGUI exampleText;
//3
public TMP_FontAsset fontStyleSelected;
public float fontSizeSelected;
Here’s what these variables do:
- These are references to the font files you can switch between.
- This provides a reference to the example text, so it can reflect the changes the player makes.
- You retain public references to the players’ settings, so that newly-instantiated UI objects, such as subtitles, can ask the Settings Manager for the font and size to use.
Return to the Unity editor and find and select the SettingsManager GameObject in the Hierarchy. The Settings Manager component in the Inspector should now be populated with your new public fields.
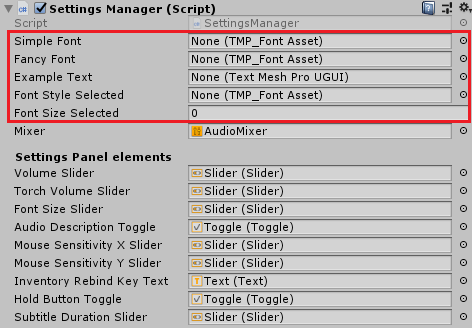
To add the font files, click the Object Picker Button on the right of the field. This will display all the possible TMP_Font Assets in your project to save you from having to search for them. Handy!
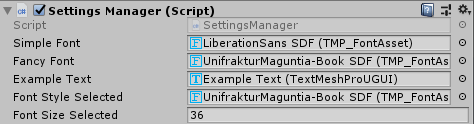
Choose LiberationSans SDF for the Simple Font, and UnifrakturMaguntia-Book SDF for the Fancy Font.
Drag the Example Text GameObject from the Hierarchy to the Example Text in the Settings Manager.
Finally, select the fancy UnifrakturMaguntia-Book SDF for the fontStyleSelected and 36 for the fontSizeSelected.
Here is how the Inspector should look now:
You should use default values with these variables so there’s no chance of them having no value if something tries to access them. A font size of 0 is pretty hard to read even with REALLY good eyesight!
Setting Up Your New UI Elements
The next step is to create the methods that your new UI elements will use. Back in the SettingsManager.cs script, add the following code to the empty SetFontType method. You may need to expand the Adjust Settings region.
//1

switch (dropdownValue)
{
    case 0:
        exampleText.font = fancyFont;
        fontStyleSelected = fancyFont;
        break;

    case 1:
        exampleText.font = simpleFont;
        fontStyleSelected = simpleFont;
        break;

    default:
        exampleText.font = fancyFont;
        break;
}
- The drop-down component contains a list of possible options. When the user selects one, it sends an
intvalue to denote which one. Here, you use a switch statement to react to each case appropriately. It applies either the fancy font or the simple font to the example text, and retains a reference to the player’s selection in the public variable,fontStyleSelected.
Next, add the following code to the empty SetSize method:
//1
exampleText.fontSize = sliderValue;
fontSizeSelected = sliderValue;
SaveSettings("FontSize", sliderValue); //**See Note below**
- The slider component sends a
floatof the value selected. As you did with the font style, you set the font size of the example text and save a reference infontSizeSelected.
Saving and loading throughout the tutorial would add a considerable amount of repetitive code. Therefore, you’ll see an example of Loading Saved Settings in Part 2 of this tutorial series when the Settings Menu is complete.
Until then, expect each control to have a line of code to save the newly-adjusted setting.
The UI components are already wired up to the methods you just completed. Once again, have a look at the tutorial here if that process is unfamiliar to you.
Back in Unity, it’s time to test things out. Don’t forget to disable the SettingsMenu GameObject again, then click the Play button to check that everything works well so far.
Work that slider! Toggle that font! Looking good?
Your next task is to implement the changes across the game when you exit the Settings Menu.
Adding Your Font Changes to the Game’s Menus
You have two types of UI that you need to tackle: The couple of game menus that persist in the scene, albeit hidden, and the subtitles that the game generates on the fly.
You’ll start with the menus.
Add and instantiate the following lists to the top of the SettingsManager script.
public List<GameObject> gameUIPanels = new List<GameObject>();
private List<TextMeshProUGUI> gameUITextComponents = new List<TextMeshProUGUI>();
private List<Button> gameUIButtonComponents = new List<Button>();
The public gameUIPanels list will allow you to simply drag all the panels you want to affect into the list in the Inspector.
At the start of the game, the text and buttons will be extracted from the gameUIPanels and added to their own lists. This means the Settings Manager won’t have to find them every time something changes.
Add the following code to Start in the SettingsManager to populate the two private variables, gameUITextComponents and gameUIButtonComponents:
foreach (GameObject panel in gameUIPanels)
{
    TextMeshProUGUI[] tempArray = panel.GetComponentsInChildren<TextMeshProUGUI>();
    foreach (TextMeshProUGUI item in tempArray)
    {
        gameUITextComponents.Add(item);
    }
    Button[] tempButtonArray = panel.GetComponentsInChildren<Button>();
    foreach (Button button in tempButtonArray)
    {
        gameUIButtonComponents.Add(button);
    }
}
Here, you iterate through the list of GameObjects looking for any TextMeshPro components in the object or any of its children. If the code finds any, it adds them to the gameUITextComponents list. Similarly, Button components are added to the gameUIButtonComponents list.
Once the player has completed the adjustments to the font and clicked the Exit button in the Settings Menu, you want to pass those changes to all the elements you’ve collected.
Add the following code to the start of SettingsDidExitOrLoad.
//1
foreach (TextMeshProUGUI textComponent in gameUITextComponents)
{
    textComponent.font = fontStyleSelected;
    textComponent.fontSize = fontSizeSelected;
}
//2
foreach (Button button in gameUIButtonComponents)
{
    button.image.rectTransform.sizeDelta = new Vector2((fontSizeSelected / 32) * 200, (fontSizeSelected / 32) * 50);
}
- Here, you iterate through the
gameUITextComponentlist and set the fonts to the size and style the user selected. - Then you expand or reduce the size of the buttons in the
gameUIButtonComponentsto match the font size the user selected.
Return to Unity and add the UI elements you want to include in the gameUIPanels list.
In the Hierarchy, make sure you’ve toggled the disclosure triangle so that the child GameObjects are visible in Canvas. Select the Settings Manager and drag the following four GameObjects from the Canvas into the Game UI Panels List:
- InventoryMenuSettingsButton
- StartMenu
- EndMenu
- DoneButton (found in the Settings Menu)

Before you click Play to see if all your hard work has paid off, go ahead and take care of the subtitles, too. All you need is a little script.