Improving Accessibility in Unity Games – Part 1
Take your games to the next level with support for a range of accessibility options. Help deal with subtitles, color blindness, audio controls and more! By Mark Placzek.
Changing the Font Styles in the Subtitles
In the Project view, navigate to Assets/RW/Prefabs/UIPrefabs/SubtitlePrefab.
The subtitle prefab is very basic. It’s simply a text element with a Destroy Timer script to remove it after a set time. The game manager instantiates one when it needs one, populates the text and slaps it in a panel with a vertical layout group.
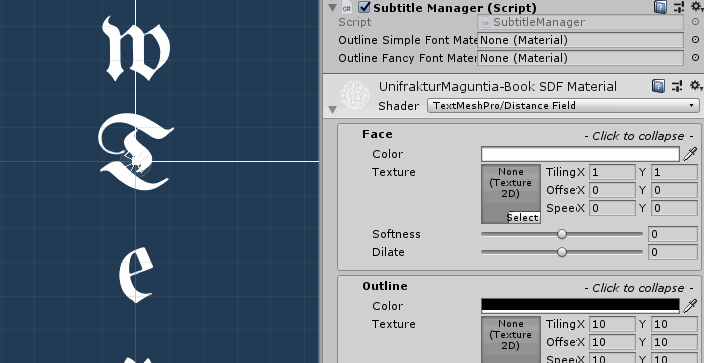
Double-click on the SubtitlePrefab to open it. In the Inspector, click Add Component and type SubtitleManager. Press Return and then Create and Add. You now have a nice, new script to manage your subtitles!
Move the new script into Assets/RW/Scripts (you’ll find it by default created under Assets). Then double-click on it to edit it and add the following at the top of the script:
using TMPro;
This lets you access TextMeshPro in the namespace.
Next, add these two private variables at the top of the class:
private SettingsManager settingsManager;
private TextMeshProUGUI myTMPComponent;
These reference the Settings Manager to extract the player’s font preferences and the TextMeshProUGUI text component so you can apply adjustments.
Add the following code to Start to make these adjustments.
//1
settingsManager = GameObject.FindGameObjectWithTag("SettingsManager").GetComponent<SettingsManager>();
myTMPComponent = gameObject.GetComponent<TextMeshProUGUI>();
//2
myTMPComponent.font = settingsManager.fontStyleSelected;
myTMPComponent.fontSize = settingsManager.fontSizeSelected;
- Wires up the variables you created in the previous step to their respective objects.
- Takes the font style and size from the Settings Manager and applies them to the subtitle.
Save the script and return to Unity to test it out. Press the Play button. Don’t forget to change the font to Simple in the Settings menu of the running game before you click Start Game.
For all those who were wondering what a “Gold Teh” was, there will be a few “ohhh” and “ahhh” moments now that you can read some of the subtitles. :]

Adding an Outline to the Subtitles
For this game, the subtitle color works well against the deep dark dungeon environment. However, making your subtitles stand out is so simple, it doesn’t make sense not to do it.
To get started, double-click on the SubtitlePrefab in Assets/RW/Prefabs/UIPrefabs to open it in the Hierarchy and Inspector.
Scroll down to the Material component and expand it using the disclosure triangle. Click on Underlay to expand it.

If you ticked Underlay and tweaked the settings, you’d create a nice outline around your text.

However, this would also affect all instances of this font throughout the game, as they share the same default material.
Setting Up a Separate Material for the Subtitles
To fix this, right-click at the top of the Material component and select Create Material Preset.

The Project view should jump to the new duplicate material named UnifrakturMaguntia-Book SDF. Select it in the Project view and append “Outline” to its name to distinguish it from its twin.
In the Inspector, check Underlay and adjust the following settings:
- Color: Set the alpha to 255 to make the black opaque.
- Offset X: Set to 0.
- Offset Y: Set to 0.
- Dilate: Set this value to 1.
Awesome! That will make your fancy styled text in-game stand out against all backgrounds.
Standardizing Your Outlines
The simple font already has a few Material Presets. Navigate to Assets/RW/TextMesh Pro/Resources/Fonts & Materials. Here, you’ll find an Outline Material already, LiberationSans SDF – Outline.
However, this material uses an Outline as opposed to an Underlay to create the outline. For clarity and consistency, your next step is to adjust the material to use an Underlay instead.
Uncheck Outline and check Underlay instead. Apply the same settings as with the fancy font.

Implementing the Outlines
To override the default material, you’ll need to set the material preset when you instantiate the subtitle. To do that, add the following two variables to the SubtitleManager:
public Material outlineSimpleFontMaterial;
public Material outlineFancyFontMaterial;
These variables will hold your new outline materials. Next, add the following code to the end of Start:
switch (settingsManager.fontStyleSelected.name)
{
    case "LiberationSans SDF":
        myTMPComponent.fontMaterial = outlineSimpleFontMaterial;
        break;
    case "UnifrakturMaguntia - Book SDF":
        myTMPComponent.fontMaterial = outlineFancyFontMaterial;
        break;
    default:
        myTMPComponent.fontMaterial = outlineFancyFontMaterial;
        break;
}
This switch statement sets the outline font material for the font that the user selected.
Now, return to Unity to populate the public variables.
Make sure you save the prefab.
Click the Play button and marvel at the clarity of the subtitles, regardless of background shenanigans!

Congratulations! You have improved the game tremendously already for people with vision impairment.
Adaptations for Color Vision Impairment
Color blindness is a fairly common condition. Red-green is the most common form, affecting approximately 8% of males and 0.5% of females. This is a problem for players since many games use color a great deal. For example, colors might help users find the solution to puzzles or to indicate status or progress in the UI.
Additionally, it offers links to sites that will allow you to upload your own images to visualize, which is useful for testing your game’s color palettes.
Additionally, it offers links to sites that will allow you to upload your own images to visualize, which is useful for testing your game’s color palettes.
Making a Color-Based Puzzle More Accessible
Puzzley Dungeon has a color-based puzzle, where the player needs to place different color gems on their respective pedestals.
There are many ways you could adjust this puzzle to assist individuals with color blindness. For example, the shapes of the gems could be different or you could emblazon archaic symbols on the gems and pedestals to indicate correct pairings.
For this tutorial, you’re going to show a change in the gems’ material emission to indicate the correct placement. After all, if you don’t have powerful glowing gems in your dungeon crawler, you are doing something wrong! :]

Open the InteractablePart script found in Assets/RW/Scripts. This class handles puzzles with more than one component, such as the gem puzzle, where a few things need to happen correctly before the user can successfully finish the puzzle.
You call OnTriggerEnter when part of a puzzle needs to react to a change. Within this method, you differentiate between puzzles where the order of events is important, such as playing musical notes or pushing buttons in the correct order, versus puzzles where order is not important, like with your gem game, where the player can place the gems in any order.
Correct placement of a gem will bring you into this nested conditional:
if (!isSequenceImportant)
{
    myMasterInteractable.playerGuess[partNumber] = 1;
    myMasterInteractable.Interaction();
}