
Unreal Engine 5 Blueprints Tutorial
In this Unreal Engine 5 Blueprints tutorial, you’ll learn how to use Blueprints to create a player character, set up inputs and make an item disappear when the player touches it. By Ricardo Santos.
Creating an Item
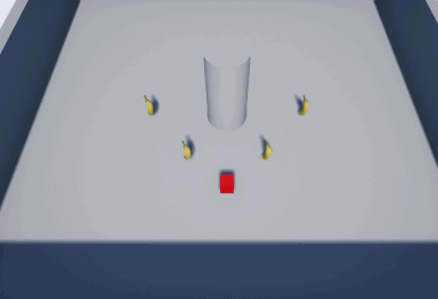
Generally, an item is anything the player can collect. You’ll use BP_Banana as the item.
To detect when the cube touches the item, you need an event node that triggers when there’s a collision. Use collision responses to generate such events.
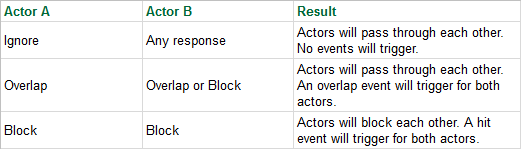
A collision response also determines how an actor reacts when colliding with another actor. There are three types of collision responses: Ignore, Overlap and Block. Here is how they interact with each other:
Although you can use either Overlap or Block, this tutorial will only show you how to use Overlap on the items.
Setting the Collision Response
Exit the game and open BP_Banana. Select the StaticMesh component and then go to the Details panel. The Collision section is where you’ll set the collision response. If you click the arrow to expand the menu, you’ll see that most settings are grayed out.

To make them editable, left-click the drop-down next to Collision Presets. Select Custom from the list.

You need to specify the collision response between the item and the cube.
Components have an attribute called object type. The object type is just a convenient way to group similar actors. Read more about object types here.
Because the cube’s type is WorldDynamic, you want to change the collision response to that type. Under the Collision Responses section, change the collision response of WorldDynamic to Overlap. Do this by left-clicking the middle checkbox to the right of WorldDynamic.

Handling Collision
To handle collision, you need to use an overlap event. Go to the Components panel and right-click on StaticMesh. From the context menu, select Add Event ▸ Add OnComponentBeginOverlap.

This adds the OnComponentBeginOverlap (StaticMesh) node to your Event Graph.

Finally, create a DestroyActor node and link it to the OnComponentBeginOverlap (StaticMesh) node. As its name suggests, it will remove the targeted actor from the game. However, because there’s no target, it will destroy the actor that called it.

Placing the Item
Close the Blueprint editor and ensure you’re in the Blueprints folder.
Start placing bananas into the level by left-clicking and dragging BP_Banana into the Viewport.

Click Play and start collecting the bananas!
Where to Go From Here?
You can download the completed project files by clicking Download Materials at the top or bottom of the tutorial.
You’re now one step closer to becoming an Unreal Engine expert. Hopefully this tutorial didn’t drive you bananas.