
Graphics Using Jetpack Compose
Learn to create custom graphics using Jetpack Compose in Android with the convenient Canvas composable and the Paint object. By arjuna sky kok.
Drawing the Ghost’s Feet
Breaking down the ghost custom graphic, separate the feet. What do you see? Three arcs or half-circles lined up horizontally.
Go inside drawGhost and add the following code:
    val ghostXPos = canvasWidth / 4
    val ghostYPos = canvasHeight / 2
    val threeBumpsPath = Path().let {
      it.arcTo( // 1
        Rect(Offset(ghostXPos - 50.dp.value, ghostYPos + 175.dp.value),
          Size(50.dp.value, 50.dp.value)),
        startAngleDegrees = 0f,
        sweepAngleDegrees = 180f,
        forceMoveTo = true
      )
      it.arcTo( // 2
        Rect(Offset(ghostXPos - 100.dp.value, ghostYPos + 175.dp.value),
          Size(50.dp.value, 50.dp.value)),
        startAngleDegrees = 0f,
        sweepAngleDegrees = 180f,
        forceMoveTo = true
      )
      it.arcTo( // 3
        Rect(Offset(ghostXPos - 150.dp.value, ghostYPos + 175.dp.value),
          Size(50.dp.value, 50.dp.value)),
        startAngleDegrees = 0f,
        sweepAngleDegrees = 180f,
        forceMoveTo = true
      )
      it.close()
      it
    }
    scope.drawPath( // 4
      path = threeBumpsPath,
      Color.Red,
      style = Fill
    )
By calling Rect, Android Studio assists you in adding the required import, androidx.compose.ui.geometry.Rect.
-
arcTois similar todrawArcabove: thestartAngleDegreesandsweepAngleDegreesarguments are like start and sweep angles where the first argument is the rectangle that defines or bounds the size of the arc. The last argument moves thePathpoint to the end of the path before drawing another arc. Otherwise, you’d always draw other arcs from the same starting position or beginning of the first arc. - You did exactly the same as above, only you’re starting at the end of the first one.
- For the last leg, you start at the end of the second leg.
-
pathargument is the path you’ve created, and the second argument is the color of your path. The third argument,fill, is whether you should fill the path with the selected color.
Rebuild the project and run the app. You’ll see the ghost’s feet:

drawPath, you could use drawArc three times. Experiment with drawArc and see which one is more convenient for you.Drawing the Ghost’s Body
Now, you’ll draw a rectangle as the main part of the ghost’s body. You already know how to build a rectangle, so add the following code at the bottom of drawGhost:
    scope.drawRect(
      Color.Red,
      Offset(ghostXPos - 150.dp.value, ghostYPos + 120.dp.value),
      Size(150.dp.value, 82.dp.value)
    )
Rebuild the project and launch the app. You’ll see the ghost’s body:

A ghost with a body? Only in Pacman. :]
Drawing the Ghost’s Head
The ghost’s head is a half-circle arc, but bigger and in the opposite direction of the ghost’s feet. Add the following code at the bottom of drawGhost:
    scope.drawArc(
      Color.Red,
      startAngle = 180f,
      sweepAngle = 180f,
      useCenter = false,
      topLeft = Offset(ghostXPos - 150.dp.value, ghostYPos + 50.dp.value),
      size = Size(150.dp.value, 150.dp.value)
    )
Starting at the top left corner of the ghost’s body, you draw an arc 180 degrees to the right. Rebuild the project and run the app. You’ll see the ghost’s head:

Drawing the Ghost’s Eyes
Wow, all you’re missing now are the eyes! The ghost has two eyes, with each eye composed of a white outer circle and a black inner circle for the iris. So now, you’ll draw four circles just like you’ve already done with the power pellet. Add the following code at the bottom of drawGhost:
    scope.drawCircle(
      Color.White,
      center = Offset(ghostXPos - 100.dp.value, ghostYPos + 100.dp.value),
      radius = 20f
    )
    scope.drawCircle(
      Color.Black,
      center = Offset(ghostXPos - 90.dp.value, ghostYPos + 100.dp.value),
      radius = 10f
    )
Rebuild the project and run the app. You’ll see a one-eyed ghost:

Now, try to draw the ghost’s left eye. Gotta have two eyes to catch Pacman. :]
Drawing Text With Jetpack Compose
To draw text, you need to access the native Canvas object because you can’t draw text on top of Jetpack Compose’s Canvas. Inside drawScore, you’ll see that you have textPaint:
  val textPaint = Paint().asFrameworkPaint().apply {
    isAntiAlias = true
    textSize = 80.sp.value
    color = android.graphics.Color.WHITE
    typeface = Typeface.create(Typeface.MONOSPACE, Typeface.BOLD)
    textAlign = android.graphics.Paint.Align.CENTER
  }
Text is drawn as a custom graphic using Jetpack Compose with Paint. You change the style and color of the text through this interface. Normally with Canvas, you use the base Paint object, but because you’re using the native Canvas object, you need the framework Paint method called asFrameworkPaint. Inside the asFrameworkPaint.apply block above, you configure the Paint object’s text for font, style, size and color.
Additionally, there’s no drawText inside the DrawingScope for the normal Canvas object. You need to call into the nativeCanvas interface to access its drawText method. To draw text on the native Canvas, add the following code below // 7. Draw a text:
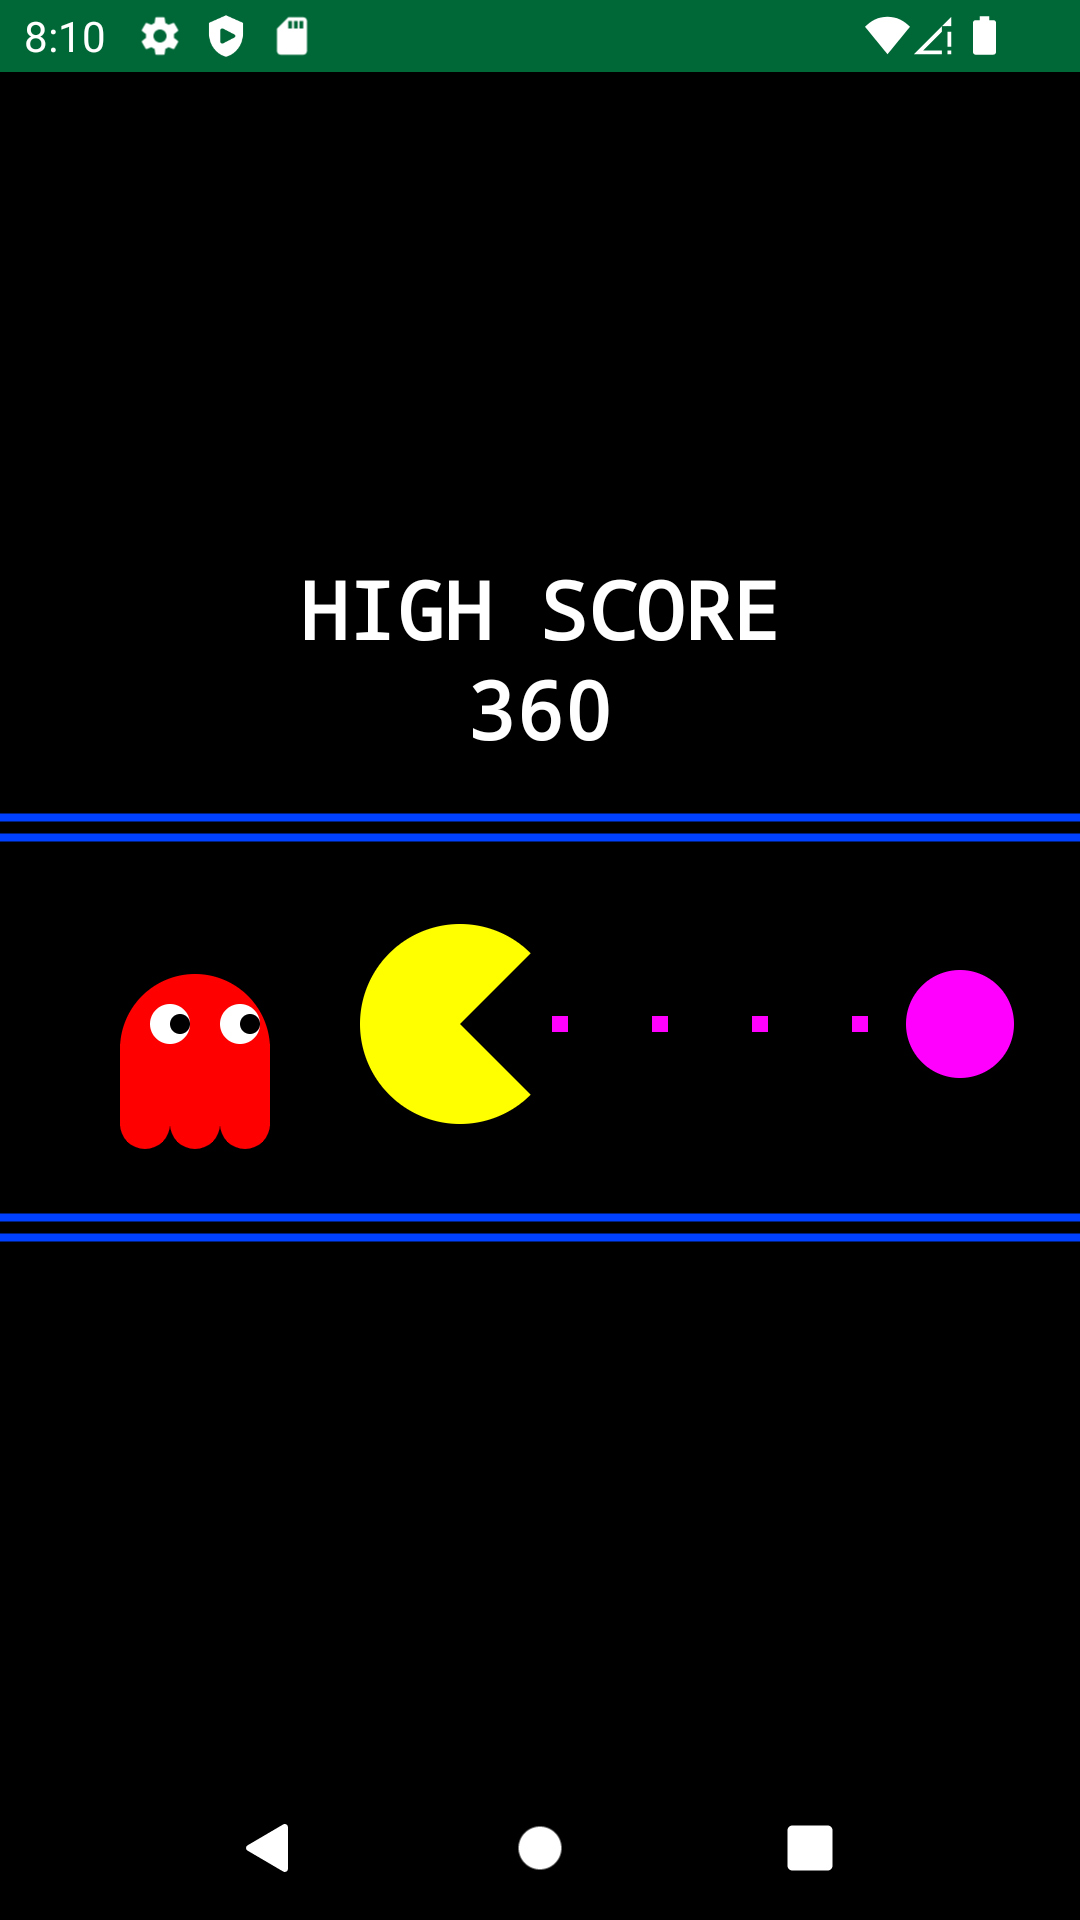
  scope.drawIntoCanvas {
    it.nativeCanvas.drawText( // 1
      "HIGH SCORE", // 2
      canvasWidth / 2, // 3
      canvasHeight / 3, // 3
      textPaint // 4
    )
    it.nativeCanvas.drawText( // 1
      "360", // 2
      canvasWidth / 2, // 3
      canvasHeight / 3 + 100.dp.value, // 3
      textPaint // 4
    )
  }
Here’s what’s happening:
- Like the Path in
arcToearlier,itis the Canvas object inside thedrawIntoCanvasblock. You reference the native Canvas object and then usedrawTextto draw the text. - This is the text you want to write.
- These are the x and y coordinates for text placement.
- This is the framework Paint object representing the text’s color, size and font.
Build the project and run the app. You’ll see the following text on the screen:
Scaling, Translating and Rotating Objects With Jetpack Compose
You’ve done a lot of drawing! Sometimes, after drawing objects, you might need to transform them. For example, you might want to make them bigger or change their position or direction. You may also need to rotate Pacman as he moves through the maze: When he moves north, his mouth should point north.
Scaling and Translating Objects
Look at the ghost, and you’ll see he’s smaller than Pacman. Also, the ghost’s position is slightly lower than Pacman’s. You can fix this by transforming the ghost, which you’ll do now.
DrawingScope has the withTransform method. Inside this method, add the scale and translate modifiers. Inside drawGhost wrap every code there with the following snippet below:
  scope.withTransform({ // 1
    scale(1.2f) // 2
    translate(top=-50.dp.value, left=50.dp.value) // 3
  }) {
    ...
  }
Here’s what this code does:
- A
scopeblock uses the methodwithTransform. Inside the block,withTransformuses two methods, or modifiers, to transform the object. -
scalechanges the size of the object. The argument1.2fmeans the object will be 20% bigger. -
translatehas two arguments,topandleft.topchanges the vertical position of the object. The negative value,-50.dp.value, means the object rises upward. A positive value pushes the object downward. The horizontal position of the object changes with theleftargument. The negative value,-50.dp.value, means object moves to the left. A positive value would move the object to the right.
Build the project and run the app. You’ll see the ghost has moved slightly up and become bigger:

Well, look at that! A Blinky replica. Blinky would be proud. Waka do you think? :]