
Graphics Using Jetpack Compose
Learn to create custom graphics using Jetpack Compose in Android with the convenient Canvas composable and the Paint object. By arjuna sky kok.
Using Modifier
You’ve seen Modifier in the Canvas function. But you have other arsenals as well. Suppose you want to add some padding. Change the Modifier inside Canvas to:
  Canvas(modifier = Modifier
    .fillMaxHeight()
    .fillMaxWidth()
    .padding(50.dp)
  ) {
Don’t forget to import padding. Each method on the modifier returns an updated Modifier instance. So by chaining the method calls, you’re gradually building the Canvas. The order by which you call the methods matter.
Rebuild the project and run it. You’ll see the black screen now has white padding:

Now that you’ve seen how padding works for custom graphics in Jetpack Compose, you can remove that code.
Creating Objects With Jetpack Compose
It’s finally time to try to draw some shapes! You’ll see that each of these shapes has its own characteristics.
Drawing Lines
Now that you’ve created a rectangle, it’s time to create other shapes. You’ll start by drawing part of the Pacman maze. Go inside drawBlueLines. You notice that there’s an annotation on top of this method, @OptIn(ExperimentalGraphicsApi::class). It’s needed because you use Color.hsv, which is experimental. So what is this method? It gets a color that you’ll use to draw on Canvas. HSV (hue, saturation, value) is one of the color spaces besides RGB (red, green, blue). You can read more about HSV in Image Processing in iOS Part 1: Raw Bitmap Modification. Color.hsv accepts three arguments: hue, saturation and value. The saturation and value ranges from 0 to 1. It’s a float which represents the percentage value.
In this method, you need to draw four lines. You’ve already got the positions defined for you.
Add the following code at // 2. Use the drawLine method:
    scope.drawLine(
      blue, // 1
      Offset(0f, line), // 2
      Offset(canvasWidth, line), // 2
      strokeWidth = 8.dp.value // 3
    )
Here’s what is happening:
-
blueis the color you got fromColor.hsv. - These define the dot positions that make a line when connected. Each dot needs an
Offset. Basically, it’s an object that accepts two values, the x and y positions. - This sets the width of the stroke. The higher the value, the thicker your line becomes. You define a line by two points. That’s why the method to draw a line needs two
Offsetarguments. It’s different from the method for drawing a rectangle.
Rebuild the project and run the app. You’ll see four blue lines:

Notice that you’ve drawn lines after drawing a rectangle — the order matters. If you draw lines first, then draw a rectangle, the big rectangle will cover your lines.
Drawing Circles
Next, you’ll draw a power pellet. The circle represents an object that, if eaten by Pacman, makes him immune to ghosts for a certain period of time. Go to // 3. Use the drawCircle method, and add the following:
  scope.drawCircle(purple, // 1
    center = Offset(pacmanOffset.x + 600.dp.value, dotYPos), // 2
    radius = radius) // 3
Here’s what this code does:
- This specifies the color of the circle.
- The
centerargument refers to the position of the center of the circle in Canvas. - The
radiusrefers to how big your circle is.
As you can see, both methods — whether drawing a rectangle, line or circle — accept a color argument. However, they differ in other arguments because every shape is a bit different. All the methods accept an optional Paint object.
Build the project and run the app. You’ll see a purple circle:
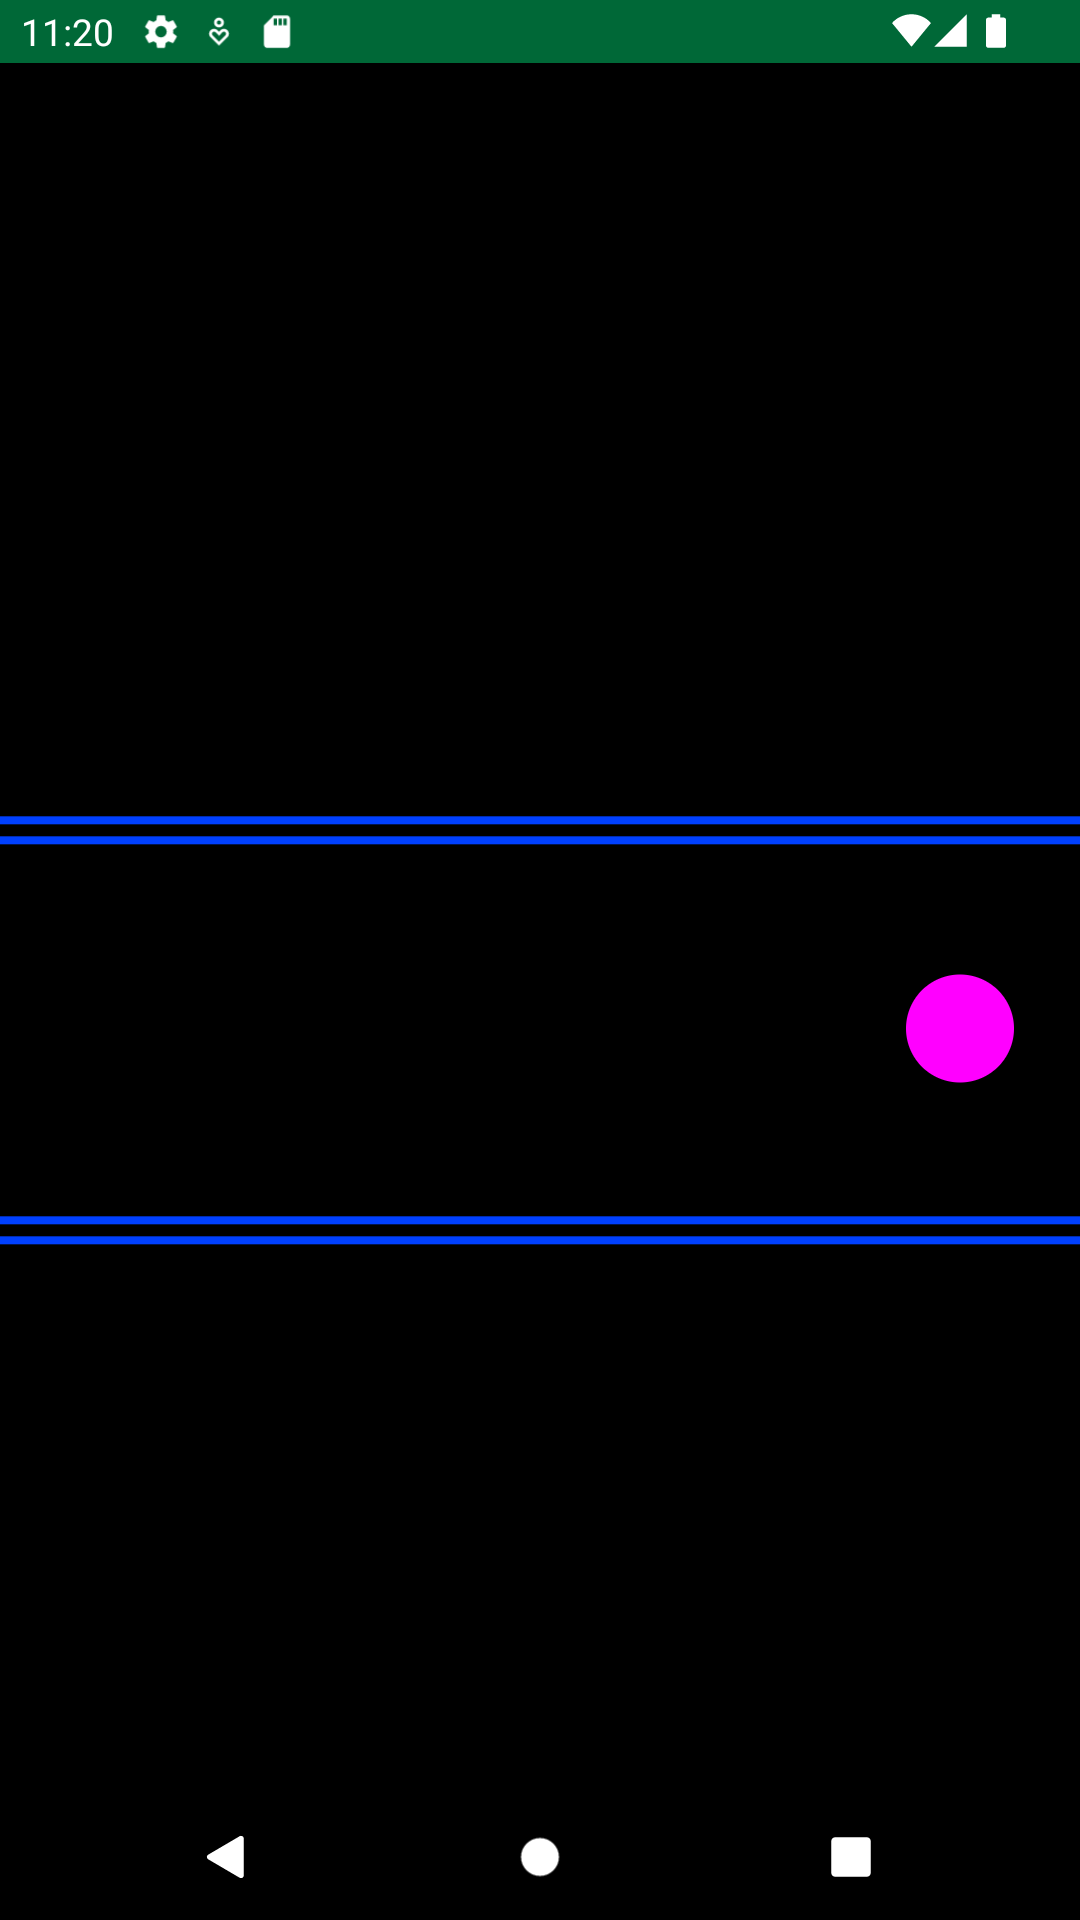
With that, your power pellet is ready to give ol’ Blinky — spoiler — a run for his money! :]
Drawing Point Lines
In the Pacman video games, this line of points refer to the dots that Pacman needs to eat to finish the game. You can create all the points one by one, but you could also use a method to create a line consisting of points. Find // 4. Use the drawPoints method, and add the following:
  scope.drawPoints(points, // 1
    PointMode.Points, // 2
    purple, // 3
    strokeWidth = 16.dp.value) // 4
This code defines:
- The list of
Offsets where you defined the position of points. - The mode or style of the point. Here, you render small squares. There are other
PointModeoptions. Try them out before moving on. Press Ctrl (or CMD on a Mac) + Space on your keyboard to see the other options. - Color.
- Line thickness.
Build the project and run the app. You’ll see a line of points:

Drawing Arcs
Now, here comes the most exciting part of the tutorial: drawing Pacman himself! Pacman is a not-quite-full circle. You call this shape a sector. You call a quarter of a circle an arc. Pacman looks like a circle with an arc taken out!
Below // 5. Use the drawArc method within drawPacman, add the following code:
  scope.drawArc(
    Color.Yellow, // 1
    45f, // 2
    270f, // 3
    true, // 4
    pacmanOffset,
    Size(200.dp.value, 200.dp.value)
  )
This code specifies:
-
Yellowas the arc’s color. - Start angle, which refers to the bottom part of Pacman’s mouth.
- Sweep angle. Sum the start angle and the sweep angle, and you’ll get the position of the top part of the mouth. Zero degrees starts at the right side of the circle. If you think of the top as north and bottom as south, then zero degrees is in the west direction. You could change the start angle to zero and redraw Pacman to see the location of zero degrees.
- Whether you draw a line between the start angle and the end angle using the center. If not, you draw a direct line between the start and end angles. In your case, you want to use the center because you create a mouth by making a line from the start angle to the center and then from the center to the end angle.
Build the project and run the app. You’ll see Pacman:

You can see the difference between using the center or not in drawing an arc in the picture below:

Drawing Complex Shapes: Blinky the Ghost
The ghosts that chase your Pacman have a complex shape, and Jetpack Compose doesn’t have any “ghost” shapes in its custom graphics. :] So, you’ll draw a custom ghost shape. To do this, you need to divide a ghost into a few simple shapes and draw them each using the methods you’ve learned.
You can separate a ghost into different primitive shapes:
