Make Your First Android App: Part 1/3
Learn the basics of how to make your first Android app and learn the ins and outs of working with Android Studio. By Matt Luedke.
2. Filter your manifest.
Once you’ve determined you app’s requirements, you need to let Android know about them. That way, the Google Play Store can keep non-compatible devices from purchasing your app.
This will save you a lot of frustration and poor reviews from users who might have downloaded your app, only to find a strange error awaiting them. It won’t, however, absolve you from communicating in any marketing materials the list of devices your users should expect to be able to run your app on.
The device features you need should be listed in a file. This file, available in every project, is called the Android manifest. This is an XML file that contains all the high-level info about your app. Remember when you chose API 14: Ice Cream Sandwich as the minimum SDK when you created the OMG Android project? That choice is now reflected in your Android manifest.
Find AndroidManifest.xml on the left side of the Android Studio window and double-click it to take a look. Can you spot where the code sets the SDK version?
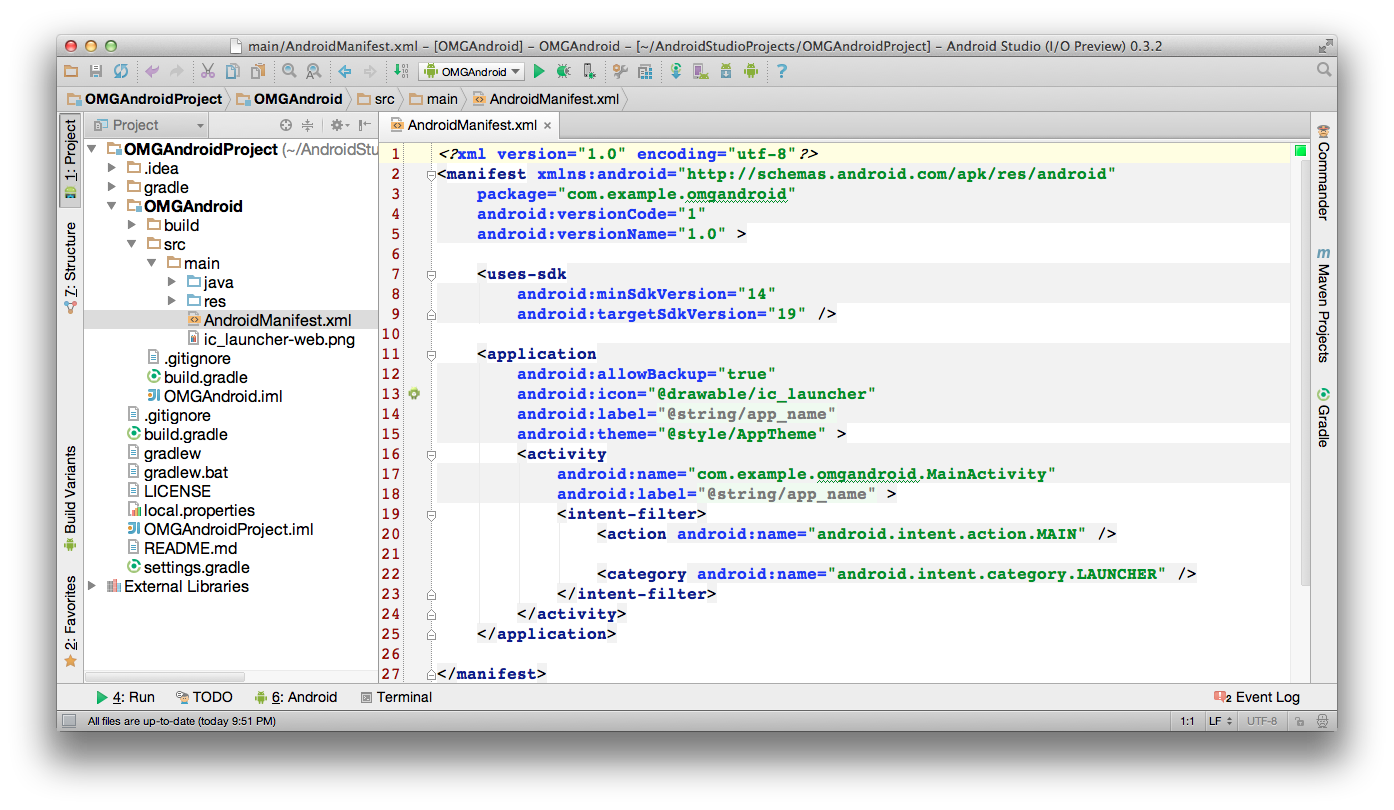
The code sets the minimum and target SDKs via the uses-sdk tag. The target SDK value just lets Android know that you’ve tested your app up to that version and everything’s shiny, not to fret. The target SDK should always be the newest possible SDK.
Just as the uses-sdk tag tells Android to filter out devices that don’t meet the minimum SDK, you can use the uses-feature tag to allow only qualified devices. For a different app — not for this demo — one would add this line to filter out devices without a camera:
<uses-feature android:name="android.hardware.camera" />
3. Check Android’s best practices.
There’s a great list of best practices to address compatibility issues that’s available on the Android site. Some of the most useful tips include:
- Use density-independent measurements in your layouts, so your specifications will scale along with the screen.
- When putting together layouts, use relative widths and heights instead of absolute values.
- Putting in several versions of the same image file, tailored to different screen densities, can also be a good idea.
The tutorial will discuss these in more detail in Part Two, when you lay out views in XML.
4. Emulate.
When you set up your emulator earlier, you saw how many options you have to work with different screen sizes. You also saw how slow the emulator can be. It is a flawed tool, but it can be useful when you have an issue under a specific hardware configuration but do not have the necessary hardware to replicate the issue.
5. Pick at least one representative device.
The most expensive option, unless you already own an Android device, is to go out and buy one. I recommend trying to find a used, unlocked device from the Google Nexus series. If your budget is tight, I’d go two generations back, which at the moment would mean a Galaxy Nexus. Of course, if you’ve got the money, you can go for the new snazzy Nexus 5!
With all the time you will save avoiding the emulator, if you continue on with Android (which I hope you will!), it will definitely be a worthwhile investment.
If you have a device, you don’t need any silly provisioning profiles. You just need to turn on USB debugging for your device. Sometimes the checkbox option is available just by going to Settings > Developer Options on your device. Check these instructions for more details.
Other times, you have to do some weird shenanigans. I can’t make this up! A direct quote from Android: “On Android 4.2 and newer, Developer options is hidden by default. To make it available, go to Settings > About phone and tap Build number seven times. Return to the previous screen to find Developer options.”
No matter if you had to do a little dance or whistle a perfect C to reveal the option, once USB debugging is on, you can go back to the Run/Debug Configurations screen and set your Target Device to USB Device. This will serve you well for the rest of the tutorial.
6. Fake other screens on your device.
If you are lucky enough to have a device and have enabled USB Debugging on it, then you have another testing advantage: you can use it to “fake” other screen sizes. Here’s how.
Open your Terminal as you did earlier, when you checked for the JDK. Then locate a tool called the Android Debug Bridge (adb). With early versions of Android Studio, it will be in the /Applications/Android\ Studio.app/sdk/platform-tools directory, or wherever you installed your copy of Android Studio, if elsewhere. Later versions of Android Studio do not come with the Android SDK bundled in and so, you might have your Android SDK installed in a totally different location.
You can use the following command at the Terminal prompt to see if adb is available in your system PATH:
adb version
The result should be something like this:

Note: If the adb version command results in an error message, your Android SDK folder is probably not in your PATH. Then you’d need to find the exact location of the Android SDK and change to the correct folder (as in the first steps in the screenshot above) before you can use any adb commands.
Note: If the adb version command results in an error message, your Android SDK folder is probably not in your PATH. Then you’d need to find the exact location of the Android SDK and change to the correct folder (as in the first steps in the screenshot above) before you can use any adb commands.
The adb version command is just an example to show you how to call adb from the command line. It can run all sorts of commands and you can get a list of available commands by typing adb help.
If not already set up, you can optionally add the Android SDK platform tools folder to your $PATH so that you can run adb from anywhere on your system. I’d suggest that you do this only if you are familiar with UNIX and feel comfortable doing this.
With your device plugged in and with its screen turned off, type the following:
adb shell wm size 640x480
And then type:
adb shell wm density 160
This represents a screen size of 640×480 pixels with 160 pixels per inch pixel density.
When you turn the device screen back on, you should see that the resolution has changed to match the new values you entered!
Feel free to turn the screen off, try another set of dimensions and turn it back on again.
To return your device to its normal settings, type:
adb shell wm size reset
And then type:
adb shell wm density reset
So you could get a full-size tablet (like a Nexus 10, perhaps) and then easily simulate all sorts of smaller devices, without having to use the emulator!
I hope that information helps you navigate the Gingerbreads, KitKats, Jelly Beans, and all the other varieties of Android candy. Now, back to the app at hand…