Make Your First Android App: Part 1/3
Learn the basics of how to make your first Android app and learn the ins and outs of working with Android Studio. By Matt Luedke.
Optional/Advanced: Moving from Eclipse
You can skip to the next section if you are new to Android development.
Android Studio is a new IDE that Google is constantly updating. If you are already involved in Android development, you are probably using Eclipse. For the transition, the Android team has put together a helpful guide on how to move from Eclipse to Studio.
The process can still be a little bumpy, even for advanced users, so the best advice I can offer on that front is to make sure that your version of Gradle is up-to-date, as well as your versions of the Android Platform Tools and Studio itself.
It’s also important to check the PATH of your Android software development kit (SDK) when switching to Studio. Otherwise, Studio may not be able to find the right Android SDK or Build Tools!
Creating OMG Android
It’s time. Let’s make your first project.
You’ll start simple. Many first programs are called “Hello World.” Let’s follow that tradition and then make a few small edits so that the app uses your name to greet you. By the end, you’ll be able to load your new app onto a device and show it to your friends!
Android Studio has a nice little step-by-step tool to help you make your project. Click New Project from the Welcome to Android Studio screen:
![]()
Studio will present you with a screen like the following:

Fill it out according to the screenshot above. Feel free to replace “example” in your Package name with something else to remove the warning at the bottom of the screen.
You can set the Project location to any location on your hard drive – you do not need to follow the screenshot for that one :]
For the SDK drop downs, pay attention to the Description section at the bottom of the dialog. It explains what each setting is for.
Set the Minimum required SDK as shown in the screenshot. This sets the minimum version of Android needed to run your app. Selecting this value for your own projects is a matter of balancing the SDK capabilities you want and the devices you want to support.
For your first app, I recommend using API version 14, which is Android 4.0 Ice Cream Sandwich. Every app will have different requirements and you may want to choose something else, depending on the situation.
For more information on API versions and their use, check the Android Dashboards, which are constantly updated.

You’ll note that a fair number of devices are still on API level 10, Gingerbread. In case you’re considering supporting Gingerbread in your project, do note that that number is shrinking and would require you to make some accommodations in your app design that often aren’t worth it.
Getting back to the dialog, Target SDK and Compile With aren’t crucial here. They should each just be the highest value possible at the time. As new SDK versions come out, this number will rise.
Click Next and you’ll see more options.

This screen creates the default app icon for you. The default values are fine for now — you’ll change it later. So click Next.
Another step in the creation process appears:
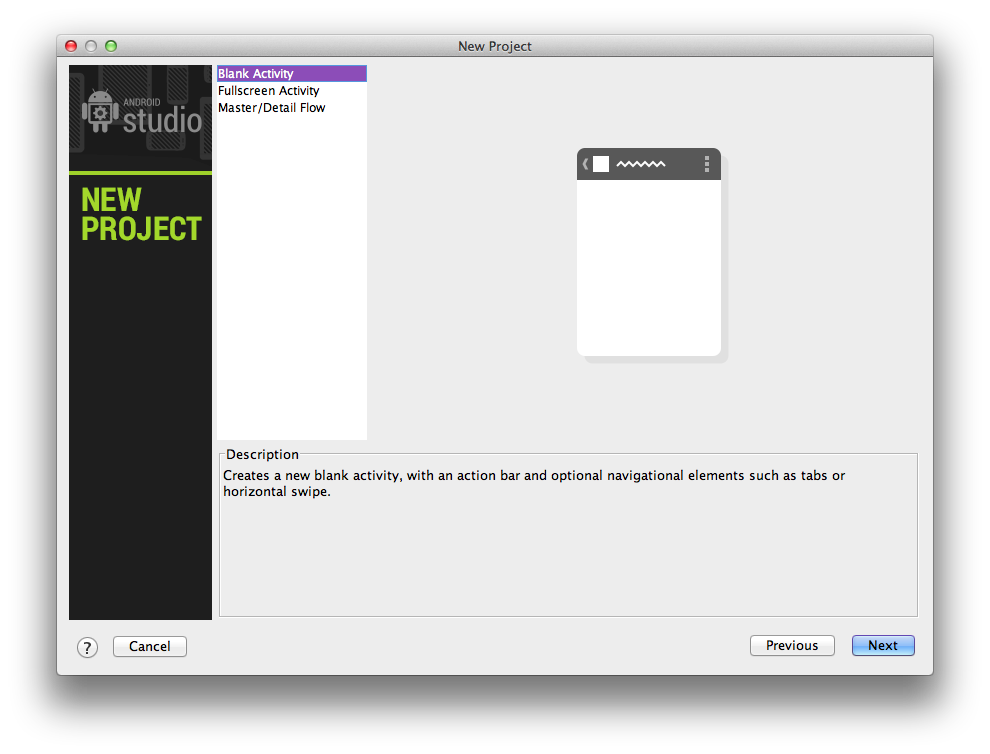
This screen offers a few different options that define how your app UI is set up. You can simply accept the default, which creates an (almost) blank screen with an action bar. The action bar is one of the reasons why you set the minimum SDK to Ice Cream Sandwich: it’s the way that modern Android apps help users easily navigate and select app options and it’s only available from API level 14 onwards. Click Next.
You are now presented with the final step in the process:
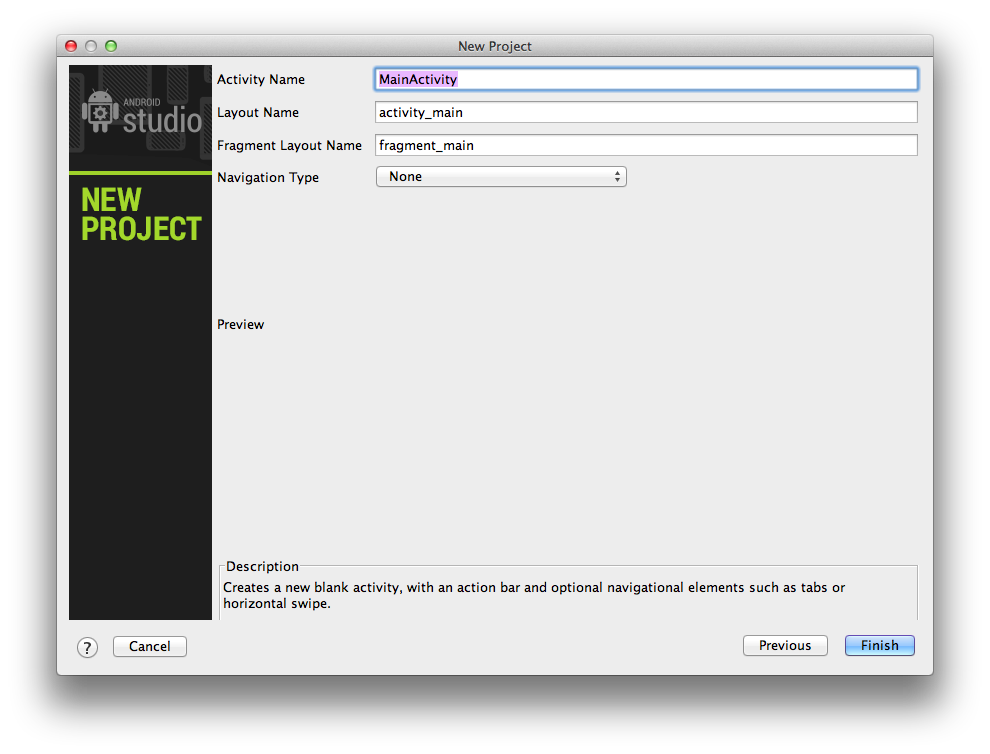
Before you click Finish, take a moment here, because you’re starting to get hints of what your program is going to look like and of terms you should know going forward.
-
Activity Name. This is the first mention you’ve seen of the word
Activity, but it certainly won’t be the last. In Android, anActivityis usually thought of as a “screen” in your app. It could be fullscreen or it could be a partial-screen pop-up. It is very flexible. If you want your user interacting with something in your app, that’s at some level happening via anActivity.Note: When Android Studio creates yourMainActivity, what it’s doing is making a subclass ofActivity. Those familiar with object-oriented programming will know what this is, but for newcomers, this basically means that yourMainActivityis going to be a customized version ofActivitythat acts just like the default one, handling things like its lifecycle and the user interface display. -
Layout Name. You’re going to define your
MainActivityin Java, but the layout of everything it will show to the user is defined in a special sort of Android XML. You will learn how to read and edit those files soon. - Fragment Layout Name. A fragment is a little like a sub-activity, and can be a useful part of your app design. I won’t go into fragments much in this tutorial—in fact, one of the things you’ll do is remove the one that the New Project wizard makes for you—but I encourage you to further investigate how to effectively use fragments after you finish this tutorial.
- Navigation Type. For now, just choose None. You won’t need any navigation for a little while, and when you do, it’ll be smarter to build it yourself, from scratch.
MainActivity, what it’s doing is making a subclass of Activity. Those familiar with object-oriented programming will know what this is, but for newcomers, this basically means that your MainActivity is going to be a customized version of Activity that acts just like the default one, handling things like its lifecycle and the user interface display.Click Finish. Android Studio takes this as its cue to go do a bunch of behind-the-scenes operations and create your project. As it shoots out some descriptions of what it’s doing from time to time, you may notice it say something like the following:

You see your project name, which is familiar. But then there is this Gradle word, and then a mention of Maven in the URL. The benefit of having a modern IDE like Android Studio is that it handles a lot for you. But as you’re just beginning to learn Studio, it’s good to know, in general, what it’s doing for you.
- Gradle is a new build tool that is easy to use, but it also contains a lot of advanced options if you investigate it further. Basically, it takes your Java code and XML layouts, and uses the latest Android build tools to create the app package file, known as an APK file. You can customize your configurations to have development or production versions of the app that behave differently, or add dependencies for third-party libraries.
- Maven is another project build tool, and it can also refer to the Maven Central repository of java libraries. It is absurdly easy to use Gradle and Maven Central in concert with Android Studio to incorporate all sorts of functionality from the Android development community. Those with an iOS background will know how cool this sort of thing can be from using the CocoaPods tool. You’ll learn more about Maven in Part Three of the tutorial.
After a while, Android Studio will finish building your project. The project is pretty empty, of course, but it still has everything it needs already set up so that it can be launched on an Android device or emulator. You will be dropped off in this spot:

You’re looking at a layout file in XML format. Before you get into any programming, let’s talk about how you’re going to get this app running. It’s time to say “Hello world!”