Unity 4.3 2D Tutorial: Scrolling, Scenes and Sounds
In this final long awaited part of the Unity 2D series, you will create the conga line as well as the win and lose states for the game. By Chris LaPollo.
Fixing the Conga Animation
To make it look like the cats are hopping along enjoying their undeath, you’ll need to change the logic slightly. Rather than calculating the target position every frame, each cat will choose a point and then hop to it over the course of one CatConga animation cycle. Then the cat will choose another point and hop to it, and so on.
Switch back to CatController.cs in MonoDevelop and add the following variable to CatController:
private Vector3 targetPosition;
This will store the cat’s current target position. The cat will move until it reaches this position, and then find a new target.
Initialize targetPosition by adding this line to JoinConga:
targetPosition = followTarget.position;
Here you set targetPosition to followTarget's current position. This ensures the cat has someplace to move as soon as it joins the conga line.
Replace the line that declares moveDirection in Update with this line:
Vector3 moveDirection = targetPosition - currentPosition;
This simply calculates moveDirection using the stored targetPosition instead of followTarget's current position.
Save the file (File\Save) and switch back to Unity.
Run again and bump into some kitty cats. Hmm. There seems to be a problem.

Whenever the zombie hits a cat, that cat heads straight to wherever the last member of the conga line happens to be at the moment of the collision. It then stays right there. Forever.
The problem is that you assign targetPosition when the cat joins the conga line, but you never update it after that! Silly you.
Switch back to CatController.cs in MonoDevelop and add the following method:
void UpdateTargetPosition()
{
  targetPosition = followTarget.position;
}
This method simply updates targetPosition with followTarget's current position. Update already looks at targetPosition, so you don't need to write any other code to send the cat toward the new location.
Save the file (File\Save) and switch back to Unity.
Recall from Part 3 of this tutorial series that Animation Clips can trigger events. You'll add an event that calls UpdateTargetPosition during the first frame of CatConga, allowing the cats to calculate their next target position before each hop.
However, you may also recall from that tutorial that you can only edit animations for a GameObject in your scene rather than a Prefab in your project. So to create the animation event, you first need to temporarily add a cat back into the scene.
Drag the cat Prefab from the Project browser to the Hierarchy.
Select cat in the Hierarchy and switch to the Animation view (Window\Animation).
Choose CatConga from the clips drop-down menu in the Animation window's control bar.
Press the Animation view’s Record button to enter recording mode and move the scrubber to frame 0, as shown below:

Click the Add Event button shown below:

Choose UpdateTargetPosition() from the Function combo box in the Edit Animation Event dialog that appears, as shown in the following image, and then close the dialog.

With that set up, your cats will update their target in sync with their animation.
Run the scene again, and now the cats hop along from point to point, as you can see in the sped-up animation below:
Difficult to see in this GIF, but trust me, these cats are hopping.
Difficult to see in this GIF, but trust me, these cats are hopping.
This works, but the cats are spread out a bit too much. Have these cats ever even been in a conga line?
Switch back to CatController.cs in MonoDevelop.
Inside JoinConga, replace the line that sets this.moveSpeed with the following code:
this.moveSpeed = moveSpeed * 2f;
Here you set the cat's speed to twice that of the zombie. This will produce a tighter conga line.
Save the file (File\Save) and switch back to Unity.
Run the scene again and you'll see the conga line looks a little friendlier, as the following sped-up sequence demonstrates:

If you'd like, experiment with different conga styles by multiplying the zombie's speed by values other than two. The larger the number, the more quickly the cat gets to its target, giving it a more jumpy feeling.
The cats are moving along nicely, except that they refuse to look where they're going. What gives? Well, that's just how Unity works and there's no way around it. Sorry about that. Tutorial done.
Aaaah. I'm just messing with you. There's an explanation for what's going on, and a solution!
Making Animations and Scripts Play Nicely Together
Why won't animated GameObjects respect the changes made to them via scripts? This is a common question, so it's worth spending some time here to work through the solution.
First, what's going on? Remember that while the cat hops along in the conga line, it's playing the CatConga Animation Clip. As you can see in the following image, CatConga adjusts the Scale property in the cat's Transform:

Important: If you remember only one thing today, make it this next paragraph.
It turns out that if an Animation Clip modifies any aspect of an object's Transform, it is actually modifying the entire Transform. The cat was pointing to the right when you set up CatConga, so CatConga now ensures that the cat continues to point to the right. Thanks, Unity?
There is a way around this problem, but it's going to require some refactoring. Basically, you need to make the cat a child of another GameObject. Then, you'll run the animations on the child, but adjust the parent's position and rotation.
You'll need to make a few changes to your code in order to keep it working after you've rearranged your objects. Here you'll go through the process in much the same way you might if you had just encountered this problem in your own project.
First, you need to move the cat Prefab into a parent object.
Create a new empty game object by choosing GameObject\Create Empty in Unity's menu. Name the new object Cat Carrier.
Inside the Hierarchy, drag cat and release it onto Cat Carrier. I bet that was the least effort you've ever expended putting a cat into its carrier. ;]
You're Hierarchy now looks like this:

When you made the enemy spawn point a child of Main Camera in Unity 4.3 2D Tutorial: Physics and Screen Sizes, you learned that the child's position defines an offset from its parent's position.
In the case of the cat, you want the child to be centered on the parent, so setting the parent's position to (X,Y,Z) essentially places the child at (X,Y,Z).
Therefore, select cat in the Hierarchy and ensure its Transform's Position is (0, 0, 0), as shown below:

Likewise, select Cat Carrier in the Hierarchy and ensure its Transform's Position is (0, 0, 0) as well. In reality, only its z position matters, but it's always nice to keep things tidy. (I swear I had no intention of making a Tidy Cat pun right there.)
In order to limit the number of changes you need to make to your code, you'll move CatController from cat to Cat Carrier.
Select cat in the Hierarchy. Inside the Inspector, click the gear icon in the upper-right of the Cat Controller (Script) component. Select Remove Component from the popup menu that appears, as shown below:

Click Apply at the top of the Inspector to ensure this change makes it back to the Prefab, as shown in the following image:

Select Cat Carrier in the Hierarchy. In the Inspector, click Add Component and choose Scripts\Cat Controller from the menu that appears, as demonstrated below:
Now drag Cat Carrier from the Hierarchy into the Project browser to turn it into a Prefab. Just like when you created the cat Prefab, Cat Carrier's name turns blue in the Hierarchy to indicate it is now an instance of a Prefab, as shown below:

Select Cat Carrier in the Hierarchy and delete it by choosing Edit\Delete from Unity's menu.
The Hierarchy now looks like this:

Inside the Project browser, you now have a cat Prefab and a Cat Carrier Prefab, which itself contains a cat Prefab, as shown below:
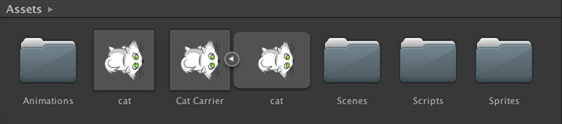
The two cat Prefabs do not refer to the same asset, and you no longer need the un-parented one. To avoid confusion later, right-click the un-parented cat Prefab and choose Delete from the popup menu, then click Delete in the confirmation dialog that appears, as shown below:

Finally, select Kitten Factory in the Hierarchy. As you can see in the following image, the Kitty Creator (Script) component's Cat Prefab field now says "Missing (GameObject)":

That's because Cat Prefab had been set to the asset you just deleted.
Change the Cat Prefab field in the Kitty Creator (Script) component to use Cat Carrier instead of cat. If you don't remember how to do that, check out the following spoiler.
[spoiler title="Need help setting the Cat Prefab field?"]To assign Cat Carrier to the Cat Prefab field, do the following:
- With Kitten Factory selected in the Hierarchy, click the small circle/target icon in the Inspector just to the right of the Kitty Creator (Script) component’s Cat Prefab field.
- Inside the Select GameObject dialog that appears, choose Cat Carrier from the Assets tab.
[/spoiler]
Run the scene. At this point, you'll see exceptions similar to the following in the Console whenever the zombie collides with a cat.
![]()
Double-click one of these exceptions inside the Console and you'll arrive at the relevant line, highlighted in MonoDevelop, as shown below:
The code above was rearranged slightly to better fit the screenshot. Don't be alarmed.

The code above was rearranged slightly to better fit the screenshot. Don't be alarmed.
These exceptions occur because ZombieController looks for a CatController component on the GameObject with which it collides, but that component now resides on the cat's parent, Cat Carrier, rather than the cat itself.
Replace the line highlighted in the image above with the following:
other.transform.parent.GetComponent<CatController>().JoinConga( followTarget, moveSpeed, turnSpeed );
You now use the cat's Transform to access its parent, which is the Cat Carrier. From there, the rest of the line remains unchanged from what you already had.
JoinConga method that simply passes its parameters to JoinConga in its parent's CatController component. It really only depends on how you like to organize your code and how much you want different objects to know about each other.Save the file (File\Save) and switch back to Unity.
Run the scene. Once again, you see exceptions in the Console when the zombie collides with a cat. This time they complain of a missing component, like this:
![]()
Double-click one of these exceptions in the Console to arrive at the relevant line in MonoDevelop. As you can see, this time the problem is in CatController.cs:

Inside JoinConga, you attempt to access the object's Animator component. This no longer works because you moved the script onto Cat Carrier but the Animator is still attached to cat.
You don't want to move the Animator, so instead you'll change the code.
Inside CatController.cs, find the following two lines of code in JoinConga:
collider2D.enabled = false;
GetComponent<Animator>().SetBool( "InConga", true );
Replace those lines with the following code:
Transform cat = transform.GetChild(0);
cat.collider2D.enabled = false;
cat.GetComponent<Animator>().SetBool( "InConga", true );
This code simply uses Cat Carrier's Transform to find its first child – indexed from zero. You know Cat Carrier only has one child, which is cat, so this finds the cat. The code then accesses the cat's Collider2D and Animator components in otherwise the same way you did before.
However, that solution relies on you knowing the name of the child you need. Better, but maybe not ideal.
The best solution might be to avoid looking up the object at runtime altogether. To do that, you could add a Transform variable to CatController and assign the cat Prefab to it in Unity's editor. Such choice!
GetChild(0);:
Transform cat = transform.FindChild("cat");
However, that solution relies on you knowing the name of the child you need. Better, but maybe not ideal.
The best solution might be to avoid looking up the object at runtime altogether. To do that, you could add a Transform variable to CatController and assign the cat Prefab to it in Unity's editor. Such choice!
Transform cat = transform.FindChild("cat");
Save the file (File\Save) and switch back to Unity.
Run the scene and now when the zombie collides with a cat...you get this error:
![]()
This problem is in your Animation Clip, CatConga. Earlier, you added an event at frame zero that would call the cat's UpdateTargetPosition. However, you've moved CatController.cs onto a different object, so this error is telling you that you're trying to call a method that doesn't exist on the target object.
Select Cat Carrier in the Project browser and then open the Animation view (Window\Animation). What's this? There are no Animation Clips!

This actually makes sense. Remember, you added the Animation Clips to cat, not Cat Carrier. In fact, the whole reason you added Cat Carrier was because Unity's animation system was interfering with your GameObject's Transform.
Expand Cat Carrier in the Project browser and select cat, then choose CatConga from the clip drop-down menu in the Animation view's control bar. Mouse-over the animation event marker in the timeline and you'll see it says Error!:

Double click the animation event marker and...nothing happens. Pop quiz! Why? Check the spoiler below for the answer.
[spoiler title=""]Remember, you cannot modify Animation Clips on a Prefab. Double-clicking the event marker should bring up the Edit Animation Event dialog, which you can't access if you can't edit the object.
To correct the situation, drag Cat Carrier from the Project browser into the Hierarchy. Then select its child, cat, in the Hierarchy.
[/spoiler]
Once you've corrected the situation, double click the animation event marker again and the following dialog appears, indicating that UpdateTargetPosition is not supported:
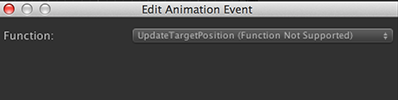
Part 4 of this tutorial series alluded to this problem. Animation Events can only access methods on scripts attached to the object associated with the clip. That means you'll need to add a new script to cat.
Select cat in the Hierarchy and add a new C# script named CatUpdater.cs.
Open CatUpdater.cs in MonoDevelop and replace its contents with the following code:
using UnityEngine;

public class CatUpdater : MonoBehaviour {

  private CatController catController;

  // Use this for initialization
  void Start () {
    catController = transform.parent.GetComponent<CatController>();
  }

  void UpdateTargetPosition()
  {
    catController.UpdateTargetPosition();
  }
}
This script includes a method named UpdateTargetPosition that simply calls the identically named method on the CatController component in the cat's parent. To avoid repeatedly getting the CatController component, the script finds the component in Start and stores a reference to it in catController.
Save the file (File\Save). However, instead of switching back to Unity, open CatController.cs in MonoDevelop.
You called CatController's UpdateTargetPosition from CatUpdater, but UpdateTargetPosition is not a public method. If you went back to Unity now you'd get an error claiming the method is 'inaccessible due to its protection level'.
Inside CatController.cs, add public to the beginning of UpdateTargetPosition's declaration, as shown below:
public void UpdateTargetPosition()
Save the file (File\Save) and switch back to Unity.
Before moving on, you should verify that your animation events are set up correctly. Select cat in the Project browser and choose CatConga from the clip drop-down menu in the Animation view's control bar. Mouse-over the animation event marker in the timeline and you'll see it says UpdateTargetPosition():

With cat still selected in the Hierarchy, click Apply in the Inspector to make sure the Prefab includes the script you just added. Then delete Cat Carrier from the scene by right-clicking it in the Hierarchy and choosing Delete from the popup menu.
Run the scene and you, the zombie and the cats can all finally have a dance party.
One last thing: now that your cat lives in a carrier, your Hierarchy starts to fill up with Cat Carriers. Weren't these things supposed to remove themselves when their OnBecameInvisible methods were called?
Well, when CatController.cs used to live on the cat object, it worked fine. But now that you've moved that script to the Cat Carrier, OnBecameInvisible never gets called! That's because that method won't be called for objects that do not have a renderer, and Cat Carrier is just such an object.
To fix this, open CatUpdater.cs in MonoDevelop and add the following method to CatUpdater:
void OnBecameInvisible() {
  catController.OnBecameInvisible();
}
This simply calls OnBecameInvisible in CatController.cs, which is important because that script has some additional logic to make sure the cats aren't removed when they are part of the conga line.
Save that file, then open CatController.cs in MonoDevelop and make OnBecameInvisible public, like this:
public void OnBecameInvisible()
If you didn't make this method public, your other script would not have been able to call it.
Save that file and next time you run, your cats will clean up after themselves. When was the last time you heard of a cat doing that?
Now, the zombie can collect cats in his conga line, but the old ladies have no way to defend against this undead uprising. Time to give those ladies a fighting chance!