Unity 4.3 2D Tutorial: Scrolling, Scenes and Sounds
In this final long awaited part of the Unity 2D series, you will create the conga line as well as the win and lose states for the game. By Chris LaPollo.
Conga Time!
If you've been following along with this tutorial series since Part 1, you've probably started wondering why the heck this game is even called Zombie Conga.

It is time.
When the zombie collides with a cat, you'll add that cat to the conga line. However, you'll want to handle enemy collisions differently. In order to tell the difference, you'll assign specific tags to each of them.
Using Tags to Identify Objects
Unity allows you to assign a string to any GameObject, called a tag. Newly created projects include a few default tags, like MainCamera and Player, but you are free to add any tags that you'd like.
In Zombie Conga, you could get away with only one tag, because there are only two types of objects with which the zombie can collide. For example, you could add a tag to the cats and then assume if the zombie collides with an object that is missing that tag, it must be an enemy. However, shortcuts like that are a good way to cause bugs when you later decide to change something about your game.
To make your code easier to understand and more maintainable, you'll create two tags: cat and enemy.
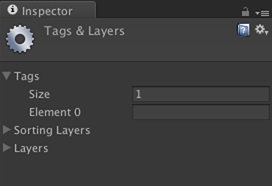
Choose Edit\Project Settings\Tags and Layers from Unity's menu. The Inspector now shows the Tags & Layers editor. If it's not already open, expand the Tags list by clicking the triangle to the left of its name, as shown in the following image:
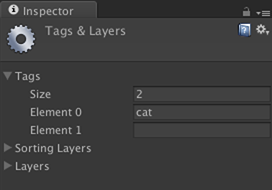
Type cat in the field labeled Element 0. As soon as you start typing, Unity adds a new tag field labeled Element 1. Your Inspector now looks like this:
Select cat in the Project browser and choose cat from the combo box labeled Tag in the Inspector, like this:

When you were adding the cat tag, you could have added the enemy tag, too. However, I wanted to show you another way to create a tag.
Many times you'll decide you want to tag an object, only to check the Tag combo box in the Inspector and realize the tag you want doesn't exist yet. Rather than go through Unity's Editor menu, you can open the Tags and Layers editor directly from the Tags combo box.
Select enemy in the Hierarchy. In the Inspector, choose Add Tag... from the Tag combo box, as shown below:

Once again, the Inspector now shows the Tags & Layers editor. Inside the Tags section, Type enemy in the field labeled Element 1. The Inspector now looks like the image below:

With the new tag created, select enemy in the Hierarchy and set its Tag to enemy, as shown below:

Now that your objects are tagged, you can identify them in your scripts. To see how, open ZombieController.cs in MonoDevelop and replace the contents of OnTriggerEnter2D with the following code:
if(other.CompareTag("cat")) {
  Debug.Log ("Oops. Stepped on a cat.");
}
else if (other.CompareTag("enemy")) {
  Debug.Log ("Pardon me, ma'am.");
}
You call CompareTag to check if a particular GameObject has the given tag. Only GameObjects can have tags, but calling this method on a Component – like you're doing here – tests the tag on the Component's GameObject.
Save the file (File\Save) and switch back to Unity.
Run the scene and you should see the appropriate messages appear in the Console whenever the zombie touches a cat or an enemy.

Now that you know your collisions are set up properly, it's time to actually make them do something.
Triggering Animations From Scripts
Remember all those animations you made in Parts two and three of this series? The cat starts out bobbing happily, like this:

When the zombie collides with a cat, you want the cat to turn into a zombie cat. The following image shows how you accomplished this in the earlier tutorial by setting the cat's InConga parameter to true in the Animator window.

Now you want to do the same thing, but from within code. To do that, switch back to CatController.cs in MonoDevelop and add the following method to CatController:
public void JoinConga() {
  collider2D.enabled = false;
  GetComponent<Animator>().SetBool( "InConga", true );
}
The first line disables the cat's collider. This will keep Unity from sending more than one collision event when the zombie collides with a cat. (Later you'll solve this problem in a different way for collisions with the enemy.)
The second line sets InConga to true on the cat's Animator Component. By doing so, you trigger a state transition from the CatWiggle Animation Clip to the CatZombify Animation Clip. You set up this transition using the Animator window in Part 3 of this series.
By the way, notice that you declared JoinConga as public. This lets you call it from other scripts, which is what you'll do right now.
Save CatController.cs (File\Save) and switch to ZombieController.cs, still in MonoDevelop.
Inside ZombieController, find the following line in OnTriggerEnter2D:
Debug.Log ("Oops. Stepped on a cat.");
And replace it with this line:
other.GetComponent<CatController>().JoinConga();
Now whenever the zombie collides with a cat, it calls JoinConga on the cat's CatController component.
Save the file (File\Save) and switch back to Unity.
Play the scene and as the zombie walks into the cats, they turn green and start hopping in place. So far, so good.

Nobody wants a bunch of zombie cats scattered across a beach. What you want is for them to join your zombie's eternal dance, and for that, you need to teach them how to play follow the leader.
Conga Motion
You'll use a List to keep track of which cats are in the conga line.
Go back to ZombieController.cs in MonoDevelop.
First, add the following at the top of the file with the other using statements.
using System.Collections.Generic;
This using statement is similar to an #import statement in Objective-C. It simply gives this script access to the specified namespace and the types it contains. In this case, you need access to the Generic namespace to declare a List with a specific data type.
Add the following private variable to ZombieController:
private List<Transform> congaLine = new List<Transform>();
congaLine will store Transform objects for the cats in the conga line. You're storing Transforms instead of GameObjects because you'll be dealing mostly with the cat's positions, and if you ever need access to anything else you can get to any part of a GameObject from its Transform, anyway.
Each time the zombie touches a cat, you'll append the cat's Transform to congaLine. This means that the first Transform in congaLine will represent the cat right behind the zombie, the second Transform in congaLine will represent the cat behind the first, and so forth.
To add cats to the conga line, add the following line to OnTriggerEnter2D in ZombieController, just after the line that calls JoinConga:
congaLine.Add( other.transform );
This line simply adds the cat's Transform to congaLine.
If you were to run the scene right now, you wouldn't see any difference from before. You're maintaining a list of cats, but you haven't written any code to move the cats from their initial positions when they join the conga line. As conga lines go, this one isn't very festive.
To fix this, open CatController.cs in MonoDevelop.
The code for moving the cats will be similar to what you wrote to move the zombie in
Part 1. Start out by adding the following instance variables to CatController:
private Transform followTarget;
private float moveSpeed;
private float turnSpeed;
private bool isZombie;
You'll use moveSpeed and turnSpeed to control the cat's rate of motion, the same way you did for the zombie. You only want the cat to move after it becomes a zombie, so you'll keep track of that with isZombie. Finally followTarget will hold a reference to the character (cat or zombie) in front of this cat in the conga line. You'll use this to calculate a position toward which to move.
The above variables are all private, so you may be wondering how you'll set them. For the conga line to move convincingly, you'll base the movement of the cats on the zombie's movement and turn speeds. As such, you're going to have the zombie pass this information to each cat during the zombification process.
Inside CatController.cs, replace your implementation of JoinConga with the following code:
//1
public void JoinConga( Transform followTarget, float moveSpeed, float turnSpeed ) {

  //2
  this.followTarget = followTarget;
  this.moveSpeed = moveSpeed;
  this.turnSpeed = turnSpeed;

  //3
  isZombie = true;

  //4
  collider2D.enabled = false;
  GetComponent<Animator>().SetBool( "InConga", true );
}
Here's a break down of this new version of JoinConga:
- The method signature now requires a target Transform, a movement speed and a turn speed. Later you'll change
ZombieControllerto callJoinCongawith the appropriate values. - These lines store the values passed into the method. Notice the use of
this.to differentiate between the cat's variables and the method's parameters of the same names. - This flags the cat as a zombie. You'll see why this is important soon.
- The last two lines are the same ones you had in the previous version of
JoinConga.
Now add the following implementation of Update to CatController:
void Update () {
  //1
  if(isZombie)
  {
    //2
    Vector3 currentPosition = transform.position;
    Vector3 moveDirection = followTarget.position - currentPosition;

    //3
    float targetAngle =
      Mathf.Atan2(moveDirection.y, moveDirection.x) * Mathf.Rad2Deg;
    transform.rotation = Quaternion.Slerp( transform.rotation,
                                           Quaternion.Euler(0, 0, targetAngle),
                                           turnSpeed * Time.deltaTime );

    //4
    float distanceToTarget = moveDirection.magnitude;
    if (distanceToTarget > 0)
    {
      //5
      if ( distanceToTarget > moveSpeed )
        distanceToTarget = moveSpeed;

      //6
      moveDirection.Normalize();
      Vector3 target = moveDirection * distanceToTarget + currentPosition;
      transform.position =
        Vector3.Lerp(currentPosition, target, moveSpeed * Time.deltaTime);
    }
  }
}
That may look a bit complicated, but most of it is actually the same as what you wrote to move the zombie. Here's what it does:
- You don't want the cat to move until it joins the conga line, but Unity calls
Updateduring every frame that the cat is active in the scene. This check ensures the cat doesn't move until it's supposed to. - If the cat is in the conga line, this method gets the cat's current position and calculates the vector from its current position to
followTarget's position. - This code rotates the cat to point in the direction its moving. This is the same code you wrote in ZombieController.cs back in Part 1 of this series.
- It then checks
moveDirection'smagnitude– which is the vector's length, for the non-mathies out there – and checks to see if the cat is not currently at the target. - This check makes sure that the cat doesn't move more than
moveSpeedper second. -
Finally, it moves the cat the appropriate distance based on
Time.deltaTime. This is basically the same code you wrote in ZombieController.cs in Part 1 of this series.
You're done with CatController.cs for now, so save the file (File\Save).
Because you changed JoinConga's method signature, you need to change the line that calls this method in ZombieController. Switch back to ZombieController.cs in MonoDevelop.
Inside OnTriggerEnter2D, replace the call to JoinConga with the following code:
Transform followTarget = congaLine.Count == 0 ? transform : congaLine[congaLine.Count-1];
other.GetComponent<CatController>().JoinConga( followTarget, moveSpeed, turnSpeed );
That first, tricky-looking line figures out what object should be in front of this cat in the conga line. If congaLine is empty, it assigns the zombie's Transform to followTarget. Otherwise, it uses the last item stored in congaLine.
The next line calls JoinConga, this time passing to it the target to follow along with the zombie's movement and turn speeds.
Save the file (File\Save) and switch back to Unity.
Run the scene and your conga line is finally in place. Sort of. But not really.

When you played the scene, you may have noted the following problems:
- If any cat in the conga line goes off screen, it gets removed and then Unity starts printing the following exception to the console:

- The motion is too perfect. It’s smooth like a snake, but the animation you defined in CatConga was meant to resemble happy hopping zombie cats, not slippery snake cats. You do know what happy hopping zombie cats look like, don't you?
- The cats always point straight to the right, no matter what direction they're moving. Zombie cats are one thing, but that's downright spooky.
These issues happen to be listed in the order of effort required to fix them. The first fix is simple, so start with that.
Go back to CatController.cs inside MonoDevelop.
You already added isZombie to keep track of when the cat is a zombie. Add the following line at the beginning of OnBecameInvisible to avoid deleting the cat while it's getting its groove on:
if ( !isZombie )
Save the file (File\Save) and switch back to Unity.
Run the scene again, and now cats in the conga line can safely go off screen and later dance right back into view.
