Unity 4.3 2D Tutorial: Scrolling, Scenes and Sounds
In this final long awaited part of the Unity 2D series, you will create the conga line as well as the win and lose states for the game. By Chris LaPollo.
Spawning Cats
You'll want new cats to keep appearing on the beach until the player wins or loses the game. To handle this, you'll create a new script and add it to an empty GameObject.
Create a new empty game object by choosing GameObject\Create Empty in Unity's menu. Name the new object Kitten Factory.
Create a new C# script called KittyCreator and attach it to Kitten Factory. No more hints for creating new scripts – you can do it! (But if you can't do it, look back through the earlier parts of the tutorial.)
Open KittyCreator.cs in MonoDevelop and replace its contents with the following code:
using UnityEngine;

public class KittyCreator: MonoBehaviour {
  //1
  public float minSpawnTime = 0.75f;
  public float maxSpawnTime = 2f;

  //2
  void Start () {
    Invoke("SpawnCat",minSpawnTime);
  }

  //3
  void SpawnCat()
  {
    Debug.Log("TODO: Birth a cat at " + Time.timeSinceLevelLoad);
    Invoke("SpawnCat", Random.Range(minSpawnTime, maxSpawnTime));
  }
}
This code doesn't actually spawn any cats, it simply lays the groundwork to do so. Here's what it does:
-
minSpawnTimeandmaxSpawnTimespecify how often new cats appear. After a cat spawns,KittyCreatorwill wait at leastminSpawnTimeseconds and at mostmaxSpawnTimeseconds before spawning another cat. You declared them public so you can tweak the spawn rate in the editor later if you'd like. - Unity's
Invokemethod lets you call another method after a specified delay.StartcallsInvoke, instructing it to waitminSpawnTimeseconds and then to callSpawnCat. This adds a brief period after the scene starts during which no cats spawn. - For now,
SpawnCatsimply logs a message letting you know when it executes and then usesInvoketo schedule another call toSpawnCat. It waits a random amount of time betweenminSpawnTimeandmaxSpawnTime, which keeps cats from appearing at predictable intervals.
Save the file (File\Save) and switch back to Unity.
Run the scene and you'll start seeing logs like the following appear in the Console:
![]()
Now that you have your Kitten Factory working on schedule, you need to make it spit out some cats. For that, you'll be using one of Unity's most powerful features: Prefabs.
Prefabs
Prefabs reside in your Project rather than in your scene's Hierarchy. You use a Prefab as a template to create objects in your scene.
However, these instances are not just copies of the original Prefab. Instead, the Prefab defines an object's default values, and then you are free to modify any part of a specific instance in your scene without affecting any other objects created from the same Prefab.
In Zombie Conga, you want to create a cat Prefab and have Kitten Factory create instances of that Prefab at different locations throughout the scene. But don't you already have a cat object in your scene, properly configured with all the animations, physics and scripts you've set up so far? It sure would be annoying if you had to redo that work to make a Prefab. Fortunately, you don't have to!
To turn it into a Prefab, simply drag cat from the Hierarchy into the Project browser. You'll see a new cat Prefab object created in the Project browser, but you should also see the word cat turn blue in the Hierarchy, as shown below:

While working on your own games, remember that objects with blue names in the Hierarchy are instances of Prefabs. When you select one, you will see the following buttons in the Inspector:
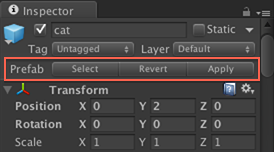
These buttons are useful while editing instances of a Prefab. They allow you to do the following:
Apply: This button takes any local changes you've made to this instance and sets those values back onto the Prefab, making them the default for all Prefab instances. Any existing instances of the Prefab that have not set local overrides for these values will automatically have their values changed to the new defaults.
Important: Clicking Apply affects every GameObject that shares this object's Prefab in every scene of your project, not just the current scene.
- Select: This button selects in the Project browser the Prefab object used to create this instance.
- Revert: This button replaces any local changes you've made to this instance with the default values from the Prefab.
-
Apply: This button takes any local changes you've made to this instance and sets those values back onto the Prefab, making them the default for all Prefab instances. Any existing instances of the Prefab that have not set local overrides for these values will automatically have their values changed to the new defaults.
Important: Clicking Apply affects every GameObject that shares this object's Prefab in every scene of your project, not just the current scene.
Now you need to get the Kitten Factory to stop polluting your Console with words and start polluting your beach with cats!
Go back to KittyCreator.cs in MonoDevelop and add the following variable to KittyCreator:
public GameObject catPrefab;
You'll assign your cat Prefab to catPrefab in Unity's editor and then KittyCreator will use it as a template when creating new cats. But before you do that, replace the Debug.Log line in SpawnCat with the following code:
// 1
Camera camera = Camera.main;
Vector3 cameraPos = camera.transform.position;
float xMax = camera.aspect * camera.orthographicSize;
float xRange = camera.aspect * camera.orthographicSize * 1.75f;
float yMax = camera.orthographicSize - 0.5f;

// 2
Vector3 catPos =
  new Vector3(cameraPos.x + Random.Range(xMax - xRange, xMax),
              Random.Range(-yMax, yMax),
              catPrefab.transform.position.z);

// 3
Instantiate(catPrefab, catPos, Quaternion.identity);
The above code chooses a random position that's visible to the camera and places a new cat there. Specifically:
You call Instantiate to create an instance of catPrefab placed in the scene at the position defined by catPos. You pass Quaternion.identity as the new object's rotation because you don't want the new object to be rotated at all. Instead, the cat's rotation will be set by the spawn animation you made in Part 2 of this tutorial series.
- The camera's current position and size define the visible part of the scene. You use this information to calculate the x and y limits within which you want to place a new cat. This calculation does not place cats too close to the top, bottom, or far left edges of the screen. See the image that follows to help visualize the math involved.
- You create a new position using
catPrefab's z position (so all cats appear at the same z-depth), and random values for x and y. These random values are chosen within the area shown in the image that follows, which is slightly smaller than the visible area of the scene. -
You call
Instantiateto create an instance ofcatPrefabplaced in the scene at the position defined bycatPos. You passQuaternion.identityas the new object's rotation because you don't want the new object to be rotated at all. Instead, the cat's rotation will be set by the spawn animation you made in Part 2 of this tutorial series.Note: This makes all cats face the same direction when they spawn. If you wanted to mix it up, you could pass toInstantiatea random rotation around the z axis instead of using the identity matrix. However, be advised that this won't actually work until after you've made some changes you'll read about later in this tutorial.
Instantiate a random rotation around the z axis instead of using the identity matrix. However, be advised that this won't actually work until after you've made some changes you'll read about later in this tutorial. Cat spawn area calculation.

Cat spawn area calculation.
Save the file (File\Save) and switch back to Unity.
You no longer need the cat in the scene because your factory will create them at runtime. Right-click cat in the Hierarchy and choose Delete from the popup menu that appears, as shown below:

Select Kitten Factory in the Hierarchy. Inside the Inspector, click the small circle/target icon on the right of the Kitty Creator (Script) component's Cat Prefab field, shown below:

Inside the Select GameObject dialog that appears, choose cat from the Assets tab, as shown in the following image:

Kitten Factory now looks like this in the Inspector:

Don't worry if your Kitten Factory doesn't have the same Transform values as those shown here. Kitten Factory only exists to hold the Kitty Creator script component. It has no visual component and as such, it's Transform values are meaningless.
Run the scene again and watch as everywhere you look, the very beach itself appears to be coughing up adorable fur balls.
Photo of spawning cats, because the GIFs weren't cooperating.
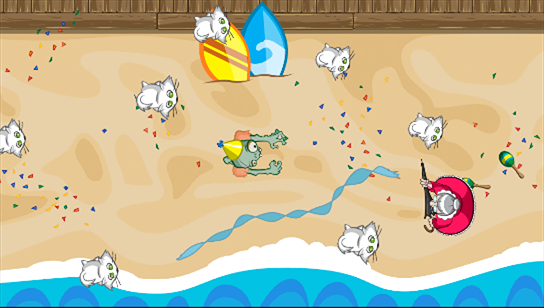
Photo of spawning cats, because the GIFs weren't cooperating.
However, there's a problem. As you play, notice how a massive list of cats slowly builds up in the Hierarchy, shown below:

This won't do. If your game lasts long enough, this sort of logic will bring it crashing to a halt. You'll need to remove cats as they go off screen.
Open CatController.cs in MonoDevelop and add the following method to CatController:
void OnBecameInvisible() {
  Destroy( gameObject );
}
This simply calls Destroy to destroy gameObject. All MonoBehaviour scripts, such as CatController, have access to gameObject, which points to the GameObject that holds the script. Although this method doesn't show it, it is safe to execute other code in a method after calling Destroy because Unity doesn't actually destroy the object right away.
To be honest, I'm not sure if there is any difference. Unity's documentation includes Destroy but not DestroyObject, but they both seem to have the same effect. I probably just type whichever one I happen to type and since the compiler doesn't complain, I've never thought anything of it.
If you know of a difference or why one should be preferred over the other, please mention it in the Comments section. Thanks!
GrantCatTheSweetReleaseOfDeath, the other method in CatController, uses DestroyObject for the same purpose as you are now using Destroy. What gives?
To be honest, I'm not sure if there is any difference. Unity's documentation includes Destroy but not DestroyObject, but they both seem to have the same effect. I probably just type whichever one I happen to type and since the compiler doesn't complain, I've never thought anything of it.
If you know of a difference or why one should be preferred over the other, please mention it in the Comments section. Thanks!
Save the file (File\Save) and switch back to Unity.
Run the scene again. As was mentioned in Part 3, OnBecameInvisible only gets called once an object is out of sight of all cameras, so be sure the Scene view is not visible while testing this bit.
Now, no matter how long you play, the Hierarchy never contains more than a few cats. Specifically, it contains the same number of objects as there are cats visible in the scene, as shown below:
After running for a minute, Hierarchy still only contains the visible cats
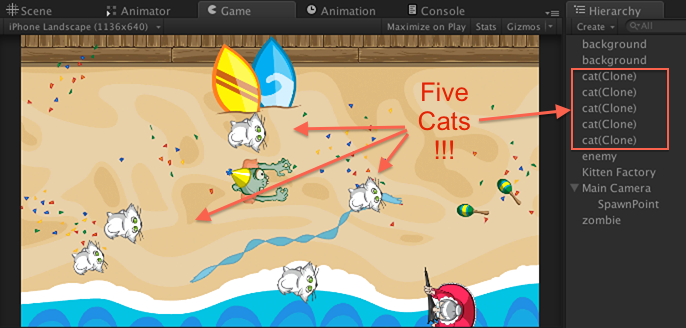
After running for a minute, Hierarchy still only contains the visible cats
Note: Creating and destroying objects is fairly expensive in Unity's runtime environment. If you're making a game even only slightly more complicated than Zombie Conga, it would probably be worthwhile to reuse objects when possible.
For example, rather than destroying a cat when it exits the screen, you could reuse that object the next time you needed to spawn a new cat. You already do this for the enemy, but for the cats you would need to handle keeping a list of reusable objects and remembering to reset the cat to an initial animation state prior to spawning it.
This technique is known as object pooling and you can find out a bit more about it in this training session from Unity.
Ok, you've got a beach filling up with cats and a zombie walking around looking to party. I think you know what time it is.