Open-Source Collaboration Using Git and GitHub
In this tutorial, you will learn how to collaborate on open-source projects through Git and GitHub. By Kelvin Lau.
Cloning
In your fork of the DadJokes repo, click on Clone or download, and you should be presented with a popover dialog:
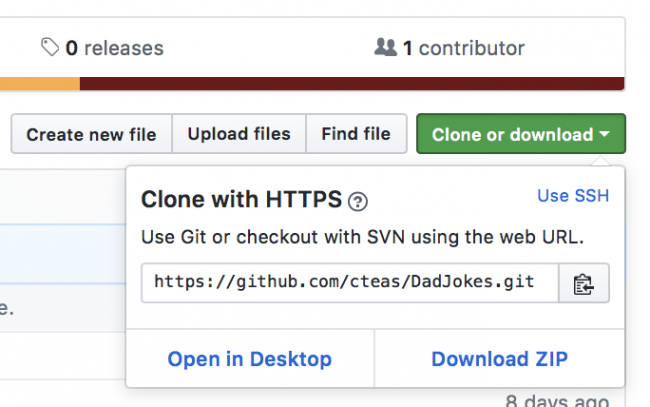
Make sure you’re cloning with HTTPS, and copy the link. Next, open Terminal and execute the following:
cd ~/Desktop
git clone <your copied HTTPS url here>
This will clone the repository in your Desktop directory.
Exploring the Project
After cloning the repository, you should see a new folder named DadJokes on your desktop. Navigate into the project folder and open DadJokes.xcodeproj in Xcode. Build and run the app on an iPhone simulator, and you should see the following:

Depending on when you read this article, there may be a few new jokes added by other contributors. The more the merrier, I say!
Making Contributions
Bring up Terminal again. Execute the following commands in Terminal:
cd ~/Desktop/DadJokes
git checkout -b feature/my-new-joke
This creates a new branch for the new modifications you’ll be making to the source code. Next, open JokeStore.swift and find the following line:
private var storage: [Joke] = [
  // ...
]
storage is a hard-coded array of Joke structures. The table view controller from earlier lists all the jokes contained in this array. To contribute to this project, you’ll need to add a joke (or a few) in this array.
Add a new Joke at the front of storage:
private var storage: [Joke] = [
  // add new joke here (feel free to add your own)
  Joke(description: "You should be careful with functions that return a value...",
    punchline: "In fact, I would just a void them."),

  // ... other jokes
]
Build and run. You should see the new joke at the top of the table view:

Pushing to Your Remote
A remote refers to the location of the repository on GitHub. Now you’ve made some changes to your personal copy project, it’s time to push the changes to your remote. Type the following in Terminal:
git add .
git commit -m "Added new joke"
git push --set-upstream origin feature/my-new-joke
You may have to enter your GitHub login and password upon pushing. Once you’ve done that, your changes will have been pushed back up to GitHub. Your personal copy is now updated with the new joke, but the original repo won’t be able to see the changes. To make them visible, you’ll have to submit a pull request.
Pull Requests
A pull request is proposed change to a project in a GitHub repository. The community can view this pull request to discuss the change and any potential modifications.
Head back to the original DadJoke repository and click on New pull request:

This brings you to the pull request creation page:

Your new joke is in your personal fork of the repo, so you’ll need to click on compare across forks. This brings up the following UI:
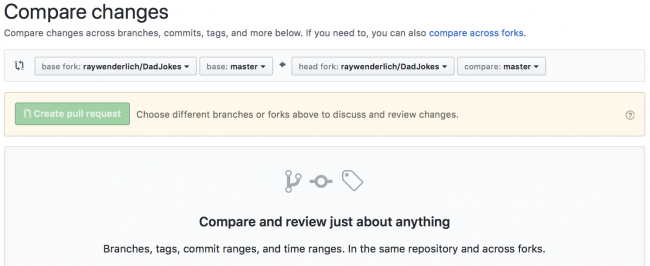
The left options represent the base fork and branch. Since you want to create a pull request for the original repository and the master branch, you’ll leave those two options alone. You need to modify the two options on the right side. Update them to match your own fork and your new branch. Here’s an example of what it would look like:

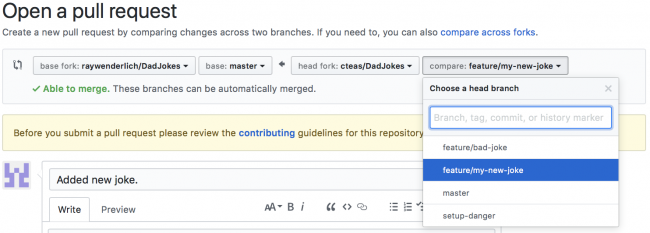
With that, you’re presented with a similar UI to the issue creations page:

This is the final step before publicly announcing your proposal to the community. The bottom section of the page shows a summary of the changes you’ve proposed for this pull request.
Change the title of the pull request to <your name>’s Joke (substituting your own name into the angle brackets), and add the following for the body:
This addresses issue #1. Adds a dad joke.
#1 creates a reference to the issue or pull request with that number. In this case, #1 refers to the issue asking for more jokes. When you create a PR, strive to be concise and reference related discussions. This gives more context to your PR and makes it easier for maintainers to review and give feedback.
Click on Create pull request to publish it to the public.
Reviewing a PR
GitHub has a great tool for streamlining the review process. This tool can be accessed by clicking on the Files changed tab of a particular pull request:
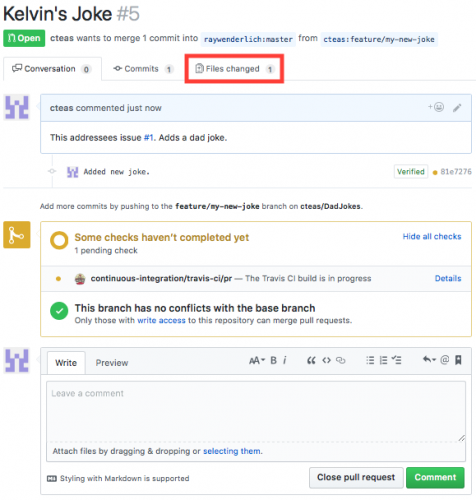
The “Files changed” tab lists all the changes being proposed by a particular pull request. Additions are highlighted as green, while removals are highlighted as red.
Hover over the green line where you added your joke. You should see a blue “+” button to the left of the line. Click on it:

When doing reviews, you’ll be going through each change and giving comments if necessary. Write LOL, my sides :+1: in the text view and click Start a review. Comments created this way will be batched until you submit the review, so don’t be afraid to take a break for bigger PRs.
Since this one’s fairly small, you’ll have to be content with just that one comment. Click Finish your review and leave a summary of your findings:

Normally you wouldn’t review your own contribution, but for the sake of this tutorial, you’ve done just that. Head over to the other PRs and apply the same procedure to give your opinions!
Where to Go From Here?
I hope you’ve enjoyed this tutorial on open-source contributions. There are lots of projects out there, and you’re now equipped to contribute to them. There are related tutorials of interest if you want to know more:
- The Swift Algorithm Club is one of the most popular Swift repositories on GitHub. Check out the introductory article to learn more about contributing to it.
- The beginning git video course is a great way to learn more about git version control. If you want to be an open-source contributor, having a thorough knowledge of git is highly beneficial.
If you have any questions or comments, please join the discussion below!