Introduction to the Sprite Kit Scene Editor
Do you dislike creating your game’s levels programmatically? Learn how to do it using SpriteKit’s Scene Editor here! By Morten Faarkrog.
Animations and Action-References
Wouldn’t it be cool if you could also add actions to nodes without having to write it all in code? Well, in Xcode 7 and later, you can! Apple added the Action Editor View so you can now drag and drop actions from the Object Library.
To open the Action Editor View, open GameScene.sks and find the arrow pointing upwards at the bottom of the Xcode window:
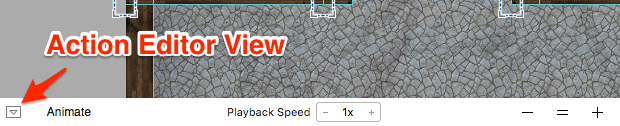
The action editor displays all the nodes in the scene and a timeline with rows that correspond to each node. If you’ve ever worked with animation or video software, you might be familiar with this user interface. You’re going to use the action editor to create a nifty zoom-out effect when you first launch the game.
Grab a Scale Action object from the Object Library and drop it onto the timeline track for the camera node. Next, locate the Attributes Inspector for the action up in the upper-right corner, and change the properties as follows:
- Start time: 0.3
- Duration: 1.5
- Timing Function: Ease in, Ease out
- Scale Amount: 5

With this action, you scale the camera by a factor of five, but you don’t want to change the scene-to-camera ratio you previously defined. Therefore, click the camera node in the scene and change it’s scale to be X = 0.1, Y = 0.1. After the action has been triggered, this will end up being 0.5, just like it was before.
Build and run the game, and you should see a cool zoom-out effect happening at launch.
Creating a Dark Vibe using SKLightNodes
Now, it was stated in the beginning that the game needed a spooky feel and so far it’s not very spooky. Change this by adding an SKLightNode to the player.
Because lights are nodes, you can move them or set them to perform actions. This means that if you add a light node to the player, it’ll follow the player around as it moves through the level – just the effect needed here.
The light node itself is invisible except for the effects you configure on the sprite nodes to interact with them.
Ah-ha!!! So that’s why I’ve had you setting the lighting, shadow cast and shadowed mask on all sprites throughout this tutorial. Each property has a different effect:
- Lighting Mask: The sprite is illuminated by the light with specular, diffuse and ambient lighting.
- Shadow Cast Mask: Whenever a sprite intersects with a light, a shadow projects past the sprite.
- Shadowed Mask: If the sprite is inside a shadow cast by a light, and the sprite has a lower z position than the light, the shadow affects how the sprite is lit.
Time to light it up!
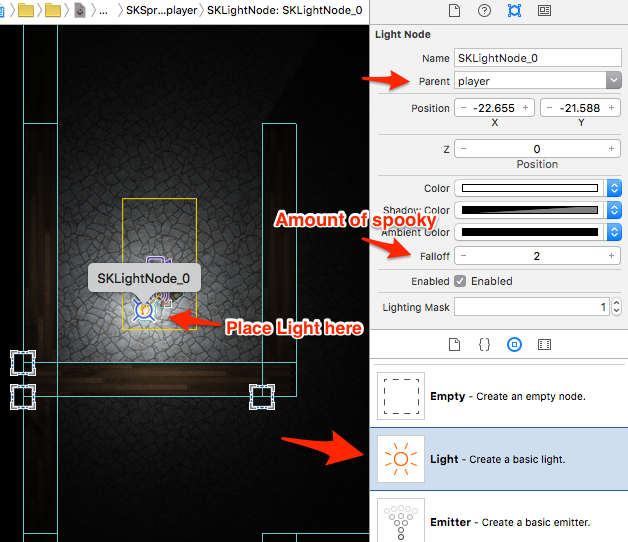
In GameScene.sks, locate the Light object from the Object Library and drop it on top of the player sprite’s torch. Next, change the light’s parent node to be equal to player and change its Falloff to be equal to 2.
The Falloff denotes the exponent for the rate of decay of the light source, so the higher the number, the spookier and darker the level.
One more thing before you’re done: The outside of the level is still a very non-spooky gray color. To fix this, select the scene by clicking outside the boundaries of the level, and change its Color to Black.
That’s it! Now you’ve created a terrifying place where zombies run wild. Build and run the game, and you should see the following:

Note: At the time of writing, the iOS Simulator is having a hard time running the game without lag after implementing the light. I’d suggest running it on a device, where it shouldn’t cause any problems, or simply disable the light while you build your level.
Note: At the time of writing, the iOS Simulator is having a hard time running the game without lag after implementing the light. I’d suggest running it on a device, where it shouldn’t cause any problems, or simply disable the light while you build your level.
Where To Go From Here?
Very well done! You’ve made it to the end of this tutorial and have now built a complete level for Fear the Dead. You have learned a ton of cool new features that you’ll be able to implement in your own projects going forward. You can download the final project here.
One of the best ways to make sure you remember what you’ve learned is to apply it in practice. For that reason, you should try and create another level or maybe even build your own game full of increasingly challenging levels.
We love seeing what you guys come up with, so make sure to share your creations in the comments below or on the forums.
If you want to learn more about Sprite Kit, you should check out our book 2D iOS & tvOS Games by Tutorials:
In this book we’ll teach you everything you need to know to make great games for iOS & tvOS – from physics, to tile maps, to particle systems, and even how to make your games “juicy” with polish and special effects.
Enjoy playing your new game; I look forward to hearing from you with comments below or questions on the forums. :]