How to Make a VR Game With Unity and Google Cardboard
Google Cardboard is a new API for creating virtual reality games with a DIY headset. In this tutorial, you’ll use it to kill blobs with throwing stars! By Todd Kerpelman.
Minor Gameplay Tweaking
So perhaps you found this version a bit harder to play in VR mode. This is partly because you have a reduced field of vision and it’s easier for enemies to slip by when you’re looking in the wrong direction. Also, you can’t change the direction you’re aiming nearly as quickly as you could before. You’re physically constrained by the speed at which you can turn your neck.

You don’t want to penalize your players for choosing to play in VR mode! So how can you correct this?

Oh, well, I was going to suggest slowing down the enemies. But… uh… your call, I guess.
Select your EvilSlimeEnemy Prefab in the Prefabs folder and open up the attached EnemyMover.cs. Add this code to Start(), right after you set thisSpeed:
if (GvrViewer.Instance.VRModeEnabled) {
  thisSpeed *= 0.85f;
}
This leads to your enemies bunching up a bit. If you want to keep them spaced out, go to EnemySpawner.cs — it’s attached to your GameLogic object — and add these lines in SetNextLaunch() right after you set launchInterval:
if (GvrViewer.Instance.VRModeEnabled) {
  launchInterval *= 1.1f;
}
This will make your game a tad easier in VR mode — just enough that your player shouldn’t feel penalized for choosing to play this way.
Fixing the On-Screen Score
The other UI element you need to address is the on-screen score object, and you’re going to try a slightly different approach for this one. While it still needs to appear in VR mode properly, you want it to stay fixed to your camera no matter where you look.
Imagine projecting your score onto a piece of glass that keeps moving around so that it’s always about 2 meters away from where the player is looking. That’s the effect you’re going to create.
You’ll accomplish this by using another world canvas so it renders properly in 3D, but you’ll make it a child of your GoogleVR Head object.
Select GvrMain\Head in the Hierarchy. Right-click on it and select UI\Canvas. Rename the new canvas to VRScoreCanvas. Change its Render Mode to World Space.
Give it the following values:
- Position: (0, 1, 2.5)
- Width: 400, Height: 100
- Rotation: (0,0,0)
- Scale: (0.0115, 0.0115, 1)
When you’re all done, it should look like this:

Right-click on your VRScoreCanvas and select UI\Text to add a text child-object. Rename it to VRScoreTxt. Change its anchor point to be top-left. Give it a Position of (150, -65, 0) and a Width of 60.
In the text component, set Font Size to 18 and change the Alignment to right-aligned. Finally, change the Text to 999.
When it’s all finished, it should look like this:

It might seem like your text is strangely aligned in the center of the screen, but in VR mode, you see much less of your world than you normally would, so this ends up being pretty close to the edge of your vision. Feel free to adjust it so it looks right to you on your phone.
Next up, add the plumbing to display your score using this text object. The process is similar to how you displayed the Game Over canvas.
Open up GameController.cs and add a new public variable:
public Text VRScoreTxt;
Next, you’ll update VRScoreTxt every time you update scoreTxt. In the ResetGame() method, add this line right after you update scoreTxt:
VRScoreTxt.text = "--";
Then add this line to GotOne(), right after you update scoreTxt:
VRScoreTxt.text = "" + _currScore;
Save your script, go back into Unity and you’ll notice the GameController Component of GameLogic now has an entry for your VR Score Txt variable. Click the target next to it and select your VRScoreTxt text object.

Play your game again, and now you’ll see that your score appears up in the upper-left corner of your vision, and that it follows your head movement.

Swapping In and Out of VR Mode
Since your game works in both top-down and VR mode, you should give the user the ability to switch between them.
The UI for this is pretty straightforward. You’ll add a simple button to your top-down game that users can press to switch into VR mode. As a bonus, the Google VR SDK automatically displays a back button you can use to go back into top-down mode.
Give it a try!
First, you’re going to add the code to handle swapping in and out of VR mode. Select GameLogic in the Hierarchy. Click Add Component in the inspector, select New Script and name the script CardboardSwapper.
Open it, and replace the class code with this:
public class CardboardSwapper : MonoBehaviour {

  public GameObject[] cardboardObjects;
  public GameObject[] monoObjects;

  // Turn on or off VR mode
  void ActivateVRMode(bool goToVR) {
    foreach (GameObject cardboardThing in cardboardObjects) {
        cardboardThing.SetActive(goToVR);
    }
    foreach (GameObject monoThing in monoObjects) {
        monoThing.SetActive(!goToVR);
    }
    GvrViewer.Instance.VRModeEnabled = goToVR;

    // Tell the game over screen to redisplay itself if necessary
    gameObject.GetComponent<GameController>().RefreshGameOver();
  }

  public void Switch() {
    ActivateVRMode(!GvrViewer.Instance.VRModeEnabled);
  }

  void Update () {
    if (GvrViewer.Instance.BackButtonPressed) {
      Switch();
    }
  }

  void Start() {
    ActivateVRMode(false);
  }
}
The most important method of this class is ActivateVRMode where you toggle the value of GvrViewer.Instance.VRModeEnabled. It’s what activates VR mode.
The rest of the logic disables or enables various GameObjects in your scene, depending on whether or not you’re in VR mode. Calling ActivateVRMode(false) in Start() starts your game off in top-down mode.
You’ll also notice that you call Switch() when you detect the back button has been pressed on the Cardboard display. You can simulate this GvrViewer.Instance.BackButtonPressed in the Unity editor by pressing the esc key, a feature you’ll no doubt find awfully handy for testing.
You do need to add just a bit more logic to your GameController script so that it properly displays or hides the correct canvas if you’re switching modes at the end of the game.
Open up GameController.cs, and add this method:
public void RefreshGameOver() {
    gameOverCanvas.enabled = false;
    VRGameOverCanvas.enabled = false;
    if (isGameOver) {
        GameOver(_didIWin);
    }
}
Save everything and go back to Unity to populate the values of the two GameObject arrays.
Select GameLogic in the Hierarchy and scroll down to the Cardboard Swapper component in the inspector.
For the Cardboard Objects array, give it a size of 1, and then fill in the Head child of the GvrMain GameObject in your scene. Not only does this disable your Google VR Head so you can go back to the top-down camera, but it disables VRScoreCanvas as well.
For the Mono Objects array, give it a size of 3, and then select Canvas, Main Camera, and raccoon-ninja from your scene (not from the Assets tab, which Unity seems to like defaulting to).

Finally, you need to add a button on the top-down canvas for the user. To save time, I’ve already made one for you — it’s in the prefabs folder.
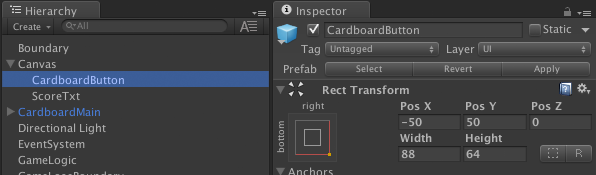
Drag CardboardButton from Assets\Prefabs into the Hierarchy so that it’s a child of your Canvas object. Make sure that its Position is set to (-50, 50, 0):
At the bottom of your button object, hook it up such that clicking the button will call the CardboardSwapper.Switch() method attached to GameLogic. You can follow this animation to see how it’s done:

Give your game another try. Click on the button at the bottom-right of the screen to switch to VR mode, then click the back button in the Cardboard display (or press Escape in the Unity editor) to go back to top-down mode.

Congratulations! You’re swapping VR Modes like a boss!
