How to Make a VR Game With Unity and Google Cardboard
Google Cardboard is a new API for creating virtual reality games with a DIY headset. In this tutorial, you’ll use it to kill blobs with throwing stars! By Todd Kerpelman.
Fixing the Game Over Menu
As you might have observed, when the game is over you’re still left with the old Game Over menu. It not only shows up improperly in 3D, but you have no way of clicking on it.
Shockingly, this button renders poorly in 3D.

Shockingly, this button renders poorly in 3D.
The game currently uses a Display Canvas — as seen in the Unity New Gui Tutorial — to display the Game Over screen, which always displays on top of the game window.
This canvas is great for most game GUIs because it automatically scales itself to fit on top of your screen no matter what your game’s camera is doing, and it nicely handles different screen sizes.
But in this case, you need a GUI canvas that exists in the world itself, partly so it renders properly in 3D, but also because you don’t want it to stay locked to the camera.
You want your users to be able to look up and down so they can look at different UI elements and trigger the active one by clicking the button.
Creating a New Canvas
Select the GameOverCanvas in the Hierarchy, right-click on it and select Duplicate.
Rename the duplicated canvas VRGameOverCanvas, to distinguish it from the original one, and rename its GameOverTxt child object to VRGameOverTxt.

In the Canvas component of VRGameOverCanvas, change the Render Mode to World Space
In the Rect Transform component, change the Position to (-2.24, 1.1, 0.07), and the Y Rotation to 90.
Finally, change the X and Y Scale to be 0.009. When it’s all done, the VRGameOverCanvas should look like this:

And you should see the two canvases roughly overlap each other in the Game View (when the game’s not running):

Where did these values come from? Truthfully, I just fiddled around with them until I had something that looked good when viewing them through the Cardboard camera.
Sometimes programming is more an art than a science. :]
Supporting Both Canvases
Next up, you’re going to alter GameController.cs so that it’s aware of both canvases. Open up the GameController script that’s also attached to the GameLogic GameObject.
Add the following two public variables to your class:
public Canvas VRGameOverCanvas;
public Text VRGameOverTxt;
Add the following line to the beginning of resetGame():
VRGameOverCanvas.enabled = false;
Replace GameOver() with:
public void GameOver(bool didIWin) {
    isGameOver = true;
    _didIWin = didIWin;
    string finalTxt = (_didIWin) ? "You won!" : "Too bad";
    if (GvrViewer.Instance.VRModeEnabled) {
        VRGameOverCanvas.enabled = true;
        VRGameOverTxt.text = finalTxt;
    } else {
        gameOverCanvas.enabled = true;
        gameOverTxt.text = finalTxt;
    }
}
This displays the proper canvas and text objects, depending on whether or not you’re in VR mode (GvrViewer.Instance.VRModeEnabled).
After you’ve saved your script, you’ll need to assign the correct objects to the new public variables.
Find the GameController script in the inspector. Click on the target next to each of the new variables, and select VRGameOverCanvas object as your VR Game Over Canvas variable and the VRGameOverTxt object as your VR Game Over Txt variable.

Note: Are you wondering why you’re going through the trouble of supporting two canvases instead of just changing the existing one? Because eventually, you’re going to support both top-down and VR mode. Stay tuned!
Note: Are you wondering why you’re going through the trouble of supporting two canvases instead of just changing the existing one? Because eventually, you’re going to support both top-down and VR mode. Stay tuned!
If you were to run your game now, you would see that it properly shows the end-game screen in VR mode. You can look up and down and see the different parts of your interface; all that’s missing is a way for you to click that Play Again button.

Note: At least, this is how it should look in theory.
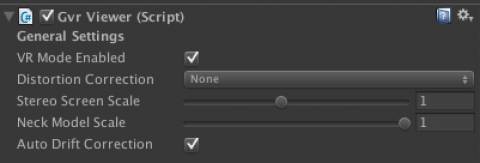
In practice, there is a bug in Unity (starting with 5.3.4p2) where World Space GUI canvases don’t render onto a RenderTexture, which is what the GoogleVR SDK uses for distortion correction — the fisheye look you see in the two cameras.
As a temporary workaround, you can go to your GvrMain object and in the Gvr Viewer component, change Distortion Correction to None.
Turning off distortion correction in Google VR
This means that you may see some slight distortion when you try your app in a Cardboard viewer, but at least you’ll be able to see your GUI. :]
Note: At least, this is how it should look in theory.
In practice, there is a bug in Unity (starting with 5.3.4p2) where World Space GUI canvases don’t render onto a RenderTexture, which is what the GoogleVR SDK uses for distortion correction — the fisheye look you see in the two cameras.
As a temporary workaround, you can go to your GvrMain object and in the Gvr Viewer component, change Distortion Correction to None.
Turning off distortion correction in Google VR
This means that you may see some slight distortion when you try your app in a Cardboard viewer, but at least you’ll be able to see your GUI. :]
Turning off distortion correction in Google VR
Adding Gaze Input
Luckily, Unity has built-in support for “Treating the center point of the camera as a mouse cursor” when using a world-space GUI canvas, but you need to provide an extra script to make it work in VR space.
First, expand GvrMain\Head in the Hierarchy. Find the Main Camera there and rename it to VR Main Camera

Select your VRGameOverCanvas object. You should see an Event Camera entry in the Canvas Component. Click on the target and select the VR Main Camera you just renamed.

Click on the EventSystem object in the Hierarchy. Click Add Component in the inspector and add the GazeInputModule script. This is a script that makes sure Unity’s GUI system understands how Google VR’s camera system works.
Check the VR Mode Only checkbox, because you only want things to work this way when you’re in VR mode — not when you’re in top-down version of your game.
Finally, click the gear of the Gaze Input Module Component you just added and select Move Up. Do this one more time, so that it appears above the Touch Input and Standalone Input modules. This is required to make sure the Gaze Input Module takes priority over the other types of input that your game can process.
When it’s all done, it should look like this:

Give it a try now! This time, when you center your view on the Play Again button, it should turn green, and pressing down on the Cardboard button will let you “click” the it to start a new game!
