Sending Push Notifications With Vapor
Adding push notifications to your app enriches the user experience by delivering data to their devices when it becomes available. In this article, you’ll learn how to send push notifications with Vapor. By Natan Rolnik.
Enriching the Notification
Your app might be interested in getting more data from a push notification than what iOS displays in the notification itself. For example, you might want to open a screen with information related to the flight in question.
To achieve this, the JSON sent to APNS must contain another object alongside aps.
For AirplaneSpotter, you might want the server to send the flight ID and airport, as well as a threadId key, to group notifications from the same flight in the lock screen. You’re also allowed to add a custom sound.
Here’s what the payload JSON looks like:
{
  "aps" : {
    "alert" : {
        "title" : "A flight is about to land",
        "subtitle": "LY042",
        "body" : "Flight LY042 is around TLV. Go get some nice pictures!"
    },
    "sound": "Cessna.aiff",
    "threadId": ""
  },
  "flight" : {
    "id": "",
    "flightNumber": "LY042"
    "arrivalAirport": {
      "id": "",
      "iataCode": "TLV",
      "longName": "Tel Aviv - Ben Gurion"
    }
  },
}
Notice how this includes not only the aps object, which provides iOS the notification data, but also the flight object. The app can use that object to take the user to a specific screen inside the app, or a notification extension can download an image and add it to the notification.
Conforming to APNSwiftNotification
To generate a notification with extra data, you need to create a concrete type that conforms to APNSwiftNotification. To do so, open Flight.swift. At the end of the file, you’ll see an extension on Flight.
First, declare what the custom notification will look like. Add the following struct inside the extension:
struct Notification: APNS.APNSwiftNotification {
  let aps: APNSwiftPayload
  let flight: Flight
}
Then replace createNotification(on:) with the code below:
// 1
func createNotification(on db: Database) -> EventLoopFuture<Notification> {
  // 2
  $arrivalAirport.get(reload: false, on: db).flatMapThrowing { airport in
    // 3
    let flightId = try self.requireID()
    let alert = APNSwiftPayload.APNSwiftAlert(
      title: "A flight is about to land!",
      subtitle: self.flightNumber,
      body: "Flight \(self.flightNumber) is around \(airport.iataCode). Go get some nice pictures!"
    )

    // 4
    return Notification(aps: .init(alert: alert,
                                   sound: .normal("Cessna.aiff"),
                                   threadID: flightId.uuidString),
                        // 5
                        flight: self)
  }
}
This might be a lot of code, but it gets easier to understand when you divide it into pieces:
- The method now returns an
EventLoopFutureofNotification, the struct you created in the previous step. - Because you need the airport acronym (the IATA code) for the notification body, make sure to fetch it before you try to access it. The
$sign accesses the property wrapper itself and usesgetto load the relationship from the database. - Create the alert content, which will be inside
apsin the notification. - Initialize
Flight.Notification. Because this method is in theFlightextension scope, there’s no need to prefix it. Initialize theapsparameter using the alert, a sound and a thread ID. Remember the sound needs to be the name of a resource file that the iOS app embeds into the bundle. - Pass the second parameter, the
flightobject —self, in this case.
Sending the Flight Notification to a Channel
Once you have the custom notification and the code that allows sending it to channels, it’s time to use them both! Open FlightController.swift (pun intended) and scroll to the last method: sendNotification(for:db:apns:). Replace the successful future with the following code:
flight.createNotification(on: db).flatMap { notification in
  apns.send(notification, toChannel: flight.arrivalAirport.iataCode, on: db)
}
Here, you get the first parameter, the flight object, and call the createNotification method you just implemented. Use flatMap to get the notification and send it to the channel. Notice how the arrival airport’s code is the channel name, in this case.
Testing the Flight Notification
Build and run the server again. Open the iOS app and, in the notification settings screen, choose the airports you want to get notifications about, then press Save.
Subscribing to a notification channel
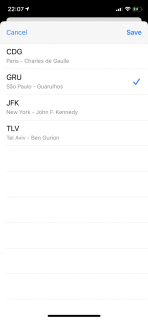
Subscribing to a notification channel
The new flight creation handler will call sendNotification to all devices subscribed to the arrival airport. Supposing you subscribed to São Paulo’s Guarulhos Airport’s channel, GRU, you can use the curl below to create a new flight:
curl -X POST http://127.0.0.1:8080/flights/new \
  -H 'Content-Type: application/json; charset=utf-8' \
  -d $'{ \
    "airportIataCode": "GRU", \
    "flightNumber": "LA703" \
  }'
Within a blink of an eye, you’ll see this notification in your device:
The notification arrived. And the flight is about to!
The notification arrived. And the flight is about to!
Where to Go From Here
Congratulations, you’ve completed the tutorial! You can download the completed project files by clicking on the Download Materials button at the top or bottom of the page.
If you want to learn more about receiving push notifications in an iOS app, check out our mini-book: Push Notifications by Tutorials, for a thorough overview for everything you can do with a push notification.
I hope you’ve enjoyed this article on sending push notifications. If you have any questions, feel free to leave them in the discussion forum below.