Sending Push Notifications With Vapor
Adding push notifications to your app enriches the user experience by delivering data to their devices when it becomes available. In this article, you’ll learn how to send push notifications with Vapor. By Natan Rolnik.
Sign up/Sign in
With a free Kodeco account you can download source code, track your progress, bookmark, personalise your learner profile and more!
Create accountAlready a member of Kodeco? Sign in
Sign up/Sign in
With a free Kodeco account you can download source code, track your progress, bookmark, personalise your learner profile and more!
Create accountAlready a member of Kodeco? Sign in
Sign up/Sign in
With a free Kodeco account you can download source code, track your progress, bookmark, personalise your learner profile and more!
Create accountAlready a member of Kodeco? Sign in
Contents
Sending Push Notifications With Vapor
30 mins
- Getting Started
- Understanding the Sample App’s Limitations
- Understanding and Configuring APNS
- APNS Device Registration Flow
- Creating the APNS Push Key
- Configuring the Server to Use the APNS Key
- Looking at the Device Model
- Using Push Channels
- Creating and Updating a Device With Routes
- Saving the Device Data From the iOS App
- Exposing the Local Server to the Web With Ngrok
- Running Ngrok
- Creating the First Device
- Updating the Device With the APNS Device Token
- Sending Push Notifications
- Targeting a Specific Device
- Sending a Notification to Channels
- Enriching the Notification
- Conforming to APNSwiftNotification
- Sending the Flight Notification to a Channel
- Testing the Flight Notification
- Where to Go From Here
Adding push notifications to your app enriches your users’ experience by delivering data to devices as it becomes available, rather than forcing users to constantly fetch that data.
If you want to add push notifications to your app, third party services like Firebase or OneSignal are easy to set up. In many cases, though, using the Apple Push Notification Service — APNS — directly from your server is a better option.
Using APNS means you don’t need to use a third party SDK in your iOS app. Plus, it means you don’t share your users’ data with any third-party companies.
In this tutorial, you’ll learn how to connect to APNS and how to send push notifications with Vapor. You’ll learn how to send notifications to a specific user’s device as well as to many devices via subscription channels.
You’ll do this by working on an app called AirplaneSpotter, which tells aviation enthusiasts when airplanes are about to land at the airports that interest them.
For this tutorial, you’ll need the following:
- An iOS device: Push notifications don’t work in a simulator, so you’ll need to use an actual device.
- An Apple Developer Program membership: To send push notifications, you need a push notification certificate for your app, which requires a program membership.
Getting Started
After opening the Starter folder in the downloaded materials, you’ll notice that there are three directories: one for the Server app, one for the iOS app and another for code shared between these two.
Open Package.swift in the Server folder, either by double-clicking it on Finder or by running open Package.swift
in Terminal. Xcode will open the Server app and start fetching all the required dependencies.
While Xcode is doing that, take the time to go over the existing code.
Start with the files in Sources/App/Models, which are: Airport.swift, Flight.swift and Device.swift.
In Migrations, you’ll see how to create each model and its associated properties in the database. You can add initial data in migrations as well, as shown in CreateAirport.swift.
Every model also has an associated controller, located in Controllers, which handles incoming requests.
After Xcode finishes resolving the project’s dependences, make sure you can run the project by selecting My Mac in the device pop-up and clicking the Run button — or by pressing Command-R.
Now, open the iOS starter project with Xcode and confirm that it compiles without any errors. Don’t run it yet, as the server isn’t ready, just press Command-B to build it. You can do this immediately, as it doesn’t have any external dependencies.
Understanding the Sample App’s Limitations
Before doing a quick recap of how APNS works, take a look at the limitations of this tutorial’s sample project:
- Scaling pushes: A single instance of a server running on Vapor can send notifications without delays to a few thousand devices. If you need to send notifications to hundreds of thousands — or millions — of users, it’s worth building a queuing system on top of Vapor.
-
Users: This tutorial has no concept of a user; every device is a separate row in the database. If your app has a User entity, you’ll want to link every user to a list of
Device
s via a one-to-many relationship. - Authorization and authentication: In the routes of the sample project, there is no authorization required. In a real app, you’d protect the routes according to the user or admin permissions.
- SQLite Database: This tutorial uses an on-disk SQLite database. In later stages of development, and certainly in production, you should use a scalable database running on a dedicated server. Good choices include PostgreSQL and MySQL.
Understanding and Configuring APNS
Now that you understand the differences between this sample project and one you could put into production, it’s time to take a look at how to set up APNS.
APNS Device Registration Flow
Apple’s documentation defines APNS in the following way:
The guide also mentions providers, which are the server counterparts of your app. They have three responsibilities:
- Receiving and storing the device tokens, which belong to instances of your app.
- Determining when and what to send to each device.
- Building and sending the payload to APNS containing the delivery information.
The figure below explains these steps:

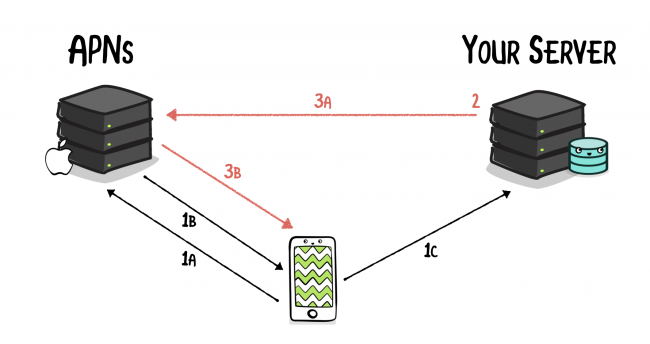
The APNS device registration flow
Here’s the run down:
1A. Your app registers for remote notifications with APNS by calling UIApplication
‘s registerForRemoteNotifications()
.
1B. APNS creates a unique device token and your app receives it via UIApplicationDelegate
‘s application(_:didRegisterForRemoteNotificationsWithDeviceToken:)
.
1C. Your app converts the device token from Data
to String
and issues a request to your server to store it in the database.
2. Your server decides when the appropriate moment to send the notification is.
3A. The server builds the notification payload and submits it to APNS (for each device).
3B. APNS delivers the notification to the device.
Creating the APNS Push Key
Apple introduced push notifications with iOS 3. At that time, servers used a single certificate, exported as a .p12 file, to authenticate with APNS. Developers had to manually generate these certificates for each app in the Developer Portal and they were only valid for one year.
In 2016, Apple added a better way to manage authenticating with APNS: token-based connections, which use signing keys. In this context, the authentication token has no relationship with a device token.
This mechanism has a few advantages over certificates. The main one is that your server can use the same token to send notifications to multiple apps you own. Another advantage is that the key doesn’t expire, although it’s a good practice to revoke it and use a new one every once in a while.
Because this is now the recommended method, this tutorial uses an APNS key. To start generating one, go to https://developer.apple.com and log in with your credentials. In the left panel, under Program Resources, click Certificates, IDs & Profiles. In the left menu again, click Keys, then click the Plus button.
The Register a New Key page will load. Give your key a name and select the APNS checkbox:
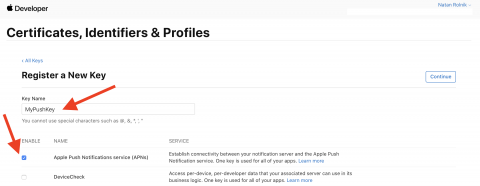
Click Continue then click Register to confirm:
Once you’ve registered the new key, a Download button will appear. Download the file and use a text editor to open the key and copy the content.
Notice that the file name includes a ten character long identifier: This is the key identifier.
You now have everything you need to configure your server in the next section.
Configuring the Server to Use the APNS Key
In this section, you’ll implement configurePush()
by configuring Vapor’s APNS package. This method handles transforming the key and the JSON payloads to the format that APNS expects.
Back in the Server project, open Application+APNS.swift from the Extensions group. Add the following code inside configurePush()
:
// 1
let appleECP8PrivateKey =
"""
-----BEGIN PRIVATE KEY-----
-----END PRIVATE KEY-----
"""
// 2
apns.configuration = try .init(
authenticationMethod: .jwt(
// 3
key: .private(pem: Data(appleECP8PrivateKey.utf8)),
keyIdentifier: "<#Key identifier#>",
teamIdentifier: "<#Team identifier#>"
),
// 4
topic: "com.raywenderlich.airplanespotter",
// 5
environment: .sandbox
)
This is what the code above does:
- Declares a string using a multi-line string literal, which contains the contents of the APNS key. Be sure to replace the contents with the actual content of your key.
- Initializes the
configuration
ofApplication
‘sapns
property by passing a JSON Web Token, also known as JWT, as its authentication method. - Passes the key information to create the JWT.
key
is the string declared in the first step, encoded asData
.keyIdentifier
is the ten-character-long string present in the key’s file name.teamIdentifier
is your Apple Developer Team ID, which you can find in the Membership page in the Developer Portal. - Sets the iOS application’s bundle identifier as the topic parameter. This is the bundle identifier used in the sample iOS app; if you changed it, you must make the same change here.
- Finally, it sets the environment that APNS will use to send the notifications: in this case,
.sandbox
. When releasing to the AppStore, or via TestFlight and AdHoc, set it to.production
.
Build and run. If you configured everything correctly, you won’t see any errors.
Now your server is ready to send authenticated requests to APNS. The next piece in the puzzle is getting a device token to send a notification to.
Looking at the Device Model
The sample server app isn’t aware of users; it only knows devices. Every Device
row in the devices table represents a unique installation of your app.
Even if your server allows user registration, keeping devices in a separate table and linking them with a children-parent relationship is a better approach. A user might log in with multiple devices, and having a separate table allows the server to save each one’s data independently.
The sample app tracks each device’s operating system and version. In your own app, you might want to save the app version, the time zone, last launch time or other properties.
Additionally, the Device
model has a channels
property, which allows sending notifications based on subscription segments.
Using Push Channels
Although this tutorial will teach you how to send notifications to a specific device, it also covers a handy way for sending pushes to a group of users. Push channels are useful when you want to create a publisher-subscriber model for sending notifications.
For example, an app that displays soccer results and news could send pushes to the Barcelona-goals
channel whenever Barcelona scores or concedes a goal, to Barcelona-news
when news about the team is published and to Barcelona-all
for the users who don’t want to miss anything!
channels
property is an array of strings stored as a single string joined by line breaks. For faster queries about which devices are subscribed to one or more channels, you should use a many-to-many relationship.
You can achieve this with Fluent’s Siblings properties, which in turn use pivot tables to link between multiple rows of two tables.
Creating and Updating a Device With Routes
Open DeviceController.swift. Inside boot(routes:)
, you’ll notice that two routes are declared under the devices group.
The first route is devices/update, which forwards creating the device in the server’s database, or updating its fields, to put(_:)
.
Scroll to put(_:)
‘s implementation and you’ll find that the server expects an UpdateDevice
in the request body. If this is an existing device, its id
will be present in the payload, and the server can find it in the database to update its properties.
Otherwise, if this is a new device, the server will create a new row in the database and return it in the response. This method returns an EventLoopFuture
so it can set the correct HTTP status depending on whether the device is new (HTTP 201, created) or existing (HTTP 200, OK).
The controller also contains a second route, devices/:id/test-push. However, its implementation in sendTestPush(_ req:)
returns an error at the moment. You’ll configure it to resolve this error later.
Saving the Device Data From the iOS App
Now, it’s time to run the server and test that the iOS app can call the server. This will allow the server to save the device, then update it once APNS provides the device token.
Exposing the Local Server to the Web With Ngrok
In development, the server runs on your own machine and is reachable via localhost
, or 127.0.0.1
. Because the iOS Simulator doesn’t support push tokens, you’ll need to run the app on an iOS device: an iPhone or an iPad.
As a consequence, there are two ways of making the local server available to the iOS device. The first, and slightly more complicated, is by finding the IP of your computer and setting it as the server host in the iOS app. The second is using a tool like ngrok to expose your local server to the public internet, then use the URL it provides upon login. This tutorial will guide you through the second option.
For server developers, especially those who are also mobile developers, ngrok makes testing your APIs much simpler. Create an account if you don’t have one, then follow the download and setup instructions.
If the server isn’t running, open the server project in Xcode and build and run it. You’ll see the following message in the console:
[ NOTICE ] Server starting on http://127.0.0.1:8080
This means the server is up and accessible in your machine via the 8080
port.
Running Ngrok
Go back to Terminal, where you configured ngrok, and enter the following command:
ngrok http 8080
If ngrok is available in a specific directory and not in /usr/local/bin, run the following instead:
./ngrok http 8080
This tells the tool to expose the server running on port 8080 to the public internet over a secure HTTP tunnel. If everything is set up correctly, ngrok will display the session information.
This information includes a Forwarding key with a URL value, which looks like https://
. Select and copy this URL; you’ll need it in the next section.
Creating the First Device
In the starter sample project directory, open the iOS project. Head to AppDelegate.swift and replace the https://yourserver.com
placeholder with the URL ngrok provided. Uncomment that line and comment out the line above that sets the server to http://localhost:8080
.
In the iOS Projects settings, go to Signing & Capabilities. Select your own Apple Developer team and enter a new bundle identifier so that Xcode can register the app to your account with the push notification permissions. Build and run on an actual device.
The Server app needs to know about your new app ID, so edit the topic
in Application+APNS.swift to match your own iOS app bundle ID.
Upon launch, the app checks to see if the server has already saved the device. If not, it will fire a request to the server. Therefore, in the first launch, you should see the logs displaying a message like this:
Device updated successfully: Device(id: CB26CA3A-1252-429B-80BA-2781F9FADB57, system: AirplaneSpotter.Device.System.iOS, osVersion: "13.5", pushToken: nil, channels: [])
The iOS app will save this information locally for future launches. Open Device+Extensions.swift if you want to see how it does this.
Fluent assigned the ID CB26CA3A-1252-429B-80BA-2781F9FADB57
to this device. This is not the device token, which you’ll deal with in the next section.
Copy the device ID that you received; you’ll need it to test sending the first push notification to your device.
Updating the Device With the APNS Device Token
Still in the iOS app, tap the Bell icon in the top-right corner. You’ll see a list of airports and the system alert for allowing notifications will pop up:

iOS’s Notification prompt
Tap Allow; after a few moments, APNS will provide the device token. You don’t need to register to any airport notifications right now, so just dismiss this screen.
In AppDelegate.swift, the delegate method application(_:didRegisterForRemoteNotificationsWithDeviceToken:)
will convert the Data
object into a string, assign it to currentDevice
and save it. The server should return a similar response, this time with status code 200 instead of 201. Also, deviceToken
now has a value.
Once the delegate method executes, you’ll see the following in the console:
Device updated successfully: Device(id: CB26CA3A-1252-429B-80BA-2781F9FADB57, system: AirplaneSpotter.Device.System.iOS, osVersion: "13.5", pushToken: Optional("some-long-device-token"), channels: [])
This confirms that the server saved this information and is ready to send push notifications to your device.
Sending Push Notifications
You’ve finally reached the fun part, and the goal of this tutorial: actually sending the notifications!
Targeting a Specific Device
After configuring the push keys and saving at least one device, you’re ready to use the devices/:id/test-push route to send a notification to that device.
Now, try to call this route with your device ID. Replace replace-with-your-device-id
with your device’s ID — not the device token! Then, make sure the server is running and run the command below in Terminal:
curl -X POST http://localhost:8080/devices/replace-with-your-device-id/test-push
You’ll see that calling this route at this stage will return an error: {"error":true,"reason":"Not Implemented"}
. That’s because the implementation is missing in the server’s DeviceController.swift, so it returns a failed future for this request.
To implement the request, you’ll use APNSwift — a great HTTP/2 APNS library built on top of SwiftNIO.
Open DeviceController.swift in the server code and scroll to its bottom. Replace the contents of sendTestPush(_:)
with the following:
// 1
Device.find(req.parameters.get("id"), on: req.db)
// 2
.unwrap(or: Abort(.notFound))
.flatMap { device in
// 3
let payload = APNSwiftPayload(alert: .init(title: "Test notification",
body: "It works!"),
sound: .normal("default"))
// 4
return req.apns.send(payload, to: device).map { .ok }
}
Here’s what this implementation does, step by step:
- Gets the
id
query parameter declared in the route and uses it to queryDevice
withfind
. - The query returns an optional
Device
because theid
might not match any existing device. To make sure it’s an existing ID, you useunwrap(or:)
, which throws anAbort
error if not. - Creates the payload to send.
APNSwiftPayload
also has other parameters, such as badge count, but you’ll only use the alert and sound for now. Here, you initializeAPNSwiftAlert
with a title and body and use"default"
as the sound. - Uses the
apns
property from the request to send the payload to the given device and map the future to aHTTPStatus.ok
. Theapns
property is actually of typeRequest.APNS
. Thesend(_:to:)
method you use is defined in APNS+Extensions.swift.
To include the changes you just made, stop the server then build and run it. Close the app on your iPhone. Now you can repeat the curl command and feel the APNS magic! The notification should arrive in seconds.
Sending a Notification to Channels
You just sent your test push notification to a single device. In this section, you’ll implement the extension methods needed to send notifications to all devices that have subscribed to one or more channels.
Open APNS+Extensions.swift in the Server app. You’ll notice that two methods currently return a failed future with a Abort(.notImplemented)
error.
While the second group of extension methods allows sending a concrete APNSwiftPayload
, as you did in the example above, the first group does the same but for APNSwiftNotification
. This is a protocol that the APNSwift package defines, and this tutorial will cover it in more depth in the next section.
Scroll to send(_:toChannels:on:)
in the first extension and replace its body with the following:
//1
Device.pushTokens(for: channels, on: db)
.flatMap { deviceTokens in
//2
deviceTokens.map {
//3
self.send(notification, to: $0)
//4
}.flatten(on: self.eventLoop)
}
Here is a step-by-step explanation of the implementation above. You:
- Use the
Device
type method to get all tokens subscribed to a list of channels. - Map the array of device tokens into an array of futures. Transform each token into a request to send a notification to.
- You have an array of
EventLoopFuture
, so you useflatten(on:)
to group them all into a singleEventLoopFuture
.
In the second extension, the same implementation is missing, but for the concrete APNSwiftPayload
. Find send(_:toChannels:on:)
Device.pushTokens(for: channels, on: db)
.flatMap { deviceTokens in
deviceTokens.map {
self.send(payload, to: $0)
}.flatten(on: self.eventLoop)
}
Notice how it is exactly the same as the previous implementation, except it forwards the payload
parameter instead of the notification
parameter.
Enriching the Notification
Your app might be interested in getting more data from a push notification than what iOS displays in the notification itself. For example, you might want to open a screen with information related to the flight in question.
To achieve this, the JSON sent to APNS must contain another object alongside aps
.
For AirplaneSpotter, you might want the server to send the flight ID and airport, as well as a threadId
key, to group notifications from the same flight in the lock screen. You’re also allowed to add a custom sound.
Here’s what the payload JSON looks like:
{
"aps" : {
"alert" : {
"title" : "A flight is about to land",
"subtitle": "LY042",
"body" : "Flight LY042 is around TLV. Go get some nice pictures!"
},
"sound": "Cessna.aiff",
"threadId": ""
},
"flight" : {
"id": "",
"flightNumber": "LY042"
"arrivalAirport": {
"id": "",
"iataCode": "TLV",
"longName": "Tel Aviv - Ben Gurion"
}
},
}
Notice how this includes not only the aps
object, which provides iOS the notification data, but also the flight
object. The app can use that object to take the user to a specific screen inside the app, or a notification extension can download an image and add it to the notification.
Conforming to APNSwiftNotification
To generate a notification with extra data, you need to create a concrete type that conforms to APNSwiftNotification
. To do so, open Flight.swift. At the end of the file, you’ll see an extension on Flight
.
First, declare what the custom notification will look like. Add the following struct inside the extension:
struct Notification: APNS.APNSwiftNotification {
let aps: APNSwiftPayload
let flight: Flight
}
Then replace createNotification(on:)
with the code below:
// 1
func createNotification(on db: Database) -> EventLoopFuture<Notification> {
// 2
$arrivalAirport.get(reload: false, on: db).flatMapThrowing { airport in
// 3
let flightId = try self.requireID()
let alert = APNSwiftPayload.APNSwiftAlert(
title: "A flight is about to land!",
subtitle: self.flightNumber,
body: "Flight \(self.flightNumber) is around \(airport.iataCode). Go get some nice pictures!"
)
// 4
return Notification(aps: .init(alert: alert,
sound: .normal("Cessna.aiff"),
threadID: flightId.uuidString),
// 5
flight: self)
}
}
This might be a lot of code, but it gets easier to understand when you divide it into pieces:
- The method now returns an
EventLoopFuture
ofNotification
, the struct you created in the previous step. - Because you need the airport acronym (the IATA code) for the notification body, make sure to fetch it before you try to access it. The
$
sign accesses the property wrapper itself and usesget
to load the relationship from the database. - Create the alert content, which will be inside
aps
in the notification. - Initialize
Flight.Notification
. Because this method is in theFlight
extension scope, there’s no need to prefix it. Initialize theaps
parameter using the alert, a sound and a thread ID. Remember the sound needs to be the name of a resource file that the iOS app embeds into the bundle. - Pass the second parameter, the
flight
object —self
, in this case.
Sending the Flight Notification to a Channel
Once you have the custom notification and the code that allows sending it to channels, it’s time to use them both! Open FlightController.swift
(pun intended) and scroll to the last method: sendNotification(for:db:apns:)
. Replace the successful future with the following code:
flight.createNotification(on: db).flatMap { notification in
apns.send(notification, toChannel: flight.arrivalAirport.iataCode, on: db)
}
Here, you get the first parameter, the flight object, and call the createNotification
method you just implemented. Use flatMap
to get the notification and send it to the channel. Notice how the arrival airport’s code is the channel name, in this case.
Testing the Flight Notification
Build and run the server again. Open the iOS app and, in the notification settings screen, choose the airports you want to get notifications about, then press Save.

Subscribing to a notification channel
The new flight creation handler will call sendNotification
to all devices subscribed to the arrival airport. Supposing you subscribed to São Paulo’s Guarulhos Airport’s channel, GRU, you can use the curl below to create a new flight:
curl -X POST http://127.0.0.1:8080/flights/new \
-H 'Content-Type: application/json; charset=utf-8' \
-d $'{ \
"airportIataCode": "GRU", \
"flightNumber": "LA703" \
}'
Within a blink of an eye, you’ll see this notification in your device:

The notification arrived. And the flight is about to!
Where to Go From Here
Congratulations, you’ve completed the tutorial! You can download the completed project files by clicking on the Download Materials button at the top or bottom of the page.
If you want to learn more about receiving push notifications in an iOS app, check out our mini-book: Push Notifications by Tutorials, for a thorough overview for everything you can do with a push notification.
I hope you’ve enjoyed this article on sending push notifications. If you have any questions, feel free to leave them in the discussion forum below.
All videos. All books.
One low price.
A Kodeco subscription is the best way to learn and master mobile development — plans start at just $19.99/month! Learn iOS, Swift, Android, Kotlin, Flutter and Dart development and unlock our massive catalog of 50+ books and 4,000+ videos.
Learn more