Sending Push Notifications With Vapor
Adding push notifications to your app enriches the user experience by delivering data to their devices when it becomes available. In this article, you’ll learn how to send push notifications with Vapor. By Natan Rolnik.
Running Ngrok
Go back to Terminal, where you configured ngrok, and enter the following command:
ngrok http 8080
If ngrok is available in a specific directory and not in /usr/local/bin, run the following instead:
./ngrok http 8080
This tells the tool to expose the server running on port 8080 to the public internet over a secure HTTP tunnel. If everything is set up correctly, ngrok will display the session information.
This information includes a Forwarding key with a URL value, which looks like https://. Select and copy this URL; you’ll need it in the next section.
Creating the First Device
In the starter sample project directory, open the iOS project. Head to AppDelegate.swift and replace the https://yourserver.com placeholder with the URL ngrok provided. Uncomment that line and comment out the line above that sets the server to http://localhost:8080.
In the iOS Projects settings, go to Signing & Capabilities. Select your own Apple Developer team and enter a new bundle identifier so that Xcode can register the app to your account with the push notification permissions. Build and run on an actual device.
The Server app needs to know about your new app ID, so edit the topic in Application+APNS.swift to match your own iOS app bundle ID.
Upon launch, the app checks to see if the server has already saved the device. If not, it will fire a request to the server. Therefore, in the first launch, you should see the logs displaying a message like this:
Device updated successfully: Device(id: CB26CA3A-1252-429B-80BA-2781F9FADB57, system: AirplaneSpotter.Device.System.iOS, osVersion: "13.5", pushToken: nil, channels: [])
The iOS app will save this information locally for future launches. Open Device+Extensions.swift if you want to see how it does this.
Fluent assigned the ID CB26CA3A-1252-429B-80BA-2781F9FADB57 to this device. This is not the device token, which you’ll deal with in the next section.
Copy the device ID that you received; you’ll need it to test sending the first push notification to your device.
Updating the Device With the APNS Device Token
Still in the iOS app, tap the Bell icon in the top-right corner. You’ll see a list of airports and the system alert for allowing notifications will pop up:
iOS’s Notification prompt
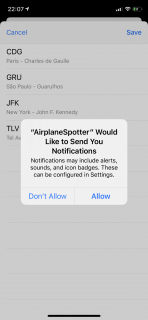
iOS’s Notification prompt
Tap Allow; after a few moments, APNS will provide the device token. You don’t need to register to any airport notifications right now, so just dismiss this screen.
In AppDelegate.swift, the delegate method application(_:didRegisterForRemoteNotificationsWithDeviceToken:) will convert the Data object into a string, assign it to currentDevice and save it. The server should return a similar response, this time with status code 200 instead of 201. Also, deviceToken now has a value.
Once the delegate method executes, you’ll see the following in the console:
Device updated successfully: Device(id: CB26CA3A-1252-429B-80BA-2781F9FADB57, system: AirplaneSpotter.Device.System.iOS, osVersion: "13.5", pushToken: Optional("some-long-device-token"), channels: [])
This confirms that the server saved this information and is ready to send push notifications to your device.
Sending Push Notifications
You’ve finally reached the fun part, and the goal of this tutorial: actually sending the notifications!
Targeting a Specific Device
After configuring the push keys and saving at least one device, you’re ready to use the devices/:id/test-push route to send a notification to that device.
Now, try to call this route with your device ID. Replace replace-with-your-device-id with your device’s ID — not the device token! Then, make sure the server is running and run the command below in Terminal:
curl -X POST http://localhost:8080/devices/replace-with-your-device-id/test-push
You’ll see that calling this route at this stage will return an error: {"error":true,"reason":"Not Implemented"}. That’s because the implementation is missing in the server’s DeviceController.swift, so it returns a failed future for this request.
To implement the request, you’ll use APNSwift — a great HTTP/2 APNS library built on top of SwiftNIO.
Open DeviceController.swift in the server code and scroll to its bottom. Replace the contents of sendTestPush(_:) with the following:
// 1
Device.find(req.parameters.get("id"), on: req.db)
  // 2
  .unwrap(or: Abort(.notFound))
  .flatMap { device in
    // 3
    let payload = APNSwiftPayload(alert: .init(title: "Test notification",
                                               body: "It works!"),
                                  sound: .normal("default"))
    // 4
    return req.apns.send(payload, to: device).map { .ok }
}
Here’s what this implementation does, step by step:
- Gets the
idquery parameter declared in the route and uses it to queryDevicewithfind. - The query returns an optional
Devicebecause theidmight not match any existing device. To make sure it’s an existing ID, you useunwrap(or:), which throws anAborterror if not. - Creates the payload to send.
APNSwiftPayloadalso has other parameters, such as badge count, but you’ll only use the alert and sound for now. Here, you initializeAPNSwiftAlertwith a title and body and use"default"as the sound. - Uses the
apnsproperty from the request to send the payload to the given device and map the future to aHTTPStatus.ok. Theapnsproperty is actually of typeRequest.APNS. Thesend(_:to:)method you use is defined in APNS+Extensions.swift.
To include the changes you just made, stop the server then build and run it. Close the app on your iPhone. Now you can repeat the curl command and feel the APNS magic! The notification should arrive in seconds.
Sending a Notification to Channels
You just sent your test push notification to a single device. In this section, you’ll implement the extension methods needed to send notifications to all devices that have subscribed to one or more channels.
Open APNS+Extensions.swift in the Server app. You’ll notice that two methods currently return a failed future with a Abort(.notImplemented) error.
While the second group of extension methods allows sending a concrete APNSwiftPayload, as you did in the example above, the first group does the same but for APNSwiftNotification. This is a protocol that the APNSwift package defines, and this tutorial will cover it in more depth in the next section.
Scroll to send(_:toChannels:on:) in the first extension and replace its body with the following:
//1
Device.pushTokens(for: channels, on: db)
  .flatMap { deviceTokens in
    //2
    deviceTokens.map {
      //3
      self.send(notification, to: $0)
      //4
    }.flatten(on: self.eventLoop)
}
Here is a step-by-step explanation of the implementation above. You:
- Use the
Devicetype method to get all tokens subscribed to a list of channels. - Map the array of device tokens into an array of futures. Transform each token into a request to send a notification to.
- You have an array of
EventLoopFuture, so you useflatten(on:)to group them all into a singleEventLoopFuture.
In the second extension, the same implementation is missing, but for the concrete APNSwiftPayload. Find send(_:toChannels:on:)
Device.pushTokens(for: channels, on: db)
  .flatMap { deviceTokens in
    deviceTokens.map {
      self.send(payload, to: $0)
    }.flatten(on: self.eventLoop)
}
Notice how it is exactly the same as the previous implementation, except it forwards the payload parameter instead of the notification parameter.