What’s New In SpriteKit on iOS 10: A Look At Tile Maps
Learn how to use Tile Maps in SpriteKit on iOS 10. By Caroline Begbie.
Update 9/26/16: This tutorial has been updated for Xcode 8 and Swift 3.
Update 9/26/16: This tutorial has been updated for Xcode 8 and Swift 3.
WWDC 2016 introduced a whole new batch of goodies. One of the best is the SpriteKit Tile Editor. It’s a blast to use, and you can get your backgrounds up and running and looking great really fast.
In this tutorial you’ll learn all about tiles – how to import them and paint them in the new Tile Editor. In the new game Rubber Duckie Rescue that’s sure to be a smash-hit, you’ll rescue some rubber duckies along the way.
Getting Started
First, download the starter project for Rubber Duckie Rescue, and make sure you have Xcode 8 installed.
Currently the game is in its infancy; by the end of this tutorial, you’ll control a car that will drive through an exciting tiled landscape on a mission to rescue those pesky ducks.
Build and run the app. You’ll see that you have a car that responds to touch. Touch to send the car to a particular location, or pan to have the car follow the touch. At the moment, the background is just a solid gray colour. But don’t worry! You’ll change that momentarily.

What is a Tile Map?
When creating a background, you have the option of either using one large image or using smaller images called tiles. These tiles are then carefully placed one-by-one, creating a complete image.
If you’re creating a golfing game, for example, you might have grass tiles and sandy bunker tiles. You might also have tiles that define the edges between the grass and the bunker.
Advantages of a Tile Map
Now you place one SKTileMapNode, and then paint it with tiles. It’s easy to place individual tiles and amazingly easy to paint a whole background in seconds. You can even paint animated tiles!
You can place a village on one tiled layer and grass on a lower layer. To change from summer to winter, just replace the lush verdant grass layer with a desolate brown layer. The village layer remains the same.
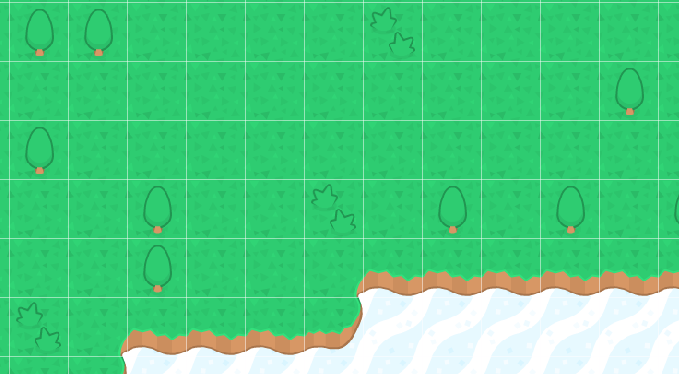
In this tutorial, you’ll be making the background environment using grass and water tiles that have different effects on the car’s movement. You’ll also create a tiled area with ducks placed randomly for the car to rescue.
-
Control: Previously, each tile would be a new
SKSpriteNode, and placing all those nodes could be a bit of a nightmare.Now you place one
SKTileMapNode, and then paint it with tiles. It’s easy to place individual tiles and amazingly easy to paint a whole background in seconds. You can even paint animated tiles!You can place a village on one tiled layer and grass on a lower layer. To change from summer to winter, just replace the lush verdant grass layer with a desolate brown layer. The village layer remains the same.
- Performance: Aside from the convenience of painting tiles, performance will be improved. Large images take up memory. Smaller tiles can be repeated, and take up fewer resources.
-
Flexibility: Each tile can be addressed in code. This means you know exactly on which tile your character is currently standing.
In this tutorial, you’ll be making the background environment using grass and water tiles that have different effects on the car’s movement. You’ll also create a tiled area with ducks placed randomly for the car to rescue.
Types of Tile Maps
There are four types of Tile Sets you can create: grid, isometric, hexagonal pointy or hexagonal flat. You choose the tile set depending on the style of your game.
Rubber Ducky Rescue uses a square grid. This a top down game, but you can also use grid tiles for a side scroller.
Isometric tiles are a diamond shape as in Ravenwood Fair.
There are two ways of placing hexagons: with the point on top or the flat side on top. This is an example of a pointy hexagon tile grid:

Sid Meier’s Civilization moved with great visual effect from an isometric grid in Civ 4 to a hexagonal grid in Civ 5.
How to Create a Tile Map
In Rubber Duckie Rescue, you’ll first paint two simple background tile maps with grass and water, replacing the current gray background. Later, you’ll create a new tile map in code with the objects that the car needs to collect.
To create a tile map, you’ll first need some tile images. Tile map art is an art form all of its own. Fortunately, there are a few free asset sites that developers can use.
Your game will use assets from kenney.nl. This is a great site with tons of tiles and other sprites available. Thanks Kenney! =]

Managing Your Images in the Asset Catalog
The starter project has an asset catalog named Assets.xcassets. It includes all of the tile and sprite images you’ll need for this tutorial.

The tile images are in texture atlases instead of folders. Texture atlases look and behave just like a folder.
The advantage of using texture atlases is performance. When your game is rendered, SpriteKit will make a “draw call” on the GPU for each and every texture you send it. If you combine multiple images into one texture — called a texture atlas — instead of having multiple draw calls, there’s only one, which is more efficient.
The asset catalog can automatically combine your sprite images into texture atlases. You don’t need to worry about how to work out the position of the sprite image in the texture atlas — SpriteKit handles all that for you.
You’ll create your tile sets using the images in this asset catalog.
Creating a Tile Set
Before getting into too much detail, you’ll do a quick overview of the tile creating and painting process. Later, you’ll create and paint a more complex tile set.
Choose File > New > File, scroll down and choose the iOS > SpriteKit Tile Set template and click Next.

Name the set Tiles, and click Create.
Select Tiles.sks in the project navigator.
A new Grid Tile Set and a Tile Group has automatically been created for you. You will have a group for every set of tiles. In this tutorial, you’ll create groups for Grass and Water.

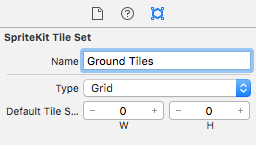
First, select Tile Set, and in the Attributes Inspector, rename the Tile Set to Ground Tiles.
Now, select new tile group in the set list panel. Again, in the Attributes Inspector, rename it to Water Tile.
Below the Attributes Inspector, select the Media Library. If you’ve not used this before, you’ll quickly discover how handy it is for creating tile sets.

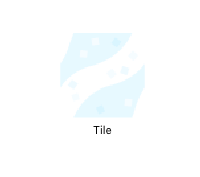
Locate the WaterCenter image and drag it onto the empty tile area.
That’s the first tile group defined, now you’ll create a second tile group.
Select Ground Tiles in the set list panel and click the + at the bottom. Select New Single Tile Group.

Select new tile group and in the Attributes Inspector change the name of new tile group to Grass Tile.
Locate the GrassCenter1 image in the Media Library and drag it to the empty Tile area.
