What’s New In SpriteKit on iOS 10: A Look At Tile Maps
Learn how to use Tile Maps in SpriteKit on iOS 10. By Caroline Begbie.
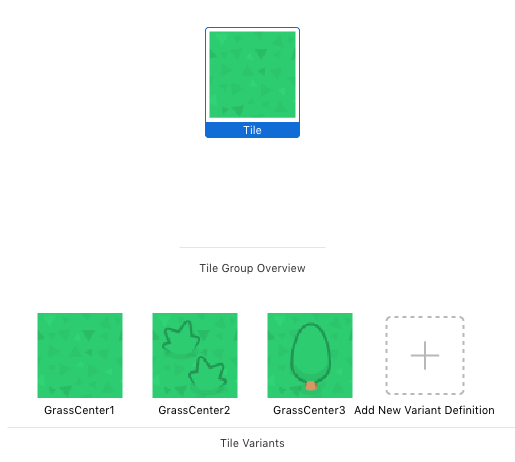
Working With Tile Variants
Click on the grass tile in the center of the screen.

At the bottom of the screen you can add new tile variants. When you paint your tiles, the editor will automatically choose one of these variants randomly, so that you get some variation in your map. Each variant can be given a Placement Weight in the Attributes Inspector. If you, for example, gave one variant a placement weight of 1, and a second variant a placement weight of 2, then the second variant would be laid down twice as often when you paint.
Drag the GrassCenter2 image to the empty variant slot and then the GrassCenter3 image to the next empty variant slot.
Note: At the time of the latest update to this article, there’s a small bug. If you paint your tiles now, the grass tile won’t paint properly. To combat this, just quit Xcode and restart. (You can alternatively add an extra new empty tile group to your tile set and delete it straightaway.)
Note: At the time of the latest update to this article, there’s a small bug. If you paint your tiles now, the grass tile won’t paint properly. To combat this, just quit Xcode and restart. (You can alternatively add an extra new empty tile group to your tile set and delete it straightaway.)
You’ve created your first tile set and now it’s time to go painting!
The Tile Map Editor
Select GameScene.sks. This scene currently just contains the car sprite.
From the Object Library at the bottom right drag a Tile Map Node onto the scene.

In the Attributes Inspector your Ground Tiles set has automatically been chosen as it’s the only tile set in the project. The Tile Size has automatically been set to the size of the tiles in that Tile Set. Change the Map Size to 32 Columns and 24 Rows. Ensure that the Position X and Y are set to 0 and Scale X and Y are set to 1.

Double-click on the Tile Map Node in the scene editor to start the tile editor. Or you can instead choose Editor > Edit Tile Map with the tile map node selected. If you have layers of tile map nodes, this menu option is very convenient.

If you don’t see a grid, zoom into the scene until you do.
At the top of the scene view there’s a new tool bar with the brush tool already selected and loaded with the water tile. Click and drag across the tile map and paint!
To change the tile, click the icon just to the left of the brush icon on the toolbar and choose the Grass tile from the drop down display.

Paint again. Notice the three Grass variants paint randomly. As much fun as this is, it’ll soon get even better :].

The icons on the toolbar are similar to other paint programs. Going from left to right:
![]()
- The Hand tool allows you to drag the scene around.
- The Eyedropper tool picks a tile from those already painted.
- You’ve already seen what the Select Tile and Brush tools do.
- The Flood Fill tool flood fills similar contiguous tiles with your selected tile.
- The Erase tool will remove tiles.
- If you are painting large areas, Select Brush Size allows you to change the brush size.
- The two stamp tools are fun. Choose Create Stamp (the stamp tool with the little circle). Click in a square and then click in another square to the right and down a bit to make a rectangular selection of tiles. You’ve now created a stamp.
- Choose Select Stamp (the stamp tool with the arrow), and a drop down of all the stamps you’ve created will show. Click on a stamp to select it, and then paint with it. The shaded area shows where the stamp will go. This makes it super easy to paint large areas.
- Randomize clears the tiles and randomizes the currently selected tile. This is a good way to paint a large area.
When you’ve finished experimenting, fill the whole map with water tiles. You can flood fill empty areas. This will be the background, and you’ll be able to overlay more detail in a second tile map node.

Now that you’ve had an overview of how to create and paint tiles, in the next section you’ll create a more complicated tile set with edge tiles.
Working With Adjacency Groups
Adjacency groups let you define what edge images should be painted when you paint your tiles. For example, if you are creating an island, you would have a center tile of grass, and the edge tiles would be the beach going into the ocean. As you paint, center grass tiles will be laid down with the edges automatically surrounding them.
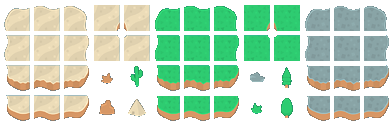
There are two approaches to tile edges. You can have solid edge tiles that transition from one surface to another, like this tile set from kenney.nl:

The other approach is to have transparent edges such as this set, which you will be using here:
If you use transparent edges, you must layer your tile map nodes so the background shows through the transparency. You’ve already painted the water background. Now you’ll add another layer for the land.
Go back to Tiles.sks to edit your tile set. Control+click Ground Tiles and select New > 8-Way Adjacency Group from the menu.

Rename new tile group to Grass. When you select the Grass tile group, you’ll see a grid of tiles to fill.
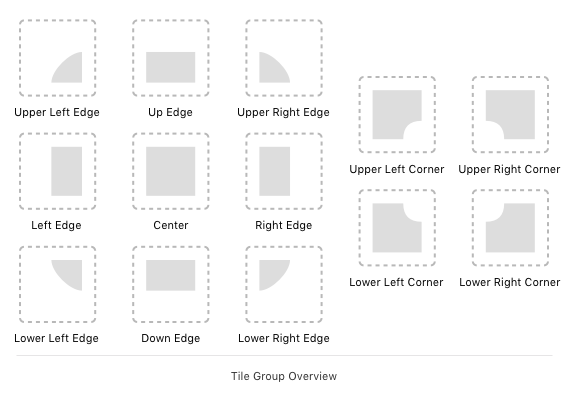
This may seem confusing at first, but all will become clear.
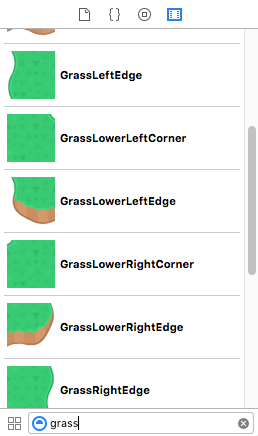
Filter the media library with grass to show all the grass tile images.
Drag the tiles to the relevant positions in the grid. I’ve named each image according to its position in the grid. Add the three variants for the center just as you did before. This time, select the GrassCenter1 variant and change the Placement Weight to 10. This way you’ll get more plain tiles when you paint.

When you drag the images into place, you might make mistakes. I, myself, frequently confuse corners and edges :]. No worries. Simply drag the correct image over the wrong image and choose Replace tile variant texture from the pop-up menu. Note that if you choose the other option you can add variants this way.
When you’ve finished, your grid should look like the image above. Quit and restart Xcode so that your changes will propagate to the scene editor.
Open GameScene.sks in the project navigator.
Drag a new Tile Map Node onto the scene. Change the name of the node to landBackground. You’ll need this because later, you’ll refer to the node in code. Change the Map Size to 32 Columns and 24 Rows. Verify that the Position X and Y are set to 0 and Scale X and Y are set to 1.

Double-click on the scene editor to edit the tile map.
On the toolbar, click Select Tile. The new Grass tile group will show on the drop down along with the other two tile groups.

Select the right-most tile group Grass, click the brush tool on the toolbar and start painting.

See how the edges magically surround where you paint!
Remembering back to that confusing grid in Tiles.sks, here’s how the tiles were painted:

In the Attributes Inspector untick Enable Automapping.

Now when you click on Select Tile, the drop-down will show all available tiles. You can now paint individual squares in the grid with your selected tile.

When you’ve finished painting click Done. Now, build and run your app to admire your new background :].
