Phase 1: The Recording Process - Capturing User Intent
The “Record” phase is the developer’s entry point into the new UI automation workflow. It has been redesigned to be more than a simple macro recorder; it is now an intelligent assistant that helps generate clean, stable, and maintainable test code from the very first interaction.
Initiating a Recording Session
Starting a recording session is a straightforward process designed to integrate seamlessly into the existing Xcode workflow.
Open the TaskMasterUITests.swift file.
Create a new test method. Test method names must begin with the prefix “test” and take no parameters, for example, func testAddTaskFlow(). Note: Execute UI tests on the MainActor.
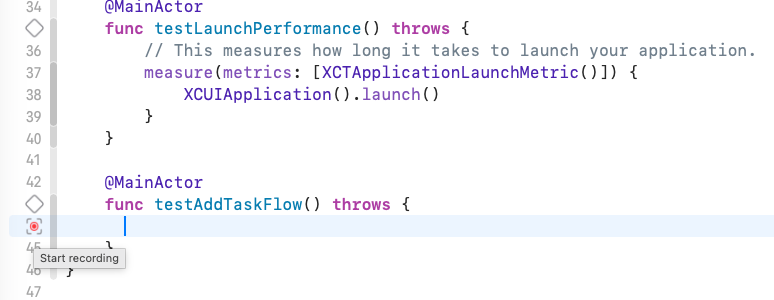
Place the cursor inside the body of this new method.
Location of the record button
In the Source Editor Gutter there is gray Record button. When you hover or click the button it turns red. Click the red circular Record button to start
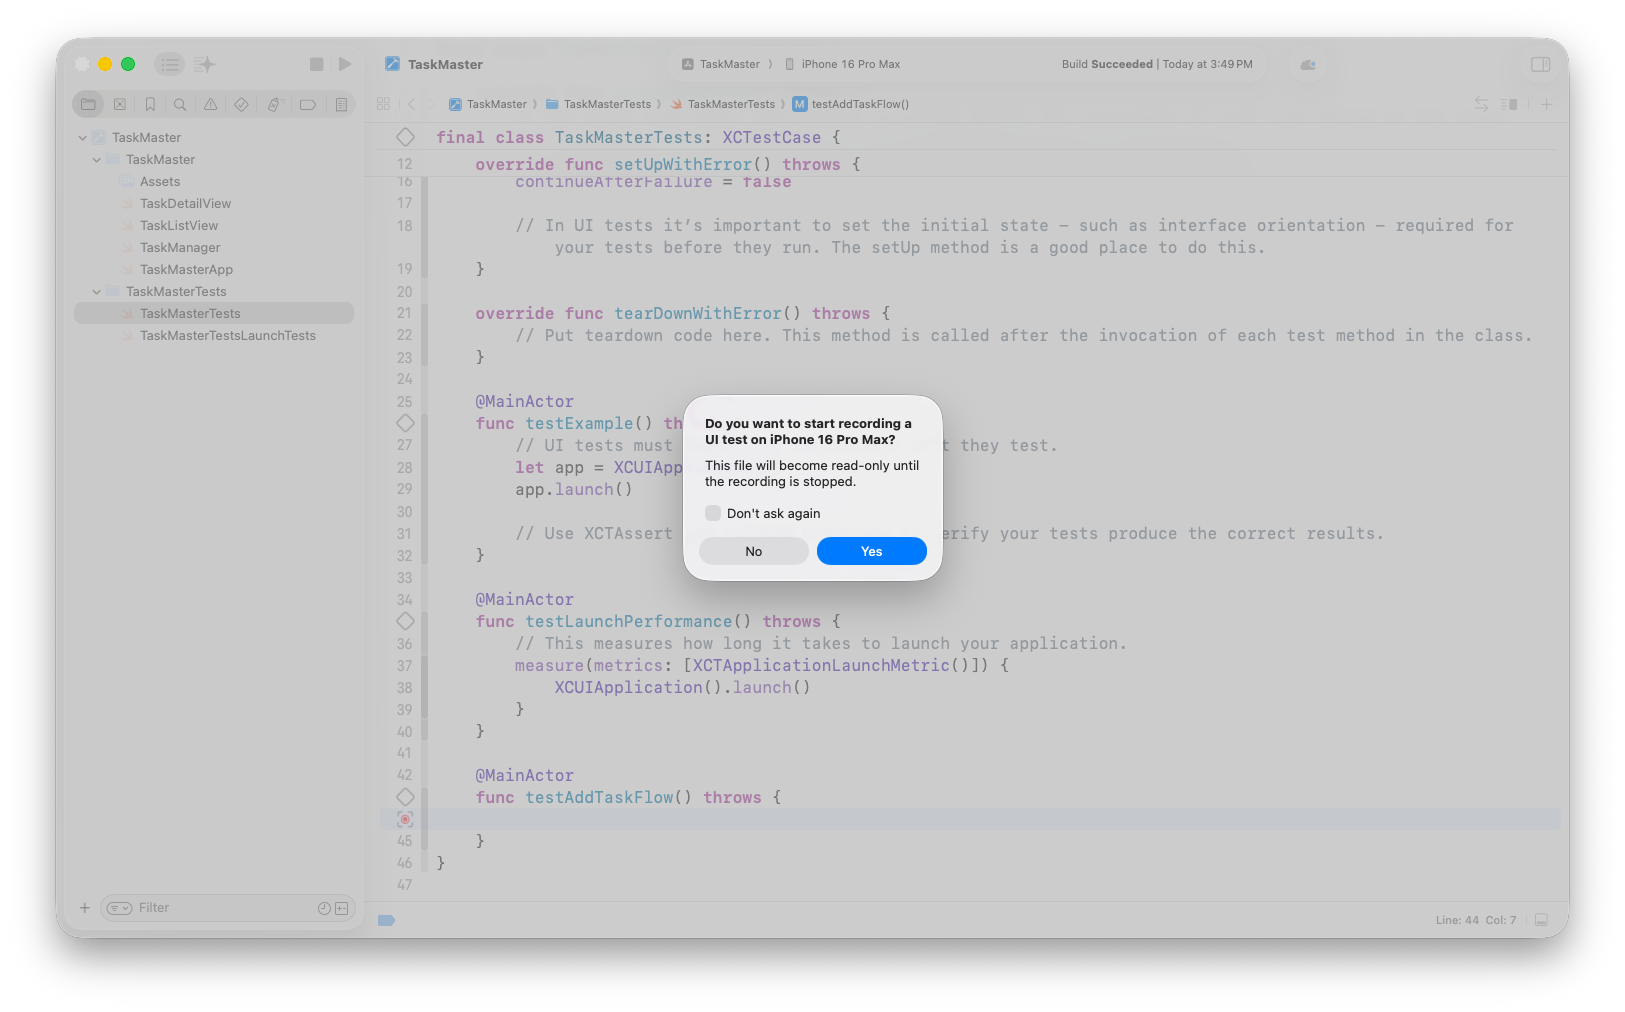
Source file is read only when recording
A warning will appear stating the file TaskMasterTest.swift will be read-only until the recording is stopped. Once you click Yes, Xcode will build and launch the TaskMaster application in the selected simulator, and the recording session will begin.
Intelligent Element Query Generation
This is where the power of the new recorder becomes apparent. As the developer interacts with the running application, Xcode captures these events and translates them into Swift code. However, unlike its predecessor, the new recorder employs an intelligent strategy for generating element queries.
Its primary directive is to find and use accessibility identifiers. Because the TaskMaster app was diligently prepared with these identifiers in Section 2, the recorder will prioritize them, resulting in highly stable locators.
If an interacted-with element lacks an identifier, the recorder falls back to other strategies, such as querying by label text or position. However, it now provides immediate feedback. The editor will present a dropdown menu next to the generated line of code, showing alternative queries and visually flagging those that are considered less stable (e.g., positional queries). This subtle but powerful feature serves as a constant reminder of best practices.
This intelligent approach transforms the recorder from a passive code generator into an active educational tool. It provides immediate feedback during the recording process itself. For example, if a developer interacts with a button that lacks an identifier, the recorder could generate a comment like // WARNING: Using a label-based query. Consider adding an accessibility identifier for stability. This gamifies good practice by rewarding the use of identifiers with clean, warning-free code, effectively upskilling the developer and promoting a culture of testability over time.
Recording a User Flow: Adding a New Task
To illustrate this process, let’s record the user flow for adding a new task to the TaskMaster app.
With the recording session active and the app running, perform the following actions in the simulator:
Tap the “+” button in the navigation bar.
Tap inside the “Task Title” text field.
Type the text “Buy groceries”.
Tap the “Save” button in the navigation bar.
As these actions are performed, Xcode will append the corresponding code to the testAddTaskFlow() method in real-time.
Click the red record button again to stop the recording.
The generated code will be clean, concise, and readable, thanks to the recorder’s reliance on the pre-defined accessibility identifiers:
This generated script is a robust starting point. It is easy to read, resistant to UI changes, and ready for the next phase: adding assertions to validate the application’s behavior.
Phase 2: The Replay Engine - Execution and Assertion
The “Replay” phase is where the recorded script is executed and, crucially, enhanced with assertions to validate the application’s state. A test script that runs without verifying an outcome is merely an automation; it is the assertion that transforms it into a true test. This phase also serves a dual purpose in the new workflow: it is the data-gathering engine that powers the comprehensive analysis in the “Review” phase.
Running Your UI Test
Xcode provides multiple convenient ways to execute UI tests, allowing for flexibility during development and debugging.
From the Test Navigator: The Test Navigator (accessible via the diamond icon in the left-hand navigator pane) lists all test targets, classes, and methods. A “play” button appears next to each item, allowing the execution of the entire test suite, a single test class, or an individual test method.
From the Source Editor Gutter: Next to each test class and method definition in the source editor, a small diamond icon appears. Clicking this icon will run the corresponding test(s). After a run, this icon changes to a green checkmark for a pass or a red ‘X’ for a failure.
Keyboard Shortcuts: The most common shortcut is Command-U, which runs all tests in the currently active scheme.
The Art of Assertion: Validating Application State
The core principle of testing is to verify that an actual outcome matches an expected outcome. In UI testing, this is accomplished through assertions. The XCTest framework provides a rich set of assertion functions, such as XCTAssertTrue, XCTAssertFalse, and XCTAssertEqual, to perform these checks.
A key philosophy when writing UI tests is to focus on testing behavior and application state, rather than cosmetic appearance. For example, instead of asserting that a button is a specific shade of blue, a better test asserts that tapping the button causes the correct data to appear on the screen.
Enhancing the Recorded Script with Assertions
The script recorded in Phase 1 successfully automates the steps to add a task, but it doesn’t verify that the task was actually added. To make it a meaningful test, assertions must be added. A widely adopted best practice for structuring test code is the Arrange-Act-Assert (AAA) pattern, also known as Given-When-Then.
Arrange: Set up the initial state. For UI tests, this is often handled by the setUpWithError() method, which launches the app in a clean state.
Act: Perform the user interactions, which is the code generated by the recorder.
Assert: Verify that the application is in the expected state after the actions.
Let’s enhance the testAddTaskFlow method with assertions:
@MainActor
func testAddTaskFlow() throws {
  let app = XCUIApplication()

  // Act
  app.activate()
  app.buttons["addTaskButton"].firstMatch.tap()
  app.textFields["taskTitleField"].firstMatch.tap()
  app.textFields["taskTitleField"].firstMatch.typeText("Buy groceries")
  app.buttons["saveTaskButton"].firstMatch.tap()

  // Assert
  // 1. Verify that the new task cell exists in the list
  let newTaskCell = app.staticTexts
  XCTAssertTrue(newTaskCell["Buy groceries"].exists, "The new task is in the list.")

  // 2. Verify that the app has returned to the main task list view.
  let navigationBar = app.navigationBars["Tasks"]
  XCTAssertTrue(navigationBar.exists, "The user is in the main task list view.")
}
With these assertions, the test now provides real value. It confirms not only that the UI can be manipulated without crashing but also that the manipulation leads to the correct application state.
Handling Asynchronicity and Delays
In real-world applications, UI elements may not appear instantaneously. They might be loaded from a network request or appear after an animation. Using hard-coded delays like sleep() is an anti-pattern because it makes tests slow and unreliable; the test might fail on a slower machine or pass unnecessarily slowly on a faster one.
The correct approach is to use XCTest’s built-in waiting mechanisms. The waitForExistence(timeout:) method is invaluable for this purpose. It polls for the existence of an element for a specified duration and returns true as soon as the element appears, or false if the timeout is reached.
For example, if adding a task involved a network call, the assertion could be made more robust:
// Assert
let newTaskCell = app.staticTexts
let cellExists = newTaskCell.element.waitForExistence(timeout: 5) // Wait up to 5 seconds
XCTAssertTrue(cellExists, "The new task cell should appear in the list after saving.")
While this replay and assertion process is executing, the test engine is performing its critical secondary function: collecting a rich stream of data. Every UI state change is snapshotted, performance counters are recorded, and the accessibility hierarchy is logged. This redefines the purpose of the test run. Every execution, even a successful one, generates valuable intelligence. A “passing” test is no longer the end of the story; it is the beginning of a deeper analysis in the Review Workbench. This encourages developers to run UI tests more frequently, not just to catch regressions, but to proactively monitor the overall health of their application’s user experience.
Phase 3: The Review
The “Review” phase represents the most significant innovation in the new UI automation workflow. The Review, a powerful, integrated suite of tools within the Xcode Test Report navigator. This transforms test analysis from a binary pass/fail check into a deep, multi-faceted investigation of application quality. It provides actionable insights into visual correctness, performance, and accessibility, directly linking them to the specific user flow under test.
Open the Report Navigator to view reports from running tests. The left side of the screen details all of the test runs made on this project. Click on the topmost TaskMaster/TaskMaster drop down to display the report. The report shows the status of the run, the number of tests, and the devices and configurations used in the test.
Xcode Report Navigator screen
Clicking on Tests, either in the left pane or report will will update the report with break down of the tests executed.
Test break down screen
Clicking the test testAddTaskFlow will show a breakdown off all of the events in the tests and their associated timestamp.
Test event break down screen
Clicking the drop down arrow will detail the steps behind the event. This screen is more interesting when there are failed tests.
Failed test event break down screen
Here in addition to the events and timestamp we can see a recording of the test and failure.
The Test Pyramid in a “Review” World
The “test pyramid” is a foundational concept in software testing, advocating for a large base of fast, inexpensive unit tests, a smaller layer of integration tests, and a very small, carefully selected set of end-to-end UI tests at the top.
The Record → Replay → Review workflow makes the tests at the top of the pyramid incredibly valuable, providing insights that unit tests cannot. However, this does not mean the pyramid should be inverted. UI tests are still inherently slower and more resource-intensive than unit tests. Therefore, the best strategy is to reserve these comprehensive UI tests for the application’s most critical, user-facing workflows. Focus on flows that represent high business value or significant user interaction, such as:
User authentication (login, logout, registration)
Core content creation or consumption
E-commerce checkout or subscription flows
See forum comments
This content was released on Sep 21 2025. The official support period is 6-months
from this date.
Demo using the Record -> Replay -> Review flow.
Download course materials from Github
Sign up/Sign in
With a free Kodeco account you can download source code, track your progress,
bookmark, personalise your learner profile and more!
Previous: Introducing the Sample Project
Next: Conclusion
All videos. All books.
One low price.
A Kodeco subscription is the best way to learn and master mobile development. Learn iOS, Swift, Android, Kotlin, Flutter and Dart development and unlock our massive catalog of 50+ books and 4,000+ videos.