UI Integration & Testing
In this segment, you’ll connect your camera and image processing components to the task creation UI. You’ll add buttons for capturing photos and applying filters, then test the complete flow from camera capture to filtered display.
The UI layer orchestrates the entire process, calling Android camera APIs and Swift image processing functions through the repositories you created.
Updating the Task Model for Photo Storage
Before adding photo capture to the UI, you need to update the Swift Task model to support storing photo URIs.
The Task struct needs a new property to hold the photo’s URI. This allows tasks to reference their associated photos, which are stored as files in the app’s directory.
Open taskmanager-lib/Sources/TaskManagerKit/Task.swift and update the Task struct:
public struct Task: Codable {
  public let id: String
  public let title: String
  public let description: String
  public let priority: Priority
  public var isCompleted: Bool
  // 1
  public let photoUri: String?

  // 2
  public init(
    id: String,
    title: String,
    description: String,
    priority: Priority,
    isCompleted: Bool = false,
    photoUri: String? = nil
  ) {
    self.id = id
    self.title = title
    self.description = description
    self.priority = priority
    self.isCompleted = isCompleted
    // 3
    self.photoUri = photoUri
  }
}
What each section does:
- photoUri property: Optional String to store the file URI of the task’s photo. Optional because not all tasks will have photos.
- Updated initializer: Adds photoUri parameter with a default value of nil, maintaining backward compatibility with existing code.
- Property assignment: Assigns the photoUri parameter to the property during initialization.
This change is backward compatible because the photoUri parameter has a default value. Existing code that creates tasks without photos will continue to work, while new code can provide a photo URI when creating tasks with photos.
Updating the Task Repository
Now that the Task model supports photo URIs, you need to update the repository to accept and pass this data when creating tasks.
Open app/src/main/java/com/kodeco/android/swiftsdkforandroid/taskmanager/repository/TaskRepository.kt and update the addTask function.
First, add the missing import at the top of the file:
import java.util.Optional
Then update the addTask function to accept and handle the photoUri parameter:
// 1
fun addTask(
  title: String,
  description: String,
  priority: Priority,
  photoUri: String? = null
): Result<Unit> {
  // 2
  if (!TaskValidator.validateTitle(title)) {
    return Result.failure(Exception("Title must be between 3 and 50 characters"))
  }

  if (!TaskValidator.validateDescription(description)) {
    return Result.failure(Exception("Description must be between 10 and 200 characters"))
  }

  // 3
  val task = Task.init(
    UUID.randomUUID().toString(),
    title,
    description,
    priority,
    false,
    Optional.ofNullable(photoUri),
    arena
  )

  // 4
  _tasks.value += task
  return Result.success(Unit)
}
What each section does:
-
Updated signature: Adds optional
photoUriparameter with a default value of null, maintaining backward compatibility. - Validation: Existing validation logic remains unchanged.
-
Task creation: Passes
Optional.ofNullable(photoUri)to the Swift Task initializer. This wraps the nullable Kotlin String in a Java Optional, which swift-java maps to Swift’s Optional type. - Add to list: Adds the new task to the in-memory list.
The key change is passing Optional.ofNullable(photoUri) as the sixth parameter to Task.init(). Swift’s Optional type is represented as Java’s Optional in the JNI bindings, so you use Optional.ofNullable() to convert Kotlin’s nullable String to the expected type.
Updating the Create Task Dialog
Now you’ll integrate photo capture, preview, and filtering into the task creation dialog. This requires adding state management, camera integration, filter buttons, and helper functions.
The complete updated CreateTaskDialog.kt brings together all the components you’ve built: camera capture, image processing, and the UI for applying filters.
Replace the contents of app/src/main/java/com/kodeco/android/swiftsdkforandroid/taskmanager/ui/CreateTaskDialog.kt with this complete implementation:
package com.kodeco.android.swiftsdkforandroid.taskmanager.ui

import android.content.Context
import android.graphics.Bitmap
import android.graphics.BitmapFactory
import android.net.Uri
import androidx.exifinterface.media.ExifInterface
import androidx.compose.foundation.horizontalScroll
import androidx.compose.foundation.layout.*
import androidx.compose.foundation.rememberScrollState
import androidx.compose.material.icons.Icons
import androidx.compose.material.icons.filled.CameraAlt
import androidx.compose.material3.*
import androidx.compose.runtime.*
import androidx.compose.ui.Alignment
import androidx.compose.ui.Modifier
import androidx.compose.ui.layout.ContentScale
import androidx.compose.ui.platform.LocalContext
import androidx.compose.ui.res.stringResource
import androidx.compose.ui.unit.dp
import coil.compose.AsyncImage
import com.kodeco.android.swiftsdkforandroid.taskmanager.R
import com.kodeco.android.taskmanagerkit.Priority
import org.swift.swiftkit.core.SwiftArena
import com.kodeco.android.swiftsdkforandroid.taskmanager.repository.ImageProcessingRepository
import com.kodeco.android.swiftsdkforandroid.taskmanager.repository.TaskRepository
import kotlinx.coroutines.Dispatchers
import kotlinx.coroutines.launch
import kotlinx.coroutines.withContext
import java.io.File
import java.io.FileOutputStream


@OptIn(ExperimentalMaterial3Api::class)
@Composable
fun CreateTaskDialog(
  onDismiss: () -> Unit
) {
  val arena = remember { SwiftArena.ofConfined() }

  var title by remember { mutableStateOf("") }
  var description by remember { mutableStateOf("") }
  var priority by remember { mutableStateOf(Priority.medium(arena)) }
  var expanded by remember { mutableStateOf(false) }
  var errorMessage by remember { mutableStateOf<String?>(null) }
  // 1
  var photoUri by remember { mutableStateOf<Uri?>(null) }
  var showCamera by remember { mutableStateOf(false) }
  // 2
  var originalBitmap by remember { mutableStateOf<Bitmap?>(null) }
  var displayedBitmap by remember { mutableStateOf<Bitmap?>(null) }
  var isProcessing by remember { mutableStateOf(false) }

  val coroutineScope = rememberCoroutineScope()
  val context = LocalContext.current


  val priorities = remember(arena) {
    listOf(
      Priority.low(arena),
      Priority.medium(arena),
      Priority.high(arena)
    )
  }

  // 3
  if (showCamera) {
    CameraPermissionHandler(
      onPermissionGranted = {
        CameraScreen(
          onPhotoCaptured = { uri ->
            photoUri = uri
            // 4
            originalBitmap = loadBitmapFromUri(context, uri)
            displayedBitmap = originalBitmap
            showCamera = false
          },
          onDismiss = {
            showCamera = false
          }
        )
      },
      onPermissionDenied = {
        showCamera = false
      }
    )
    return
  }


  AlertDialog(
    onDismissRequest = onDismiss,
    title = {
      Text(text = stringResource(R.string.add_task))
    },
    text = {
      Column(
        modifier = Modifier
          .fillMaxWidth()
          .padding(vertical = 8.dp),
        verticalArrangement = Arrangement.spacedBy(12.dp)
      ) {
        OutlinedTextField(
          value = title,
          onValueChange = { title = it },
          label = { Text(stringResource(R.string.task_title)) },
          modifier = Modifier.fillMaxWidth(),
          singleLine = true
        )

        OutlinedTextField(
          value = description,
          onValueChange = { description = it },
          label = { Text(stringResource(R.string.task_description)) },
          modifier = Modifier.fillMaxWidth(),
          minLines = 3,
          maxLines = 5
        )

        ExposedDropdownMenuBox(
          expanded = expanded,
          onExpandedChange = { expanded = !expanded }
        ) {
          OutlinedTextField(
            value = priority.rawValue,
            onValueChange = {},
            readOnly = true,
            label = { Text(stringResource(R.string.task_priority)) },
            trailingIcon = { ExposedDropdownMenuDefaults.TrailingIcon(expanded = expanded) },
            modifier = Modifier
              .menuAnchor(MenuAnchorType.PrimaryNotEditable)
              .fillMaxWidth()
          )

          ExposedDropdownMenu(
            expanded = expanded,
            onDismissRequest = { expanded = false }
          ) {
            priorities.forEach { option ->
              DropdownMenuItem(
                text = { Text(option.rawValue) },
                onClick = {
                  priority = option
                  expanded = false
                }
              )
            }
          }
        }

        // 5
        Button(
          onClick = { showCamera = true },
          modifier = Modifier.fillMaxWidth()
        ) {
          Icon(
            imageVector = Icons.Default.CameraAlt,
            contentDescription = null,
            modifier = Modifier.padding(end = 8.dp)
          )
          Text("Add Photo")
        }

        // 6
        displayedBitmap?.let { bitmap ->
          AsyncImage(
            model = bitmap,
            contentDescription = "Task photo preview",
            modifier = Modifier
              .fillMaxWidth()
              .height(150.dp),
            contentScale = ContentScale.Crop
          )

          if (isProcessing) {
            Text(
              text = "Processing...",
              style = MaterialTheme.typography.bodySmall,
              modifier = Modifier.padding(vertical = 4.dp)
            )
          }

          // 7
          Row(
            modifier = Modifier
              .fillMaxWidth()
              .horizontalScroll(rememberScrollState()),
            horizontalArrangement = Arrangement.spacedBy(8.dp)
          ) {
            // 8
            Button(
              onClick = {
                displayedBitmap = originalBitmap
              }
            ) {
              Text("Original")
            }

            // 9
            Button(
              onClick = {
                originalBitmap?.let { original ->
                  isProcessing = true
                  coroutineScope.launch {
                    val result = withContext(Dispatchers.Default) {
                      ImageProcessingRepository.applyFilter(
                        original,
                        ImageProcessingRepository.FilterType.GRAYSCALE,
                        context
                      )
                    }
                    displayedBitmap = result
                    isProcessing = false
                  }
                }
              },
              enabled = !isProcessing
            ) {
              Text("Grayscale")
            }

            // 10
            Button(
              onClick = {
                originalBitmap?.let { original ->
                  isProcessing = true
                  coroutineScope.launch {
                    val result = withContext(Dispatchers.Default) {
                      ImageProcessingRepository.applyFilter(
                        original,
                        ImageProcessingRepository.FilterType.BLUR,
                        context
                      )
                    }
                    displayedBitmap = result
                    isProcessing = false
                  }
                }
              },
              enabled = !isProcessing
            ) {
              Text("Blur")
            }

            // 11
            Button(
              onClick = {
                originalBitmap?.let { original ->
                  isProcessing = true
                  coroutineScope.launch {
                    val result = withContext(Dispatchers.Default) {
                      ImageProcessingRepository.applyFilter(
                        original,
                        ImageProcessingRepository.FilterType.BRIGHTER,
                        context
                      )
                    }
                    displayedBitmap = result
                    isProcessing = false
                  }
                }
              },
              enabled = !isProcessing
            ) {
              Text("Brighter")
            }

            // 12
            Button(
              onClick = {
                originalBitmap?.let { original ->
                  isProcessing = true
                  coroutineScope.launch {
                    val result = withContext(Dispatchers.Default) {
                      ImageProcessingRepository.applyFilter(
                        original,
                        ImageProcessingRepository.FilterType.DARKER,
                        context
                      )
                    }
                    displayedBitmap = result
                    isProcessing = false
                  }
                }
              },
              enabled = !isProcessing
            ) {
              Text("Darker")
            }
          }
        }


        errorMessage?.let { error ->
          Text(
            text = error,
            color = MaterialTheme.colorScheme.error,
            style = MaterialTheme.typography.bodySmall
          )
        }
      }
    },
    confirmButton = {
      Button(
        onClick = {
          // 13
          val finalUri = if (displayedBitmap != null && displayedBitmap != originalBitmap) {
            saveBitmapAndGetUri(context, displayedBitmap!!)
          } else {
            photoUri
          }

          // 14
          val result = TaskRepository.addTask(
            title = title,
            description = description,
            priority = priority,
            photoUri = finalUri?.toString()
          )

          result.onSuccess {
            onDismiss()
          }.onFailure { error ->
            errorMessage = error.message ?: "Validation failed"
          }
        }
      ) {
        Text(stringResource(R.string.save))
      }
    },
    dismissButton = {
      TextButton(onClick = onDismiss) {
        Text(stringResource(R.string.cancel))
      }
    }
  )
}

// 15
private fun loadBitmapFromUri(context: Context, uri: Uri): Bitmap? {
  return try {
    // 15a
    val bitmap = context.contentResolver.openInputStream(uri)?.use { inputStream ->
      BitmapFactory.decodeStream(inputStream)
    } ?: return null

    // 15b
    correctBitmapOrientation(context, uri, bitmap)
  } catch (e: Exception) {
    e.printStackTrace()
    null
  }
}

// 16
private fun correctBitmapOrientation(context: Context, uri: Uri, bitmap: Bitmap): Bitmap {
  return try {
    context.contentResolver.openInputStream(uri)?.use { inputStream ->
      // 16a
      val exif = ExifInterface(inputStream)
      val orientation = exif.getAttributeInt(
        ExifInterface.TAG_ORIENTATION,
        ExifInterface.ORIENTATION_NORMAL
      )

      // 16b
      when (orientation) {
        ExifInterface.ORIENTATION_ROTATE_90 -> rotateBitmap(bitmap, 90f)
        ExifInterface.ORIENTATION_ROTATE_180 -> rotateBitmap(bitmap, 180f)
        ExifInterface.ORIENTATION_ROTATE_270 -> rotateBitmap(bitmap, 270f)
        else -> bitmap
      }
    } ?: bitmap
  } catch (e: Exception) {
    e.printStackTrace()
    bitmap
  }
}

// 17
private fun rotateBitmap(bitmap: Bitmap, degrees: Float): Bitmap {
  val matrix = android.graphics.Matrix()
  matrix.postRotate(degrees)
  return Bitmap.createBitmap(bitmap, 0, 0, bitmap.width, bitmap.height, matrix, true)
}

// 18
private fun saveBitmapAndGetUri(context: Context, bitmap: Bitmap): Uri? {
  return try {
    val photoDir = context.getExternalFilesDir("photos") ?: return null
    val file = File(photoDir, "FILTERED_${System.currentTimeMillis()}.jpg")

    FileOutputStream(file).use { out ->
      bitmap.compress(Bitmap.CompressFormat.JPEG, 90, out)
    }

    Uri.fromFile(file)
  } catch (e: Exception) {
    e.printStackTrace()
    null
  }
}
What each section does:
- Camera state: Tracks the photo Uri and whether the camera screen should be shown.
- Bitmap state: Stores the original captured bitmap, the currently displayed bitmap (which may be filtered), and a processing flag.
- Camera screen: When showCamera is true, displays the camera permission handler and camera screen.
- Photo loading: Loads the captured photo as a Bitmap and initializes both original and displayed versions.
- Camera button: Opens the camera when tapped.
- Photo preview: Shows the current bitmap (original or filtered) using AsyncImage.
- Filter button row: Horizontal scrolling row of filter options.
- Original button: Resets the display to the original captured photo.
- Grayscale button: Applies the grayscale filter using Swift image processing.
- Blur button: Applies the blur filter using Swift image processing.
- Brighter button: Applies brightness increase using Swift image processing.
- Darker button: Applies brightness decrease using Swift image processing.
- Save logic: If a filter was applied, saves the filtered bitmap to a new file and uses that Uri. Otherwise, uses the original photo Uri.
- Task creation: Passes the photo Uri (original or filtered) to TaskRepository when creating the task.
- loadBitmapFromUri: Helper function that loads a Bitmap from a Uri (15a) and corrects its orientation using EXIF data (15b).
- correctBitmapOrientation: Reads EXIF orientation metadata from the image file (16a) and rotates the bitmap accordingly (16b) to ensure photos display correctly regardless of how the device was held.
- rotateBitmap: Helper function that applies a rotation transformation to a bitmap using Android’s Matrix.
- saveBitmapAndGetUri: Helper function that saves a filtered Bitmap to a file and returns its Uri.
This complete implementation integrates all the components you’ve built throughout this lesson: camera capture from Segment 2, binary data processing from Segment 3, and Swift image filters from Segment 4.
Note: Why does EXIF orientation matter? When you take a photo with a camera, the device stores orientation metadata (EXIF data) in the image file rather than physically rotating the pixel data. Without reading and applying this metadata, photos taken in portrait mode or with the device held at different angles will display rotated incorrectly. The
correctBitmapOrientationfunction reads this EXIF data using theandroidx.exifinterfacelibrary (which you added in Segment 2) and rotates the bitmap accordingly, ensuring photos always display with the correct orientation.
Via Android Studio’s Build menu choose Clean Project then build and run your app on a device or emulator with camera support.
Testing the Complete Flow
You can now verify that everything works correctly.
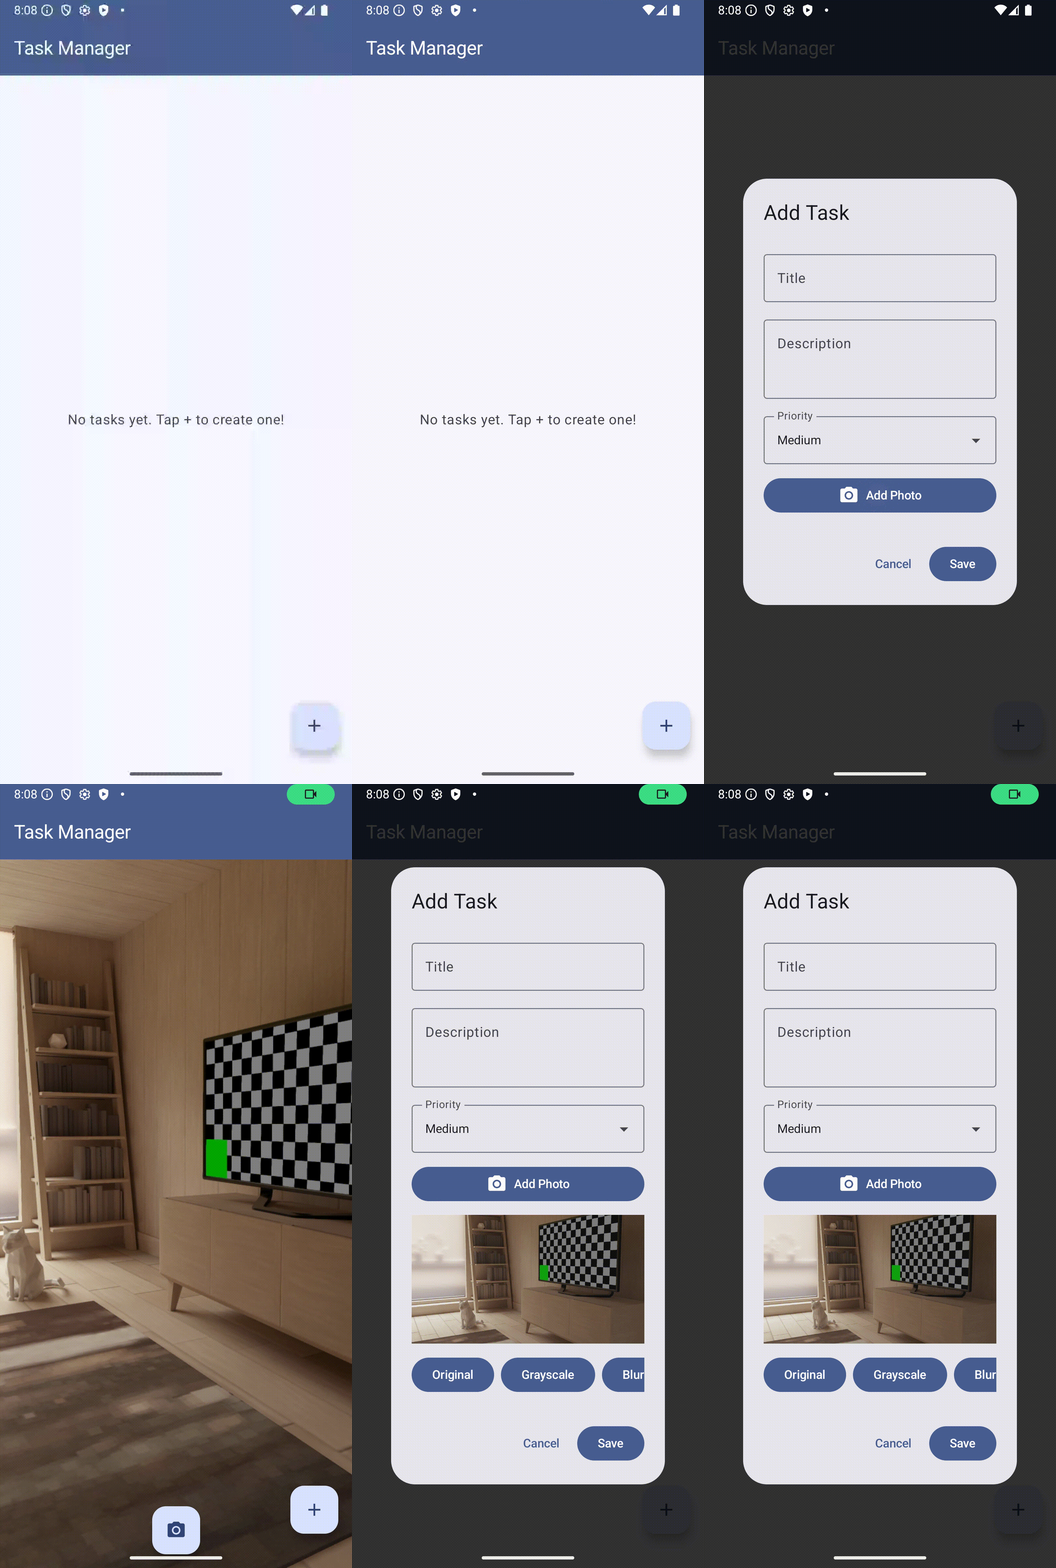
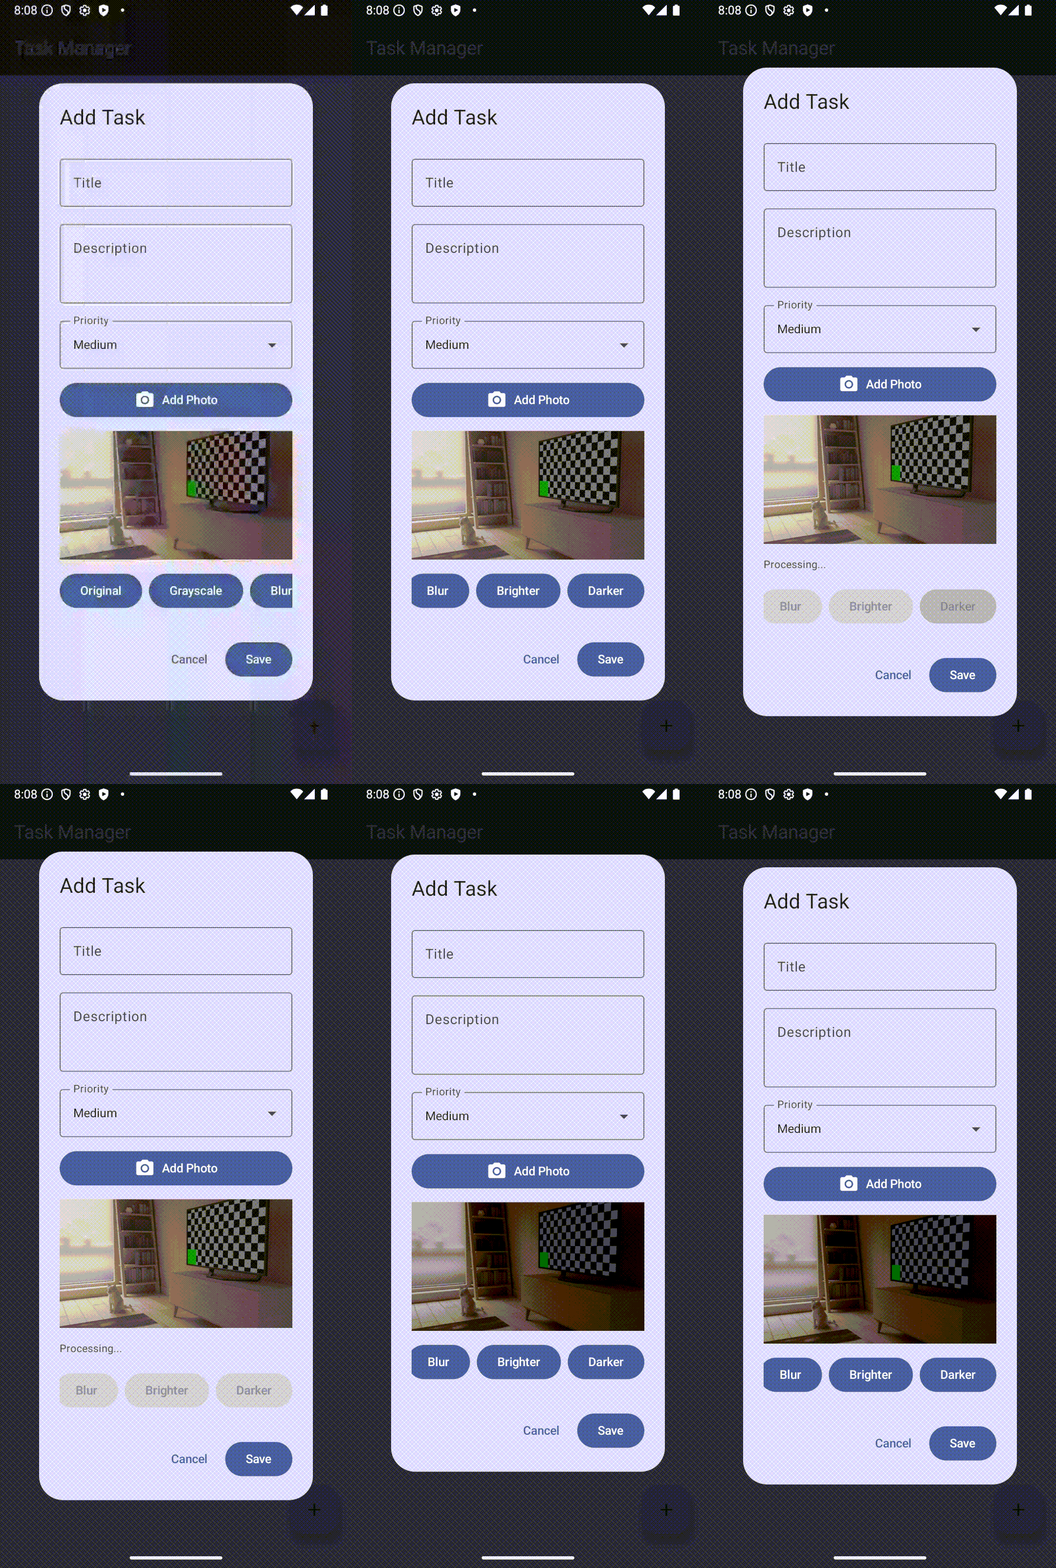
Test Case 1: Camera Capture
- Open the app and tap the floating action button.
- In the Add Task dialog, tap the “Add Photo” button.
- Grant camera permission when prompted.
- See the camera preview screen.
- Tap the capture button.
Expected result: Camera closes and the photo appears in the task dialog preview.
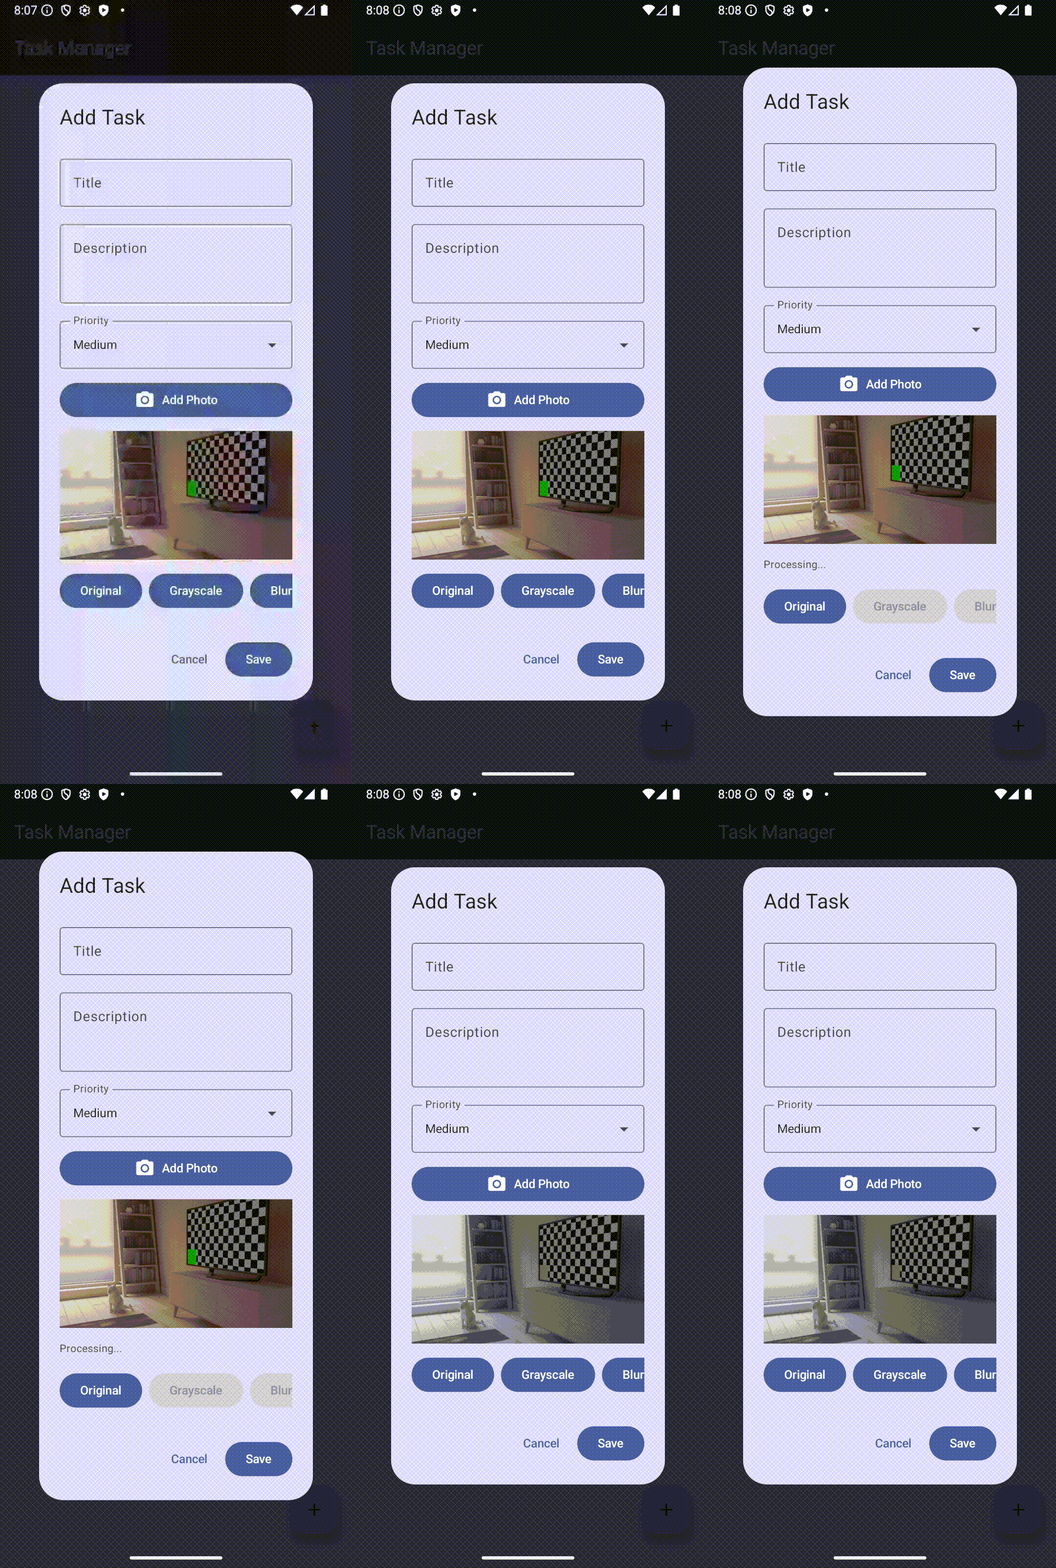
Test Case 2: Grayscale Filter
- With a photo captured, tap the “Grayscale” button.
- Wait for processing to complete.
Expected result: The photo converts to black and white. Colors are replaced with gray values based on the luminosity formula.
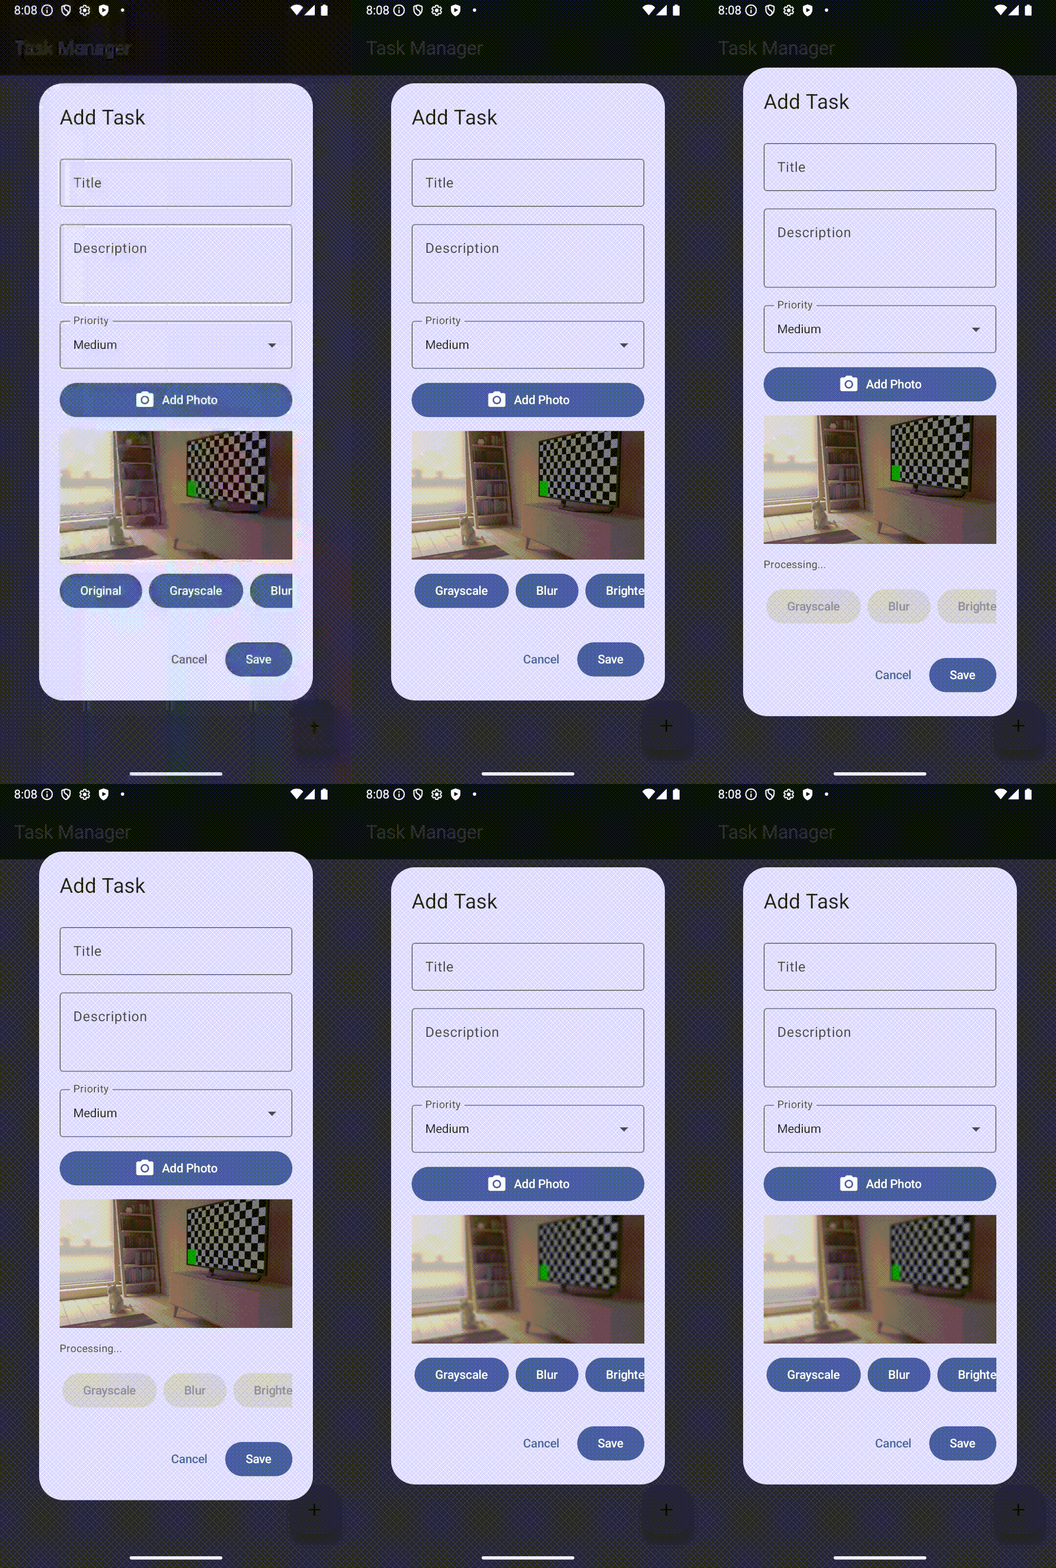
Test Case 3: Blur Filter
- Tap the “Original” button to reset the photo.
- Tap the “Blur” button.
- Wait for processing (this takes longer than other filters).
Expected result: The photo becomes soft-focused with edges blurred. Fine details are smoothed out.
Test Case 4: Brightness Filters
- Tap “Brighter”.
Expected result: The photo becomes lighter. Dark areas become more visible.
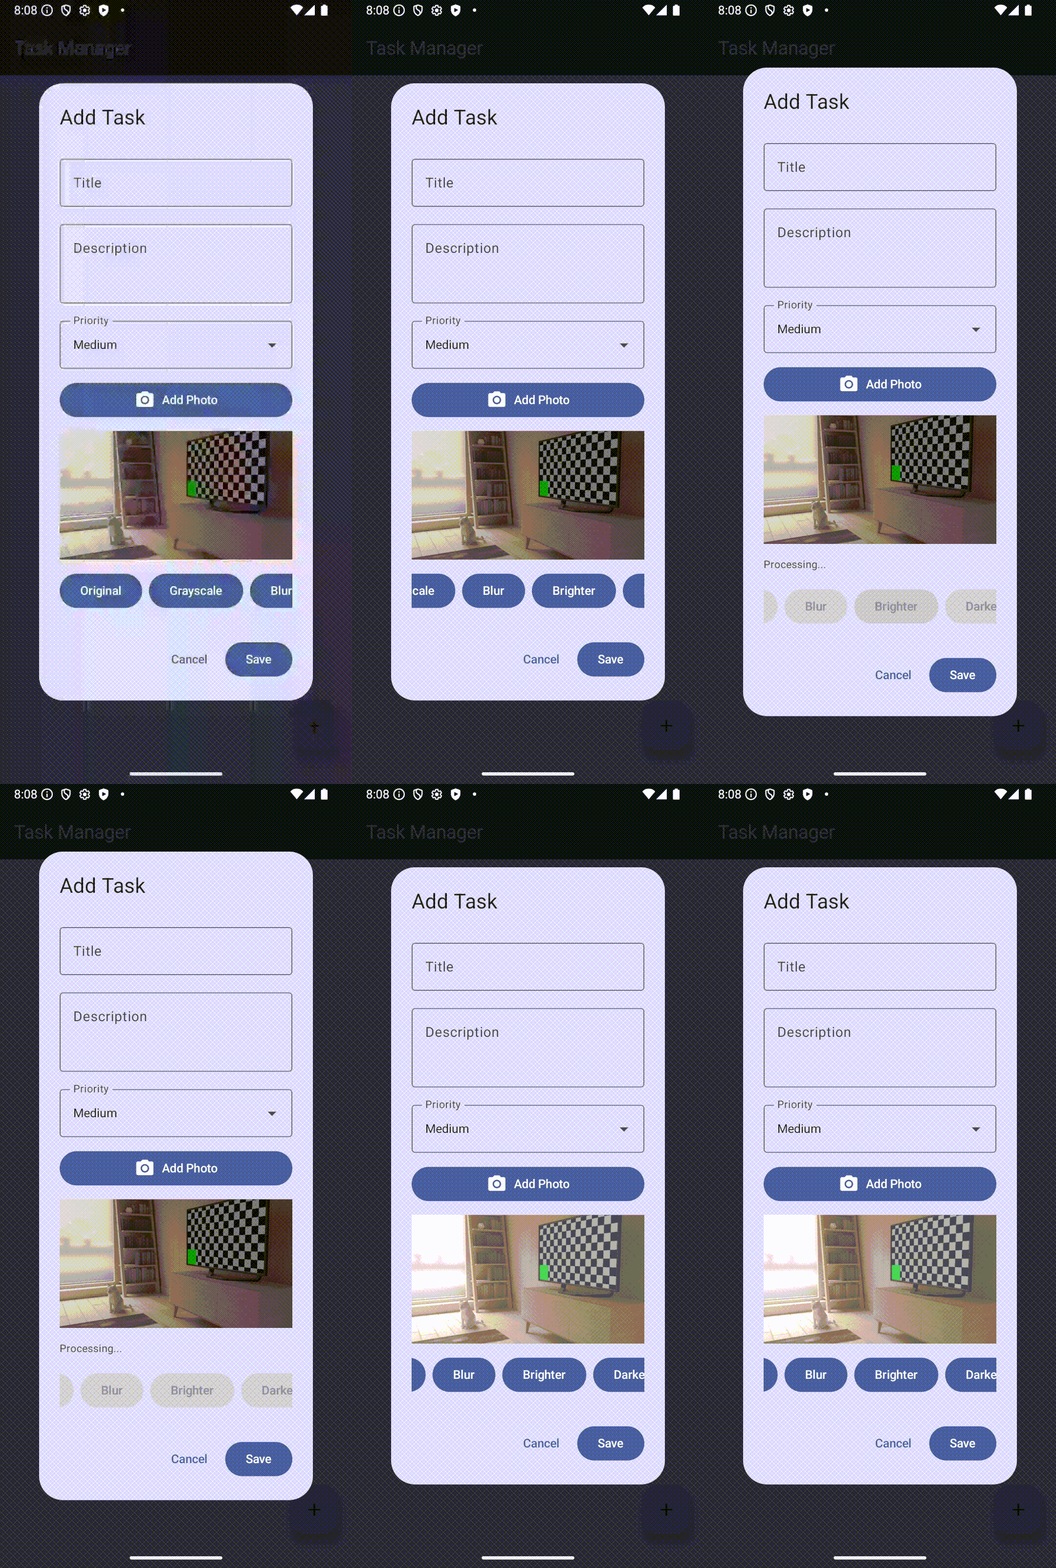
- Tap “Darker”.
Expected result: The photo becomes darker. Bright areas become more subdued.
Test Case 5: Creating the Task
- Fill in title and description.
- Apply your preferred filter.
- Tap “Save”.
Expected result: The task appears in the list. The filtered photo should display in the task card (you’ll implement TaskCard updates next).
Updating the Task Card
To display photos in the task list, you need to update TaskCard.kt to show the task’s photo when one exists.
The Task model now has an optional photoUri property. When present, you’ll display the photo using AsyncImage, the same image loading library you used in CreateTaskDialog.
Open app/src/main/java/com/kodeco/android/swiftsdkforandroid/taskmanager/ui/TaskCard.kt and add the photo display section after the description text and before the priority badge:
Text(
  text = task.description,
  style = MaterialTheme.typography.bodyMedium,
  color = MaterialTheme.colorScheme.onSurfaceVariant
)

// 1
if (task.photoUri.isPresent) {
  val uri = task.photoUri.get()
  Spacer(modifier = Modifier.height(12.dp))

  AsyncImage(
    model = uri,
    contentDescription = "Task photo",
    modifier = Modifier
      .fillMaxWidth()
      .height(200.dp),
    contentScale = ContentScale.Crop
  )
}

Spacer(modifier = Modifier.height(12.dp))

PriorityBadge(priority = task.getPriority(arena).rawValue)
What this section does:
- Conditional photo display: Checks if the task has a photoUri using the Swift Optional’s isPresent property. If a photo exists, displays it using AsyncImage with a fixed height and crop scaling to maintain consistent card sizing.
Make sure you have the required imports at the top of the file:
import androidx.compose.ui.layout.ContentScale
import coil.compose.AsyncImage
Now tasks with photos will display them prominently in the task list, while tasks without photos remain unchanged. Great job so far!
Common Issues and Solutions
Issue: Camera permission denied. Solution: Go to device Settings > Apps > Task Manager > Permissions and grant camera access manually.
Issue: Filters are slow on large images.
Solution: The downscaleForProcessing() function limits images to 1024x1024. Check that it’s being called.
Issue: Blurred image looks pixelated. Solution: This is expected with the simple box blur algorithm. A production app would use a more sophisticated blur (Gaussian blur).
Issue: Photo doesn’t appear after capture.
Solution: Check logcat for exceptions. Verify the Uri is valid and loadBitmapFromUri() succeeds.
Issue: App crashes when applying filter.
Solution: Ensure the Swift library built correctly. Run ./gradlew assembleDebug and check for Swift compilation errors.
Performance Considerations
Image processing is computationally expensive. Here’s what you’re doing to manage performance:
- Downscaling: Large images are reduced to maximum 1024x1024 pixels.
- Background threads: Processing happens on Dispatchers.IO, not the UI thread.
- Limited blur radius: Capped at 10 pixels to avoid excessive computation.
- Temporary files: Files are immediately deleted after processing to save storage.
For production apps, consider:
- Using native image processing libraries (RenderScript, CameraX effects).
- Caching filtered versions.
- Providing a progress indicator for slow operations.
- Implementing incremental processing for real-time filters.
Key Takeaways
In this segment, you’ve:
- Added camera capture to the task creation UI.
- Implemented filter button selection interface.
- Connected Kotlin UI to Swift image processing.
- Used coroutines for background processing.
- Tested the complete camera-to-filter-to-display flow.
- Understood performance considerations for image processing.
- Learned how to handle loading states in Compose.
Your Task Manager now supports photo capture with Swift-powered filters. Users can take photos of tasks and apply visual effects before saving, demonstrating practical platform integration between Kotlin UI and Swift business logic.
Where to Go From Here?
Congratulations on completing the UI integration for your photo-enabled Task Manager! You’ve successfully built a complete feature that spans Android’s camera APIs, custom binary data formats, Swift image processing algorithms, and a polished Compose UI.
What You’ve Accomplished:
In this lesson, you’ve created a fully functional photo capture and filtering system:
- Android Platform Integration: Camera permissions, CameraX preview and capture, file management
- Cross-Language Data Exchange: Custom binary format with RGBA pixel data and header encoding
- Swift Image Processing: Grayscale conversion, box blur, and brightness adjustment algorithms
- Production-Ready UI: Photo preview, filter selection, EXIF orientation handling, and background processing
Explore Further:
Now that you have a working implementation, consider experimenting with:
- Additional Filters: Try implementing sepia tone, contrast adjustment, or saturation changes
- Filter Parameters: Add sliders to control blur radius or brightness amount
- Multiple Photos: Allow tasks to have photo galleries instead of single images
- Filter Previews: Generate small thumbnails showing each filter’s effect before applying
- Custom Camera UI: Enhance the camera screen with zoom controls or flash options
Review the Final Project:
Download the completed Final project from the Materials section to compare your implementation. The Final project demonstrates all the concepts from this lesson with complete, tested code that you can reference.
You’ve now built real-world Swift-Kotlin integration! The patterns you’ve learned—binary data marshaling, JNI boundary crossing, and platform-specific API handling—are fundamental skills for building sophisticated hybrid applications.
What’s Next
Your Task Manager currently stores tasks in memory, which means they disappear when the app closes. In Lesson 3: Data Persistence and Testing, you’ll add permanent storage and comprehensive testing to create a production-ready application.
What You’ll Build:
- File-Based Persistence: Implement JSON serialization in Swift to save and load tasks from disk
- Cross-Platform File Handling: Learn how to work with Android’s file system from Swift code
- CRUD Operations: Complete Create, Read, Update, and Delete functionality with persistent storage
- Comprehensive Testing: Write unit tests for Swift business logic and integration tests for the hybrid boundary
- Error Handling: Add robust error handling for file operations and data validation
Key Concepts:
You’ll explore advanced Swift-Kotlin interoperability patterns including:
- Swift Codable protocol for JSON serialization
- Cross-platform file path handling and permissions
- Testing strategies for hybrid architectures
- Error propagation across the JNI boundary
- State management with persistent data
By the end of Lesson 3, your Task Manager will be a fully functional app with data that survives app restarts, photo attachments that persist, and a test suite that ensures reliability as your codebase grows.
Ready to make your tasks permanent? Let’s continue to the next lesson!