SceneKit Tutorial With Swift Part 5: Particle Systems
In the fifth installment of our SceneKit With Swift tutorial, you’ll wrap up your Geometry Fighter game by adding cool particle systems. By Chris Language.
Simulation Attributes
The simulation attributes manage the motion of particles over their lifetimes. This lets you manage their movement without having to use the physics engine:
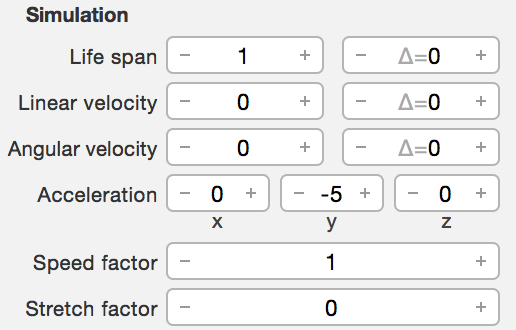
- Life span: Specifies the lifetime of a particle in seconds. Set this to 1 so a single particle will only exist for one second.
- Linear velocity: Specifies the linear velocity of the emitted particles. Set this to 0 so the particles will spawn with no direction or velocity.
- Angular velocity: Specifies the angular velocity of the emitted particles. Set this to 0 so the particles will not spin.
- Acceleration: Specifies the force vector applied to the emitted particles. Set this to (x: 0, y: -5, z: 0) — which is a downwards vector — to simulate a soft gravity effect on the particles, once spawned.
- Speed factor: A multiplier that sets the speed of the particle simulation. Set this to 1 to run the simulation at a normal speed.
- Stretch factor: A multiplier that stretches particles in their direction of motion. Set this to 0 to not stretch the particle image.
Image Attributes
The image attributes control the visual aspects of the particles. They also govern how the appearance of those particles can change over their lifetimes:

- Image: Specifies an image with which each particle will be rendered. Select the CircleParticle.png image, giving the particle its primary shape.
- Color: Sets the tint of the specified image. Set the color to White, giving the particle system a base color of white.
- Animate color: Causes particles to change color over their lifetimes. Uncheck this, because the particle color is not going to change at all.
- Color variation: Adds a bit of randomness to the particle color. You can set this to (h: 0, s: 0, b: 0, a: 0) because the particle color will not vary.
- Size: Specifies the size of the particles. Set this to 0.1 so the emitted particles are small in size.
Image Sequence Attributes
To create an animated image for your particles, you arrange each frame of the animation into a grid on a single image (like a sprite sheet in a game). Then you simply use that grid image as the image for your particle emitter. The image sequence attributes let you control the basic animation properties of the particle:
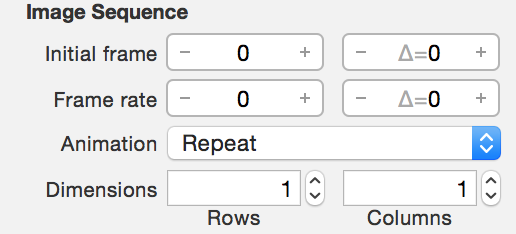
- Initial frame: Sets the first zero-based frame of the animation sequence. The zeroth frame corresponds to the top left image in the grid. You’re using a single frame image, so set this to 0.
- Frame rate: Controls the rate of the animation in frames per second. Set this to 0 as this only applies when using an image that contains multiple frames.
- Animation: Specifies the behavior of the animation sequence. Repeat loops the animation, Clamp only plays it once and Auto Reverse plays it from the start to the end, then back again. You can leave this on Repeat as this doesn’t matter when using a single frame image.
- Dimensions: Specifies the number of rows and columns in the animation grid. Set this to (Rows: 1, Columns: 1) because you’re using a single frame image.
Rendering Attributes
The rendering attributes define how the render phase treats the particles:

- Blending: Specifies the blend mode of the renderer when drawing the particles into the scene. Set this to Alpha, which will use the image alpha channel information for transparency.
- Orientation: Controls the rotation of the particles. Set this to Billboard screen-aligned, which will keep the flat particles facing the camera view at all times so you won’t notice that the particles are indeed flat images.
- Sorting: Sets the rendering order of the particles. This property works in conjunction with the blend mode and affects how the blending is applied. Set this to None so the particle system will not make use of sorting.
- Lighting: Controls whether SceneKit applies lighting to the particles. Uncheck this so the particle system ignores any lights in the scene.
Physics Attributes
The physics attributes let you specify how particles behave in the physics simulation:

- Affected by gravity: Causes the scene’s gravity to affect the particles. Uncheck this as you don’t want the particle system to participate in the physics simulation.
- Affected by physics fields: Causes physics fields within the scene to affect the particles. Uncheck this as you don’t want physics fields to have an effect on the particles.
- Die on Collision: Lets physics bodies in your scene collide and destroy the particles. Uncheck this as you don’t want to remove particles when they collide with node objects in the scene.
- Physics Properties: Basic physics properties that control the physics behaviour of the particles during the physics simulation. You can leave all these at their default values since the particle system will not make use of this.
Life Cycle Attributes
The life cycle attributes let you control the overall life cycle of your particle system:

- Emission duration: Controls the length of time the emitter will emit new particles. Set this to 1, which will activate the particle emitter for a total length of 1 second.
- Idle duration: Looping particle systems emit particles for the specified emission duration, then become idle for the specified idle duration, after which the cycle repeats. Set this to 0 so the particle system will only emit once.
- Looping: Specifies whether the particle system emits particles once, as in an explosion, or continously, like a volcano. Set this to Loops continuously so the emitter emits for as long as it can before it’s removed from the scene again.
Phew! There are a lot of attributes to consider for a single particle system, but this gives you a lot of control to get the exact special effect you’re looking for.
If you diligently copied over the values from the screenshots to your particle system, you will have a system that represents the following effect:

If yours doesn’t look like this, try rotating the camera. It might also help to change the background color to a dark blue like you see here to make the particle system easier to see.
It’s finally time to add the cool particle effect to your game. Add the following to the GameViewController.swift class:
// 1
func createTrail(color: UIColor, geometry: SCNGeometry) ->
  SCNParticleSystem {
  // 2
  let trail = SCNParticleSystem(named: "Trail.scnp", inDirectory: nil)!
  // 3
  trail.particleColor = color
  // 4
  trail.emitterShape = geometry
  // 5
  return trail
}
Here’s what’s going on above:
-
This defines
createTrail(_: geometry:)which takes incolorandgeometryparameters to set up the particle system. - This loads the particle system from the file you created earlier.
- Here, you modify the particle’s tint color based on the parameter passed in.
-
This uses the
geometryparameter to specify the emitter’s shape. - Finally, this returns the newly created particle system.
This method helps you create instances of SCNParticleSystem, but you still need to add the particle systems to your spawned shape objects.
Note that createTrail(_: geometry:) takes in a color parameter and uses it to tint the particles. You will set the color of the particle system to be the same as the color of the shape.
Find the line in spawnShape(), where you set the shape’s material diffuse contents, and split it up so the random color is stored in a constant like so:
let color = UIColor.random()
geometry.materials.first?.diffuse.contents = color
Next, add the following lines further down in spawnShape(), just after you apply a force to the physics body of geometryNode:
let trailEmitter = createTrail(color: color, geometry: geometry)
geometryNode.addParticleSystem(trailEmitter)
This uses createTrail(_: geometry:) to create a particle system and attach it to geometryNode.
Build and run; take a look at your hard work in action!

Woot! :] It looks great — but what would really make this shine is a heads-up display.