Core ML and Vision Tutorial: On-device training on iOS
This tutorial introduces you to Core ML and Vision, two cutting-edge iOS frameworks, and how to fine-tune a model on the device. By Christine Abernathy.
Integrating the Request
Add the following at the end of the private CreateQuoteViewController extension:
func classifyImage(_ image: UIImage) {
  // 1
  guard let orientation = CGImagePropertyOrientation(
    rawValue: UInt32(image.imageOrientation.rawValue)) else {
    return
  }
  guard let ciImage = CIImage(image: image) else {
    fatalError("Unable to create \(CIImage.self) from \(image).")
  }
  // 2
  DispatchQueue.global(qos: .userInitiated).async {
    let handler =
      VNImageRequestHandler(ciImage: ciImage, orientation: orientation)
    do {
      try handler.perform([self.classificationRequest])
    } catch {
      print("Failed to perform classification.\n\(error.localizedDescription)")
    }
  }
}
Here’s what this classification request method does:
- Gets the orientation of the image and the
CIImagerepresentation. - Kicks off an asynchronous classification request in a background queue. You create a handler to perform the Vision request, and then schedule the request.
Finally, add the following at the end of imagePickerController(_:didFinishPickingMediaWithInfo:):
classifyImage(image)
This triggers the classification request when the user selects an image.
Build and run the app. Tap the camera icon and select a photo. Nothing changes visually:

However, the console should list the raw classification results:
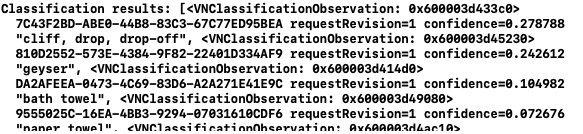
In this example, the classifier has a 27.9% confidence that this image is a cliff, drop, drop-off. Find classificationRequest and replace the print statement with the code below to log the results:
let topClassifications = classifications.prefix(2).map {
  (confidence: $0.confidence, identifier: $0.identifier)
}
print("Top classifications: \(topClassifications)")
Build and run the app and go through the steps to select a photo. The console should log the top results:
![]()
You can now use the extracted prediction details to show a quote related to the image.
Adding a Related Quote
In imagePickerController(_:didFinishPickingMediaWithInfo:), remove the following:
if let quote = getQuote() {
  quoteTextView.text = quote.text
}
This displays a random quote and is no longer needed.
Next, you’ll add logic to get a quote using the results of VNClassificationObservation. Add the following to the CreateQuoteViewController extension:
func processClassifications(for request: VNRequest, error: Error?) {
  DispatchQueue.main.async {
    // 1
    if let classifications =
      request.results as? [VNClassificationObservation] {
      // 2
      let topClassifications = classifications.prefix(2).map {
        (confidence: $0.confidence, identifier: $0.identifier)
      }
      print("Top classifications: \(topClassifications)")
      let topIdentifiers =
        topClassifications.map {$0.identifier.lowercased() }
      // 3
      if let quote = self.getQuote(for: topIdentifiers) {
        self.quoteTextView.text = quote.text
      }
    }
  }
}
Here what’s going on in the code above:
- This method processes the results from an image classification request.
- The method extracts the top two predictions using code you’ve seen before.
- The predictions feed into
getQuote(for:)to get a matching quote.
The method runs on the main queue to ensure that the quote display update happens on the UI thread.
Finally, call this method from classificationRequest and change request to the following:
let request = VNCoreMLRequest(model: model) { [weak self] request, error in
    guard let self = self else {
      return
  }
  self.processClassifications(for: request, error: error)
}
Here, your completion handler calls your new method to process the results.
Build and run the app. Select a photo with a lemon or lemon tree in it. If necessary, download one from the browser. You should see the lemon quote selected instead of a random quote:

Verify that the console logs a matching classification:
![]()
Test the flow a few times to verify the consistency of the results.
Great stuff! You’ve learned how to use Core ML for on-device model inference. :]

Personalizing a Model on the Device
With Core ML 3, you can fine-tune an updatable model on the device during runtime. This means you can personalize the experience for each user.
On-device personalization is the idea behind Face ID. Apple can ship a model down to the device that recognizes generic faces. During Face ID set up, each user can fine-tune the model to recognize their face.
It doesn’t make sense to ship this updated model back up to Apple for deployment to other users. This underscores the advantage of the privacy that on-device personalization brings.
An updatable model is a Core ML model that’s marked as updatable. You also define the training inputs that you’ll use to update the model.
k-Nearest Neighbors
You’ll enhance Vibes using an updatable drawing classifier model. The classifier recognizes new drawings based on k-Nearest Neighbors, or k-NN. K-what?
The k-NN algorithm assumes that similar things are close to each other.

It does this by comparing feature vectors. A feature vector contains important information that describes an object’s characteristics. An example feature vector is RGB color represented by R, G, B.
Comparing the distance between feature vectors is a simple way to see if two objects are similar. k-NN categorizes an input by using its k nearest neighbors.
The example below shows a spread of drawings classified as squares and circles. Let’s say you want to find out what group the new mystery drawing in red belongs to:
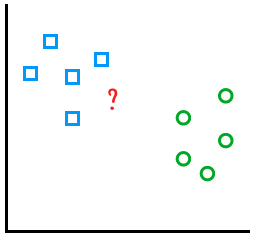
Choosing k = 3 predicts that this new drawing is a square:

k-NN models are simple and fast. You don’t need many examples to train them. Performance can slow down though, if there’s lots of example data.
k-NN is one of the model types that Core ML supports for training. Vibes uses an updatable drawing classifier with:
- A neural network that acts as a feature extractor. The neural network knows how to recognize drawings. You need to extract the features for the k-NN model.
- A k-NN model for on-device drawing personalization.

In Vibes, the user can add a shortcut by selecting an emoji then drawing three examples. You’ll train the model with the emoji as the label and the drawings as the training examples.
Setting Up Training Drawing Flow
First, prepare the screen to accept user input to train your model by:
- Adding a screen to be shown on selecting an emoji.
- Add action on tapping save.
- Removing
UIPanGestureRecognizerfromstickerLabel.
Open AddStickerViewController.swift and in collectionView(_:didSelectItemAt:) replace the performSegue(withIdentifier:sender:) call with the following:
performSegue(withIdentifier: "AddShortcutSegue", sender: self)
This transitions to the examples drawing view when the user selects an emoji.
Next, open AddShortcutViewController.swift and add the following code to implement savePressed(_:):
print("Training data ready for label: \(selectedEmoji ?? "")")
performSegue(
  withIdentifier: "AddShortcutUnwindSegue",
  sender: self)
This unwinds the segue to go back to the main screen when the user taps Save.
Finally, open CreateQuoteViewController.swift and in addStickerToCanvas(_:at:) remove the following code:
stickerLabel.isUserInteractionEnabled = true
let panGestureRecognizer = UIPanGestureRecognizer(
  target: self,
  action: #selector(handlePanGesture(_:)))
stickerLabel.addGestureRecognizer(panGestureRecognizer)
This removes the code that allows the user to move stickers around. This was only useful when the user couldn’t control the sticker location.
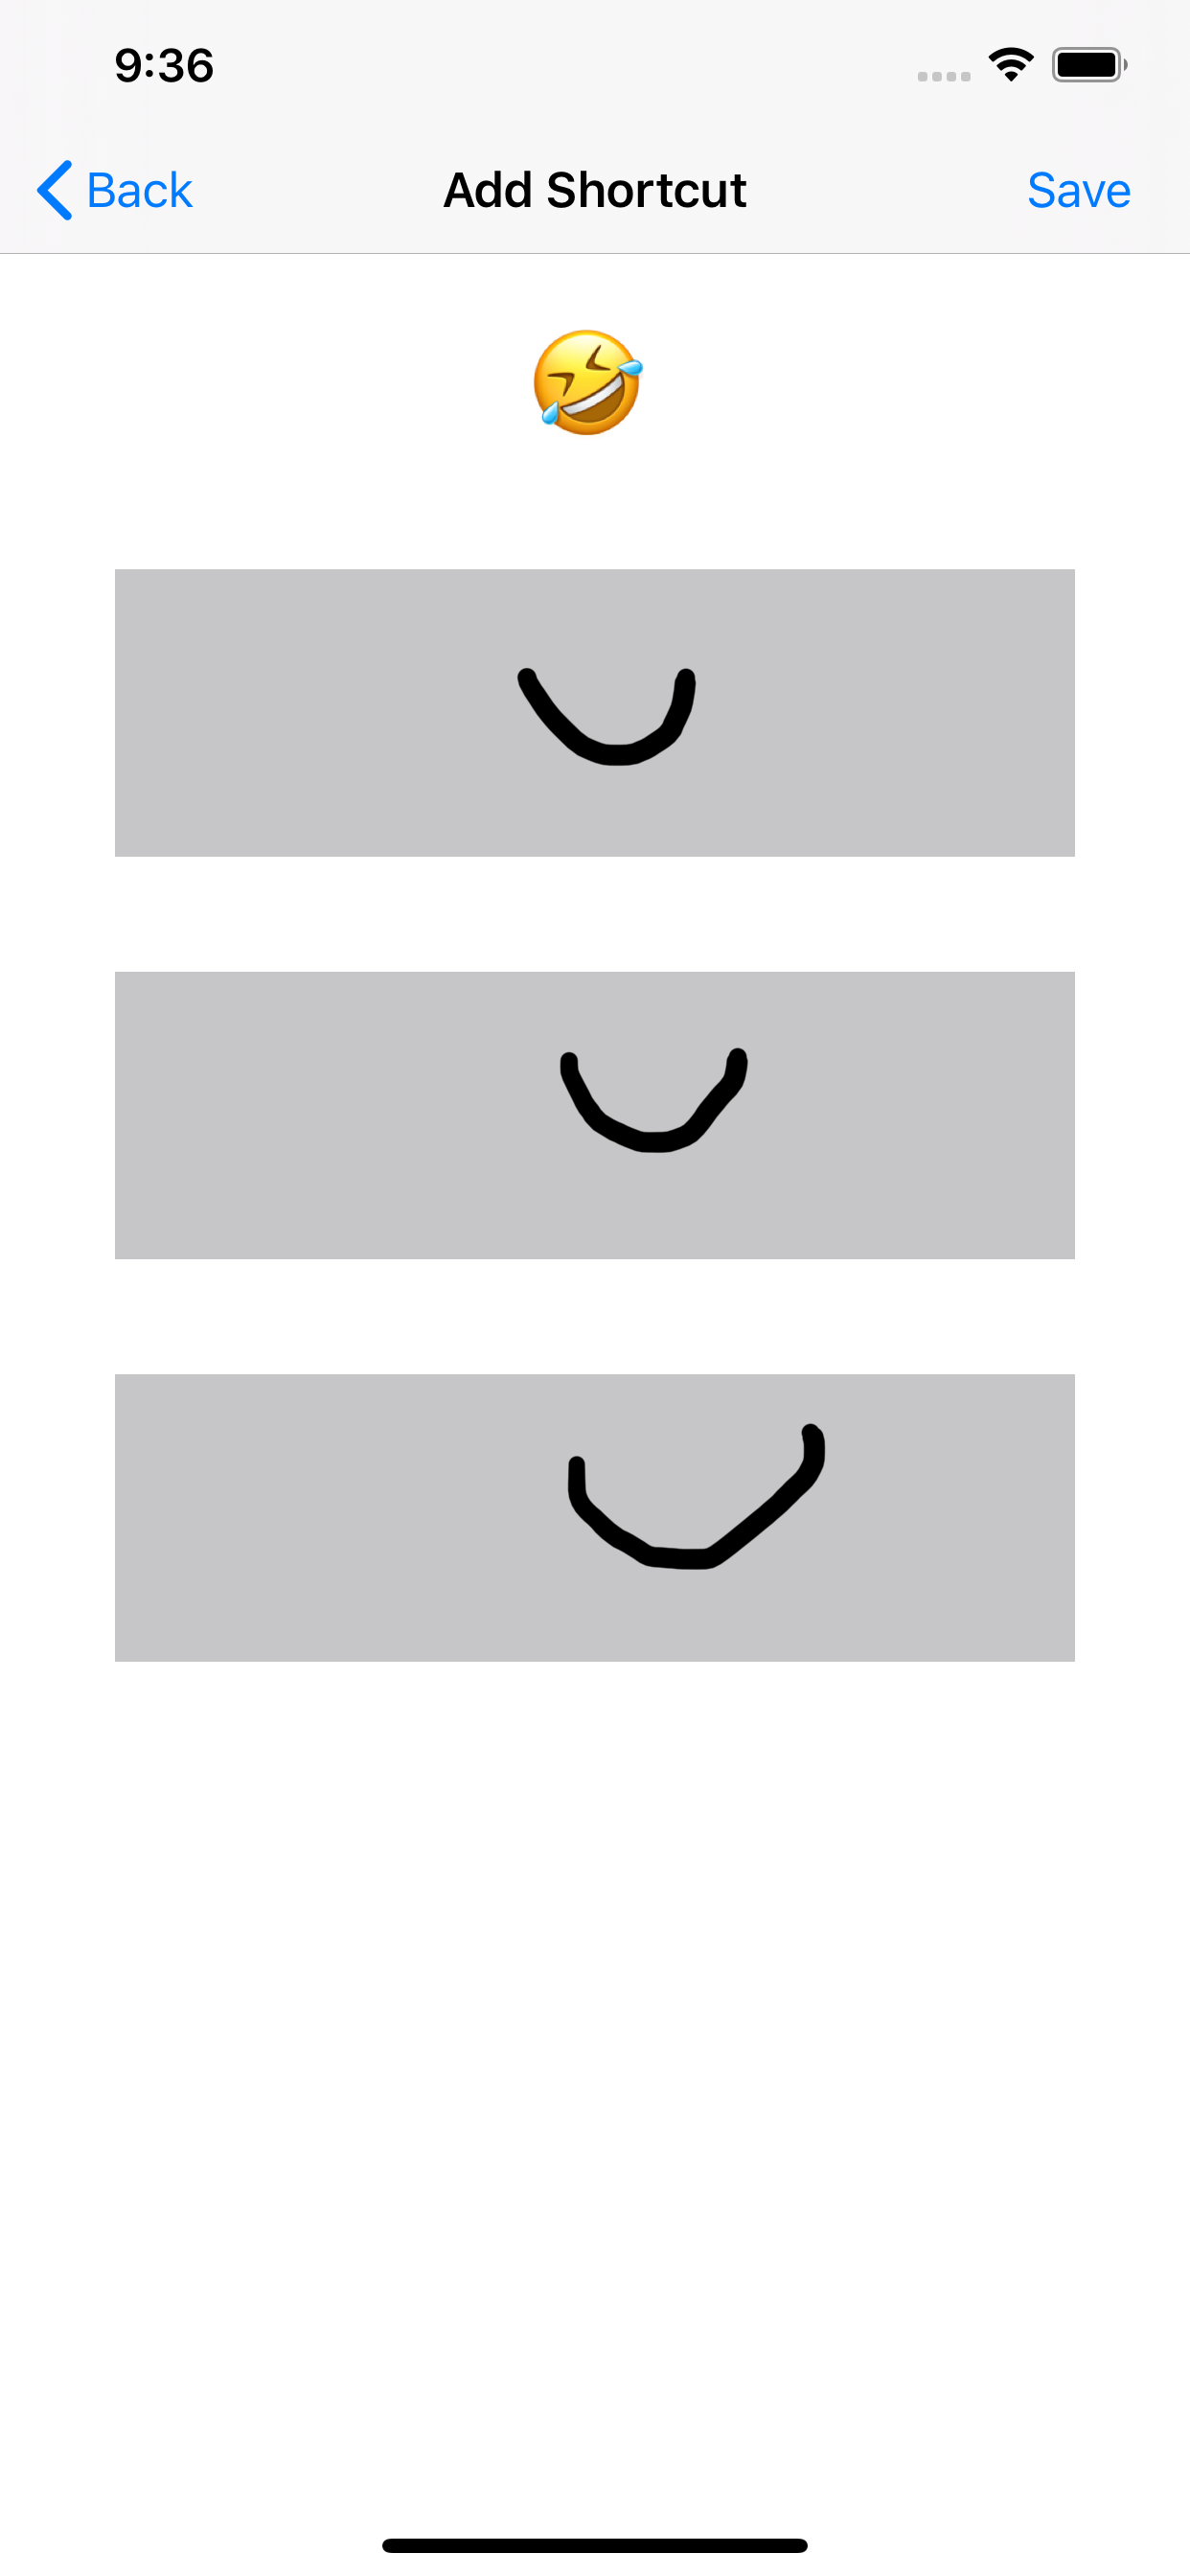
Build and run the app then select a photo. Tap the sticker icon and select an emoji. You’ll see your selected emoji as well as three drawing canvases:

Now, draw three similar images. Verify that Save is enabled when you complete the third drawing:
Then, tap Save and verify that the selected emoji is logged in the console:
![]()
You can now turn your attention to the flow that triggers the shortcut.