How to Make a Game Like Stack
In this tutorial, you’ll learn how to make a game like Stack using SceneKit and Swift. By Brody Eller.
Sign up/Sign in
With a free Kodeco account you can download source code, track your progress, bookmark, personalise your learner profile and more!
Create accountAlready a member of Kodeco? Sign in
Contents
Have you ever seen one of those amazing 3D games that uses slick simplistic graphics and requires a steady timed tapping finger to create a fun and immersive gaming experience? With the power of SceneKit, it’s amazingly easy to create those types of games yourself!
Here’s what you’ll learn:
- Visually creating a 3D scene.
- Programmatically adding nodes to a scene.
- Using physics bodies with nodes.
- Combining UIKit and SceneKit.
- Playing audio in SceneKit games.
This tutorial assumes you’re familiar with SceneKit and Swift. If you are beginning your SceneKit journey, check out our SceneKit tutorials as well as our beginning Swift tutorials.
Getting Started
Start by downloading the starter project.
Inside, you’ll find a SceneKit catalog filled with some audio and a scene file. In addition, there are some SCNVector3
extensions to perform simple arithmetic operations on vectors and a gradient image. You’ll also notice the App Icon has already been added for you! :] Take some time to look around and get familiar with the project.
You’ll be creating a game similar to Stack. The goal of stack is to place blocks one on top of the other. Be careful though: Placing a block even slightly off will cause it to become sliced. Miss entirely, and it’s game over!
Setting up the Scene
You’ll begin by setting up your game scene. Open GameScene.scn.
Drag a new camera into your scene, then select the Node Inspector and rename the node to Main Camera. Set the Position to X: 3, Y: 4.5, Z: 3 and the Rotation to X: -40, Y: 45, Z:0:
Now switch to the Attributes Inspector and change the camera’s Projection type to Orthographic.
Next, you’ll add some light to the scene.
Drag a new directional light from the object library into the scene and rename it to Directional Light. Since the camera is viewing the scene from one side, you don’t have to light the side you don’t see. Back in the Attributes Inspector, set the Position to X: 0, Y: 0, Z: 0 and the Rotation to X: -65, Y: 20, Z:-30:
Fantastic. It’s lit!
Now onto the tower. You’ll need a base block to support the tower as the player builds it up. Drag a new box into the scene and apply the following properties to it:
- In the Node Inspector, change the name to Base Block and set the position to X:0, Y:-4, Z:0.
- In the Attributes Inspector, change the size to Width: 1, Height: 8, Length: 1.
- In the Material Inspector, change the diffuse hex color to #434343.
You need to add a physics body to the base block, so switch to the Physics Inspector and change the physics body type to Static.
Now let’s spice it up with a cool background! With the base block still selected, switch to the Scene Inspector and drag the file Gradient.png to the background slot like this:
You need a way to show the player how high they’ve stacked their tower. Open Main.storyboard; you’ll notice it already has a SCNView. Add a label on top of the SCNView and set its text to 0. Then add a constraint that aligns the label to the center, like so:
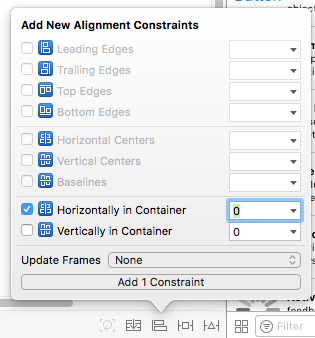
Add another constraint that pins the top of the label to the top of the screen.
Now switch to the Attributes Inspector and change the font to Custom, Thonburi, Regular, 50.
Then use the assistant editor (hint: it’s the one with the two overlapping circles located at the top right of Xcode’s window) to add an outlet from the label to the view controller and name it scoreLabel
:
Build and run to see what you have so far.
Adding Your First Block
Do you know what makes a tower taller and taller? Yep! Building blocks.
You’re going to add some properties to help you keep track of the blocks in play. To do this, open ViewController.swift() and add the following variables right above viewDidLoad()
:
//1
var direction = true
var height = 0
//2
var previousSize = SCNVector3(1, 0.2, 1)
var previousPosition = SCNVector3(0, 0.1, 0)
var currentSize = SCNVector3(1, 0.2, 1)
var currentPosition = SCNVector3Zero
//3
var offset = SCNVector3Zero
var absoluteOffset = SCNVector3Zero
var newSize = SCNVector3Zero
//4
var perfectMatches = 0
Here’s what this code does:
- The
direction
will track whether the block’s position is increasing or decreasing, and theheight
variable will contain how high the tower is. - The
previousSize
andpreviousPosition
variables contain the size and position of the previous layer. ThecurrentSize
andcurrentPosition
variables contain the size and position of the current layer. - You will use the
offset
,absoluteOffset
, andnewSize
variables to calculate the size of the new layer. - The
perfectMatches
keeps track of how many times the player has perfectly matched the previous layer in a row.
With this in place, it’s time to add a block to your scene. Add this at the bottom of viewDidLoad()
:
//1
let blockNode = SCNNode(geometry: SCNBox(width: 1, height: 0.2, length: 1, chamferRadius: 0))
blockNode.position.z = -1.25
blockNode.position.y = 0.1
blockNode.name = "Block\(height)"
//2
blockNode.geometry?.firstMaterial?.diffuse.contents =
UIColor(colorLiteralRed: 0.01 * Float(height), green: 0, blue: 1, alpha: 1)
scnScene.rootNode.addChildNode(blockNode)
Here’s the play-by-play:
- Here you create a new block using a box-shaped SCNNode, position it on the Z and Y axis, and name it according to its place in the tower using the
height
property. - You calculate a new number for the diffuse color’s red value so that it increases with the height. Finally, you add the node to the scene.
Build and run, and you should now see your new block show up on the screen!
Moving the Blocks
Excellent! Now you have a brand new block ready to play. However, I think we can all agree that blocks are more fun when they’re moving.
You will accomplish this movement by setting the view controller as the scene renderer delegate and implementing the required methods on the SCNSceneRendererDelegate
protocol.
Add this extension at the bottom of the class:
extension ViewController: SCNSceneRendererDelegate {
func renderer(_ renderer: SCNSceneRenderer, updateAtTime time: TimeInterval) {
}
}
Here you implement the SCNSceneRendererDelegate
protocol and add renderer(_:updateAtTime:)
.
Add the following inside renderer(_:updateAtTime:)
:
// 1
if let currentNode = scnScene.rootNode.childNode(withName: "Block\(height)", recursively: false) {
// 2
if height % 2 == 0 {
// 3
if currentNode.position.z >= 1.25 {
direction = false
} else if currentNode.position.z <= -1.25 {
direction = true
}
// 4
switch direction {
case true:
currentNode.position.z += 0.03
case false:
currentNode.position.z -= 0.03
}
// 5
} else {
if currentNode.position.x >= 1.25 {
direction = false
} else if currentNode.position.x <= -1.25 {
direction = true
}
switch direction {
case true:
currentNode.position.x += 0.03
case false:
currentNode.position.x -= 0.03
}
}
}
Here's what's happening:
- You use the name of the block specified earlier to find it in the scene.
- You need to move the block on the X or Z axis, depending on the layer it's in. Even layers move on the Z axis, while odd layers move on the X axis. If the layer height divided by 2 has a remainder of 0, the layer height is even. You use the modulo operator (
%
) to find the remainder. - If the position of the box hits either 1.25 or -1.25, you change its direction and start moving it the other way.
- Depending on the direction, the box is either moving forward or backward along the Z axis.
- You repeat the same code as before, but for the X axis.
By default, SceneKit pauses the scene. To be able to see moving objects in your scene, add this at the bottom of viewDidLoad()
:
scnView.isPlaying = true
scnView.delegate = self
In this code you also set this view controller as the scene's renderer delegate, so you can execute the code you wrote above.
Build and run to see some movement!
Handling Taps
Now that you've got the block moving, you need to add a new block and resize the old block whenever the player taps the screen. Switch to Main.storyboard and add a tap gesture recognizer to the SCNView like this:
Now create an action and name it handleTap
inside the view controller using the assistant editor.
Switch back to the Standard Editor and open ViewController.swift, then place this inside handleTap(_:)
:
if let currentBoxNode = scnScene.rootNode.childNode(
withName: "Block\(height)", recursively: false) {
currentPosition = currentBoxNode.presentation.position
let boundsMin = currentBoxNode.boundingBox.min
let boundsMax = currentBoxNode.boundingBox.max
currentSize = boundsMax - boundsMin
offset = previousPosition - currentPosition
absoluteOffset = offset.absoluteValue()
newSize = currentSize - absoluteOffset
currentBoxNode.geometry = SCNBox(width: CGFloat(newSize.x), height: 0.2,
length: CGFloat(newSize.z), chamferRadius: 0)
currentBoxNode.position = SCNVector3Make(currentPosition.x + (offset.x/2),
currentPosition.y, currentPosition.z + (offset.z/2))
currentBoxNode.physicsBody = SCNPhysicsBody(type: .static,
shape: SCNPhysicsShape(geometry: currentBoxNode.geometry!, options: nil))
}
Here you retrieve the currentBoxNode
from the scene. Then you calculate the offset and new size of the block. From there you change the size and position of the block and give it a static physics body.
The offset is equal to the difference in position between the previous layer and the current layer. By subtracting the absolute value of the offset from the current size, you get the new size.
You'll notice that by setting the position of the current node to the offset divided by two, the block's edge matches perfectly with the previous layer's edge. This gives the illusion of chopping the block.
Next, you need a method to create the next block in the tower. Add this under handleTap(_:)
:
func addNewBlock(_ currentBoxNode: SCNNode) {
let newBoxNode = SCNNode(geometry: currentBoxNode.geometry)
newBoxNode.position = SCNVector3Make(currentBoxNode.position.x,
currentPosition.y + 0.2, currentBoxNode.position.z)
newBoxNode.name = "Block\(height+1)"
newBoxNode.geometry?.firstMaterial?.diffuse.contents = UIColor(
colorLiteralRed: 0.01 * Float(height), green: 0, blue: 1, alpha: 1)
if height % 2 == 0 {
newBoxNode.position.x = -1.25
} else {
newBoxNode.position.z = -1.25
}
scnScene.rootNode.addChildNode(newBoxNode)
}
Here you create a new node with the same size as the current block. You position it above the current block and change its X or Z position depending on the layer height. Finally, you change its diffuse color and add it to the scene.
You will use handleTap(_:)
to keep all your properties up to date. Add this to the end of handleTap(_:)
inside the if let
statement:
addNewBlock(currentBoxNode)
if height >= 5 {
let moveUpAction = SCNAction.move(by: SCNVector3Make(0.0, 0.2, 0.0), duration: 0.2)
let mainCamera = scnScene.rootNode.childNode(withName: "Main Camera", recursively: false)!
mainCamera.runAction(moveUpAction)
}
scoreLabel.text = "\(height+1)"
previousSize = SCNVector3Make(newSize.x, 0.2, newSize.z)
previousPosition = currentBoxNode.position
height += 1
The first thing you do is call addNewBlock(_:)
. If the tower size is greater than or equal to 5, you move the camera up.
You also update the score label, set the previous size and position equal to the current size and position. You can use newSize
because you set the current box node's size to newSize
. Then you increment the height.
Build and run. Things are stacking up nicely! :]
Implementing Physics
The game resizes the blocks correctly, but it would be cool if the chopped block would fall down the tower.
Define the following new method under addNewBlock(_:)
:
func addBrokenBlock(_ currentBoxNode: SCNNode) {
let brokenBoxNode = SCNNode()
brokenBoxNode.name = "Broken \(height)"
if height % 2 == 0 && absoluteOffset.z > 0 {
// 1
brokenBoxNode.geometry = SCNBox(width: CGFloat(currentSize.x),
height: 0.2, length: CGFloat(absoluteOffset.z), chamferRadius: 0)
// 2
if offset.z > 0 {
brokenBoxNode.position.z = currentBoxNode.position.z -
(offset.z/2) - ((currentSize - offset).z/2)
} else {
brokenBoxNode.position.z = currentBoxNode.position.z -
(offset.z/2) + ((currentSize + offset).z/2)
}
brokenBoxNode.position.x = currentBoxNode.position.x
brokenBoxNode.position.y = currentPosition.y
// 3
brokenBoxNode.physicsBody = SCNPhysicsBody(type: .dynamic,
shape: SCNPhysicsShape(geometry: brokenBoxNode.geometry!, options: nil))
brokenBoxNode.geometry?.firstMaterial?.diffuse.contents = UIColor(colorLiteralRed: 0.01 *
Float(height), green: 0, blue: 1, alpha: 1)
scnScene.rootNode.addChildNode(brokenBoxNode)
// 4
} else if height % 2 != 0 && absoluteOffset.x > 0 {
brokenBoxNode.geometry = SCNBox(width: CGFloat(absoluteOffset.x), height: 0.2,
length: CGFloat(currentSize.z), chamferRadius: 0)
if offset.x > 0 {
brokenBoxNode.position.x = currentBoxNode.position.x - (offset.x/2) -
((currentSize - offset).x/2)
} else {
brokenBoxNode.position.x = currentBoxNode.position.x - (offset.x/2) +
((currentSize + offset).x/2)
}
brokenBoxNode.position.y = currentPosition.y
brokenBoxNode.position.z = currentBoxNode.position.z
brokenBoxNode.physicsBody = SCNPhysicsBody(type: .dynamic,
shape: SCNPhysicsShape(geometry: brokenBoxNode.geometry!, options: nil))
brokenBoxNode.geometry?.firstMaterial?.diffuse.contents = UIColor(
colorLiteralRed: 0.01 * Float(height), green: 0, blue: 1, alpha: 1)
scnScene.rootNode.addChildNode(brokenBoxNode)
}
}
Here you create a new node and name it using the height
variable. You use anif
statement to determine the axis and make sure the offset is greater than 0, because if it is equal to zero then you shouldn't spawn a broken block!
Breaking down the rest:
- Earlier, you subtracted the offset to find the new size. Here, you don't need to subtract anything, as the correct size is equal to the offset.
- You change the position of the broken block.
- You add a physics body to the broken block so it will fall. You also change its color and add it to the scene.
- You do the same for the X axis as you did for the Z.
You find the position of the broken block by subtracting half the offset from the current position. Then, depending on whether the block is in a positive or negative position, you add or subtract half the current size minus the offset.
Add a call to this method right before you call addNewBlock(_:)
in handleTap(_:)
:
addBrokenBlock(currentBoxNode)
When the broken node falls out of view, it doesn't get destroyed: It continues falling infinitely. Add this inside renderer(_:updateAtTime:)
, right at the top:
for node in scnScene.rootNode.childNodes {
if node.presentation.position.y <= -20 {
node.removeFromParentNode()
}
}
This code deletes any node whose Y position is less than -20.
Build and run to see some sliced blocks!
Finishing Touches
Now that you've finished the core game mechanics, there are only a few loose ends to tie up. There should be a reward for the player if they match the previous layer perfectly. Also, there is no win/lose condition or any way to start a new game when you've lost! Finally, the game is devoid of sound, so you'll need to add some as well.
Handling Perfect Matches
To handle the "perfect matching" case, add the following method under addBrokenBlock(_:)
:
func checkPerfectMatch(_ currentBoxNode: SCNNode) {
if height % 2 == 0 && absoluteOffset.z <= 0.03 {
currentBoxNode.position.z = previousPosition.z
currentPosition.z = previousPosition.z
perfectMatches += 1
if perfectMatches >= 7 && currentSize.z < 1 {
newSize.z += 0.05
}
offset = previousPosition - currentPosition
absoluteOffset = offset.absoluteValue()
newSize = currentSize - absoluteOffset
} else if height % 2 != 0 && absoluteOffset.x <= 0.03 {
currentBoxNode.position.x = previousPosition.x
currentPosition.x = previousPosition.x
perfectMatches += 1
if perfectMatches >= 7 && currentSize.x < 1 {
newSize.x += 0.05
}
offset = previousPosition - currentPosition
absoluteOffset = offset.absoluteValue()
newSize = currentSize - absoluteOffset
} else {
perfectMatches = 0
}
}
If the player stops the block within 0.03 of the previous position, you’ll consider this a a perfect match. You set the position of the current block equal to the position of the previous block, since it’s not quite a perfect mathematical match, but it’s close enough.
By setting the current and previous positions equal, you make the perfect match mathematically correct and then recalculate the offset and new size. Call this method right after you calculate the offset and new size inside handleTap(_:)
:
checkPerfectMatch(currentBoxNode)
Handling Misses
Now you've covered the cases where the player matches perfectly and when they partially match, but you haven't covered the case when the player misses.
Add the following right above the call to checkPerfectMatch(_:)
inside handleTap(_:)
:
if height % 2 == 0 && newSize.z <= 0 {
height += 1
currentBoxNode.physicsBody = SCNPhysicsBody(type: .dynamic,
shape: SCNPhysicsShape(geometry: currentBoxNode.geometry!, options: nil))
return
} else if height % 2 != 0 && newSize.x <= 0 {
height += 1
currentBoxNode.physicsBody = SCNPhysicsBody(type: .dynamic,
shape: SCNPhysicsShape(geometry: currentBoxNode.geometry!, options: nil))
return
}
If the player misses the block, the new size calculation will be negative, so you can check for this to see if the player has missed. If the player has missed, you increment the height by one so that the movement code is no longer moving the current block. Then you add a dynamic physics body so the block will fall.
Finally, you return
so that the code after does not run, such as checkPerfectMatch(_:)
, and addBrokenBlock(_:)
.
Adding Sound Effects
Since the audio files are very short, it makes sense to pre-load the audio. Add a new dictionary property named sounds to the variable declarations:
var sounds = [String: SCNAudioSource]()
Next, add these two methods below viewDidLoad
:
func loadSound(name: String, path: String) {
if let sound = SCNAudioSource(fileNamed: path) {
sound.isPositional = false
sound.volume = 1
sound.load()
sounds[name] = sound
}
}
func playSound(sound: String, node: SCNNode) {
node.runAction(SCNAction.playAudio(sounds[sound]!, waitForCompletion: false))
}
The first method loads the audio file at the path specified and stores it inside the sounds
dictionary. The second method plays the audio file stored in the sounds
dictionary.
Add these inside the middle of viewDidLoad()
:
loadSound(name: "GameOver", path: "HighRise.scnassets/Audio/GameOver.wav")
loadSound(name: "PerfectFit", path: "HighRise.scnassets/Audio/PerfectFit.wav")
loadSound(name: "SliceBlock", path: "HighRise.scnassets/Audio/SliceBlock.wav")
There are a few places where you'll need to play the sound effects. Inside handleTap(_:)
, add this line inside each section of the if
statement that checks whether the player missed the block, but before the return
statement:
playSound(sound: "GameOver", node: currentBoxNode)
Add this line below the call to addNewBlock
:
playSound(sound: "SliceBlock", node: currentBoxNode)
Scroll down to checkPerfectMatch(_:)
and add this line inside both sections of the if statement:
playSound(sound: "PerfectFit", node: currentBoxNode)
Build and run — things feel much more fun with some sounds, don’t they?
Handling Win/Lose Condition
What good is a game that doesn't end? You're going to fix that right now! :]
Head into Main.storyboard and drag a new button onto the view. Change the text color's hex value to #FF0000 and its text to Play. Then change its font to Custom, Helvetica Neue, 66.
Next, align the button to the center and pin it to the bottom with a constant of 100.
Connect an outlet to the view controller titled playButton
. Then create an action titled playGame
and place this code inside:
playButton.isHidden = true
let gameScene = SCNScene(named: "HighRise.scnassets/Scenes/GameScene.scn")!
let transition = SKTransition.fade(withDuration: 1.0)
scnScene = gameScene
let mainCamera = scnScene.rootNode.childNode(withName: "Main Camera", recursively: false)!
scnView.present(scnScene, with: transition, incomingPointOfView: mainCamera, completionHandler: nil)
height = 0
scoreLabel.text = "\(height)"
direction = true
perfectMatches = 0
previousSize = SCNVector3(1, 0.2, 1)
previousPosition = SCNVector3(0, 0.1, 0)
currentSize = SCNVector3(1, 0.2, 1)
currentPosition = SCNVector3Zero
let boxNode = SCNNode(geometry: SCNBox(width: 1, height: 0.2, length: 1, chamferRadius: 0))
boxNode.position.z = -1.25
boxNode.position.y = 0.1
boxNode.name = "Block\(height)"
boxNode.geometry?.firstMaterial?.diffuse.contents = UIColor(colorLiteralRed: 0.01 * Float(height),
green: 0, blue: 1, alpha: 1)
scnScene.rootNode.addChildNode(boxNode)
You'll notice that you're resetting all the game's variables to their default value and adding the first block.
Since you are now adding the first block here, remove the following lines of code out the viewDidLoad(_:)
again, specifically from the declaration of blockNode
until you add it to the scene.
//1
let blockNode = SCNNode(geometry: SCNBox(width: 1, height: 0.2, length: 1, chamferRadius: 0))
blockNode.position.z = -1.25
blockNode.position.y = 0.1
blockNode.name = "Block\(height)"
//2
blockNode.geometry?.firstMaterial?.diffuse.contents =
UIColor(colorLiteralRed: 0.01 * Float(height), green: 0, blue: 1, alpha: 1)
scnScene.rootNode.addChildNode(blockNode)
Define a new method below the method you just created:
func gameOver() {
let mainCamera = scnScene.rootNode.childNode(
withName: "Main Camera", recursively: false)!
let fullAction = SCNAction.customAction(duration: 0.3) { _,_ in
let moveAction = SCNAction.move(to: SCNVector3Make(mainCamera.position.x,
mainCamera.position.y * (3/4), mainCamera.position.z), duration: 0.3)
mainCamera.runAction(moveAction)
if self.height <= 15 {
mainCamera.camera?.orthographicScale = 1
} else {
mainCamera.camera?.orthographicScale = Double(Float(self.height/2) /
mainCamera.position.y)
}
}
mainCamera.runAction(fullAction)
playButton.isHidden = false
}
Here, you zoom out the camera to reveal the entire tower. At the end, you set the play button to visible so the player can start a new game.
Place the following call to gameOver()
in the missed block if
statement inside handleTap(_:)
, above the return
statement and inside both parts of the if
statement:
gameOver()
Build and run. You should now be able to start a new game if — I mean when — you lose. :]
Launch Image
You get an ugly white screen right before the game starts up. Open up LaunchScreen.storyboard
and drag in an image view. Pin it to all four sides of the screen:
Change the image to Gradient.png
Now you've replaced that ugly white screen with a nicer looking gradient! :]
Where to Go From Here?
Congratulations, you're all done! You can download the final project here.
I hope you've enjoyed this tutorial on making a game like Stack!
There are many additional features that you could add to the game:
- Make the Color Change With Height more distinctively
- Currently, the Camera won't zoom out all the way for certain heights. Change the amount the camera zooms out to fix this.
- Apply a force to the cut off block to make it spin off the tower
If you'd like to learn more about making 3D Games with Scene Kit, check out our 3D Apple Games by Tutorials book. We also recommend checking out the official Apple's Scene Kit page for even more details about SceneKit.
We'd love to see what you've done, so join the discussion below share some of your ideas to improve this game and feel free to ask any questions you may have!
All videos. All books.
One low price.
A Kodeco subscription is the best way to learn and master mobile development — plans start at just $19.99/month! Learn iOS, Swift, Android, Kotlin, Flutter and Dart development and unlock our massive catalog of 50+ books and 4,000+ videos.
Learn more