Swift Tutorial Part 3: Flow Control
Welcome to part 3 of our Swift tutorial, where you’ll learn how code decisions using Booleans and repeat tasks using loops to control the flow. By Lorenzo Boaro.
Repeat-while Loops
A variant of the while loop is called the repeat-while loop. It differs from the while loop in that the condition is evaluated at the end of the loop rather than at the beginning.
You construct a repeat-while loop like this:
repeat {
  <LOOP CODE>
} while <CONDITION>
Here’s the example from the last section, but using a repeat-while loop:
sum = 1

repeat {
  sum = sum + (sum + 1)
} while sum < 1000
In this example, the outcome is the same as before. However, that isn’t always the case — you might get a different result with a different condition.
Consider the following while loop:
sum = 1

while sum < 1 {
  sum = sum + (sum + 1)
}
And now consider the corresponding repeat-while loop, which uses the same condition:
sum = 1

repeat {
  sum = sum + (sum + 1)
} while sum < 1
In the case of the regular while loop, the condition sum < 1 is false right from the start. That means the body of the loop won’t be reached! The value of sum will equal 1 because the loop won’t execute any iterations.
In the case of the repeat-while loop, however, sum will equal 3 because the loop will execute once.
Breaking Out of a Loop
Sometimes you want to break out of a loop early. You can do this using the break statement, which immediately stops the execution of the loop and continues on to the code after the loop.
For example, consider the following code:
sum = 1

while true {
  sum = sum + (sum + 1)
  if sum >= 1000 {
    break
  }
}
Here, the loop condition is true, so the loop would normally iterate forever. However, the break means the while loop will exit once the sum is greater than or equal to 1000.
Advanced Control Flow
In this section, you’ll continue to learn how to control the flow of execution. You’ll learn about another loop known as the for loop.
Ranges
Before you dive into the for loop statement, you need to know about the ClosedRange and Range types, which lets you represent a sequence of numbers.
First, there’s closed range, which you represent like so:
let closedRange = 0...5
The three dots (...) indicate that this range is closed, which means the range goes from 0 to 5, inclusive. That means the numbers (0, 1, 2, 3, 4, 5).
Second, there’s half-open range, which you represent like so:
let halfOpenRange = 0..<5
Here, you replace the three dots with two dots and a less-than sign (..<). Half open means the range goes from 0 to 5, inclusive of 0 but not of 5. That means the numbers (0, 1, 2, 3, 4).
Both closed and half-open ranges must always be increasing. In other words, the second number must always be greater than or equal to the first.
Ranges are commonly used in both for loops and switch statements, which means you’ll use ranges soon!
For Loops
Now that you know about ranges, it’s time to look at the for loop. It's used to run code a certain number of times.
You construct a for loop like this:
for <CONSTANT> in <RANGE> {
  <LOOP CODE>
}
The loop begins with the for keyword, followed by a name given to the loop constant, followed by in, followed by the range to loop through.
Here’s an example:
let count = 10
var sum = 0

for i in 1...count {
  sum += i
}
The for loop iterates through the range 1 to count. At the first iteration of the loop, i will equal the first element in the range — 1. Each time around the loop, i will increment until it’s equal to count; the loop will execute one final time and then finish.
i equal to count - 1.
Inside the loop, you add i to the sum variable; it runs 10 times to calculate the sequence 1 + 2 + 3 + 4 + 5 + ... all the way up to 10.
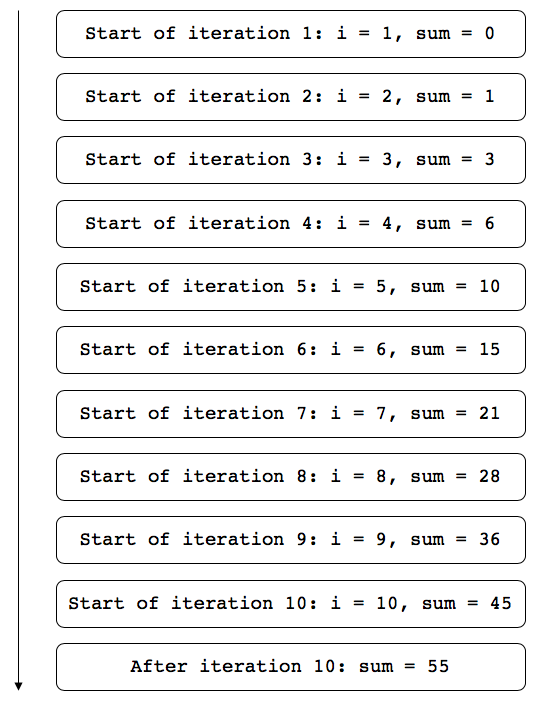
Here are the values of the constant i and variable sum for each iteration:
The i constant is only visible inside the scope of the for loop, which means it’s not available outside of the loop.
When you are not interested in the loop constant at all, you can employ the underscore to indicate that you’re ignoring it. For example:
sum = 1
var lastSum = 0

for _ in 0..<count {
  let temp = sum
  sum = sum + lastSum
  lastSum = temp
}
This code doesn’t require a loop constant; the loop simply needs to run a certain number of times. In this case, the range is 0 through count and is half open. This is the usual way of writing loops that run a certain number of times.
It’s also possible to only perform the iteration under certain conditions. For example, imagine that you wanted to compute a sum but only for odd numbers:
var sum = 0
for i in 1...count where i % 2 == 1 {
  sum += i
}
The loop above has a where clause in the for loop statement. The loop still runs through all values in the range 1 to count, but it will only execute the loop’s code block when the where condition is true; in this case, it executes when i is odd.
Continue Statement
Sometimes you’d like to skip a loop iteration for a particular case without breaking out of the loop entirely. You can do this with the continue statement, which immediately ends the current iteration of the loop and starts the next iteration.
continue statement instead of simpler where clause when you need a higher level of control.
Take the example of an 8 ✕ 8 grid, wherein each cell holds a value of the row multiplied by the column:

It looks much like a multiplication table, doesn’t it?
Let’s say you wanted to calculate the sum of all cells but exclude all even rows, as shown below:

Using a for loop, you can achieve this as follows:
sum = 0

for row in 0..<8 {
  if row % 2 == 0 {
    continue
  }

  for column in 0..<8 {
    sum += row * column
  }
}
When the row modulo 2 equals 0, the row is even. In this case, continue makes the for loop skip to the next row.
Just like break, continue works with both for loops and while loops.
continue and break in flow control elements. If you want to learn more, read our book Swift Apprentice, Fourth Edition.