SwiftUI: Getting Started
In this SwiftUI tutorial, you’ll learn how to layout the UI by declaring and modifying views, and how to use state variables to update your UI. You’ll use Xcode’s new preview and live preview, and experience the joy of code and WYSIWYG layout that stay in sync. By Audrey Tam.
Presenting an Alert
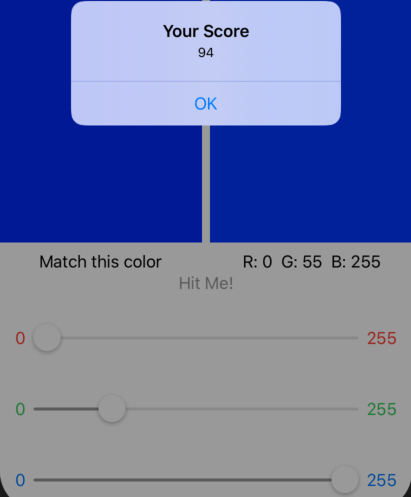
After using the sliders to get a good color match, your user taps the Hit Me button, just like in the original BullsEye game. And just like in BullsEye, an Alert will appear, displaying the score.
First, add a method to ContentView to compute the score. Between the @State variables and the body, add this method:
func computeScore() -> Int {
  let rDiff = rGuess - rTarget
  let gDiff = gGuess - gTarget
  let bDiff = bGuess - bTarget
  let diff = sqrt(rDiff * rDiff + gDiff * gDiff + bDiff * bDiff)
  return Int((1.0 - diff) * 100.0 + 0.5)
}
The diff value is just the distance between two points in three-dimensional space — the user's error. To get the score, you subtract diff from 1, then scale this to a value out of 100. Smaller diff yields a higher score.
Next, replace the Text("Hit me button") placeholder with a Button view:
Button(action: {

}) {
  Text("Hit Me!")
}
A Button has an action and a label, just like a UIButton. The action you want to happen is the presentation of an Alert view. But if you just create an Alert in the Button action, it won't do anything.
Instead, you create the Alert as one of the subviews of ContentView, and add a @State variable of type Bool. Then, you set the value of this variable to true when you want the Alert to appear — in the Button action, in this case. The value resets to false — to stop showing the alert — when the user dismisses the Alert.
So add this @State variable, initialized to false:
@State var showAlert = false
Then add this line as the Button action:
self.showAlert = true
You need the self because showAlert is inside a closure.
Finally, add an alert modifier to the Button, so your Button view looks like this:
Button(action: {
  self.showAlert = true
}) {
  Text("Hit Me!")
}
.alert(isPresented: $showAlert) {
  Alert(title: Text("Your Score"), message: Text("\(computeScore())"))
}
You pass the binding $showAlert because its value will change when the user dismisses the alert, and this change will cause the view to update.
SwiftUI has simple initializers for Alert views, just like the ones that many developers have created for themselves in a UIAlertViewController extension. This one has a default OK button, so you don't even need to include it as a parameter.
Turn off live preview, click Resume to refresh the preview, then turn on live preview, and try your hand at matching the target color:
Hey, when you've got live preview, who needs iOS Simulator? Although if you do run your app in the simulator, you can rotate it to landscape:

Previewing in Landscape
RGBullsEye looks best in landscape orientation. However, at the time of writing, Xcode 11 doesn't provide an easy way to preview in landscape orientation. For now, you have to specify fixed width and height values: Inside the static previews property, add a previewLayout modifier to ContentView():
ContentView()
  .previewLayout(.fixed(width: 568, height: 320))
These values display an iPhone SE-sized window in landscape orientation, but not in Live Preview.
You can find a list of dimensions for other iPhone models in The Ultimate Guide To iPhone Resolutions.
Where to Go From Here?
You can download the final project using the link at the top or bottom of this article.
This article barely scratches the surface of SwiftUI, but you now have a feel for how to use some new Xcode tools to layout and preview views, and how to use @State variables to keep your UI updated. Not to mention that terrific Alert!
You're now well-prepared to dive deeper into Apple's wealth of resources — its tutorials and WWDC sessions. The tutorials and WWDC sessions work through different sample projects. For example, Introducing SwiftUI (#204) builds a list app for meeting rooms — it's simpler than the tutorials' Landmarks app. And SwiftUI Essentials (#216) shows you how to use the Form container view to easily get the look and feel of an iOS form.
To keep this article simple, I didn't create a data model for RGB colors. But most apps model their data as structs or classes. If you need SwiftUI to keep track of changes in a model's instances, it must conform to BindableObject by implementing a didChange property that publishes change events. Look at Apple's sample projects and especially Data Flow Through SwiftUI (#226)
To ease yourself into SwiftUI, you can add a SwiftUI view to an existing app, or use existing views in a new SwiftUI app — watch Integrating SwiftUI (#231) to see how quick and easy this is to do.
Also, explore the SwiftUI documentation to see what else is available — there's a lot!
And check out our SwiftUI by Tutorials book!