How To Make An Interface With Horizontal Tables Like The Pulse News App: Part 1
This is a blog post by iOS Tutorial Team member Felipe Laso, an independent iOS developer and aspiring game designer/programmer. In this 2-part series you’ll learn how to make an interface similar to the Pulse News app for iPhone and iPad by using only UITableViews. Here are some of the things we’ll focus on for […] By Ray Wenderlich.
Sign up/Sign in
With a free Kodeco account you can download source code, track your progress, bookmark, personalise your learner profile and more!
Create accountAlready a member of Kodeco? Sign in
Sign up/Sign in
With a free Kodeco account you can download source code, track your progress, bookmark, personalise your learner profile and more!
Create accountAlready a member of Kodeco? Sign in
Contents
How To Make An Interface With Horizontal Tables Like The Pulse News App: Part 1
40 mins
Understanding Our Interface
Before moving on, I wanted to give an overview of the interface we’re about to build.
The reason why we created a navigation-based project from a window-based application is that the navigation-based template is only designed for iPhone, so we would would have to make our app universal and manually add the interface and code files for iPad. The way we did it, we have a universal navigation-based app with very little work.
Plus, it’s fun practice to see how everything fits together from scratch! :]
Now let’s take a look at the interface we’re going to build:
The first thing we have is a regular UITableView that scrolls vertically. This will be the main element of our Navigation Controller. We will be adding a custom UITableViewController in a little bit in order to get this working.
Each cell inside this vertical table will contain a subclass of UITableViewCell, named HorizontalTableCell. This custom cell will contain a UITableView as a subview, but rotated 90 degrees counter clockwise so it scrolls horizontally.
We will then create another custom UITableViewCell named ArticleCell, rotate it (90 degrees clockwise) to get it face up again, and use it as the cells for the rotated table view within HorizontalTableCell.
So a summary of the steps required for things to work:
- Create a regular UITableView
- Create a custom UITableViewCell
- Add a rotated UITableView as a subview of our UITableViewCell
- Create another custom UITableViewCell for our articles
- Rotate our custom cell and use it for our horizontal table view
If this sounds complicated don’t worry, you’ll see how easy it is to make all of this work and how little code is actually required.
The Vertical Table
Let’s go ahead an implement our vertical table. The first thing we’ll need to do is create a custom subclass of UITableViewController. In our Project Navigator, right-click on the HorizontalTables folder and select New File. On the left side under the iOS file templates select Cocoa Touch\UIViewController subclass and click Next.
You will now see a screen where you can select a subclass from a drop down menu or write the class yourself, as well as some options regarding the file. For our subclass select UITableViewController, make sure that “Targeted for iPad” and “With XIB for user interface” are not selected, and click Next.
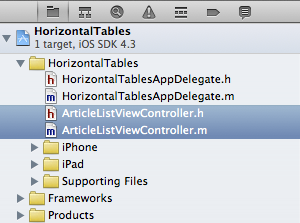
Type in ArticleListViewController for the file name and click on save. Your project should now have the ArticleListViewController.h and ArticleListViewController.m files
For now we won’t add anything to our ArticleListViewController.h file, but just to be tidy we are going to cleanup the ArticleListViewController.m file a bit. We will not be needing the following methods so go ahead and delete them:
- initWithStyle
- viewWillAppear
- viewDidAppear
- viewWillDisappear
- viewDidDisappear
- shouldAutorotateToInterfaceOrientation
- didSelectRowAtIndexPath
- cellForRowAtIndexPath
- All the methods that are commented out
Wait a second, how are we going to provide cells for our rows if we are deleting the cellForRowAtIndexPath method?!? That’s because we are going to create two subclasses of ArticleListViewController, one for the iPhone interface and one for the iPad interface. That way we can control things like custom headers, row height and items specific to the interface of each device.
We delete the other methods because we are not going to be adding, deleting or modifying rows to the vertical table view, and we will not be selecting it’s cells. If you remember the graphic we just saw explaining the structure of the interface, each cell in the vertical table will have a table view within it, so we will be selecting the cells of those inner tables, not this outer one.
Before we create subclasses for iPhone and iPad make these changes in the ArticleListViewController.m file so we have some test rows to show:
- (NSInteger)numberOfSectionsInTableView:(UITableView *)tableView
{
    return 1;
}

- (NSInteger)tableView:(UITableView *)tableView numberOfRowsInSection:(NSInteger)section
{
    return 10;
}
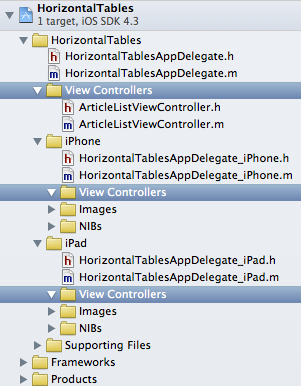
In order to keep our files, controllers, classes and resources organized within our project, in the Project Navigator control-click on the HorizontalTables folder and select Create New Group, name it View Controllers and put the ArticleListViewController .m and .h files in it.
Repeat the same process under the iPhone and iPad folder, as we are just about to create subclasses of ArticleListViewController.
This is what your project navigator will look like afterwards:
Subclassing Article List View Controller
Control-click your newly created View Controllers folder in the iPhone folder and select New File. Select Cocoa Touch from the list on the left side and UIViewController Subclass as the file type, go ahead and click Next.
For the subclass write in ArticleListViewController and make sure that With XIB for user interface is selected, click the Next button, name your file ArticleListViewController_iPhone, and click Save.
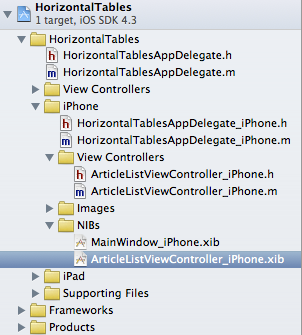
Just to be tidy go ahead and drag the ArticleListViewController_iPhone.xib NIB file under the NIBs folder within the iPhone folder. This is what my Project Navigator looks like:
Open ArticleListViewController_iPhone.h and add the following import to the top of the file:
#import "ArticleListViewController.h"
Then open up the ArticleListViewController_iPhone.m file and delete the initWithNibName method as well as the shouldAutorotateToInterfaceOrientation method. We’ll also add the cellForRowAtIndexPath method now so insert the following code into your implementation:
- (UITableViewCell *)tableView:(UITableView *)tableView cellForRowAtIndexPath:(NSIndexPath *)indexPath
{
    static NSString *CellIdentifier = @"Cell";

    UITableViewCell *cell = [tableView dequeueReusableCellWithIdentifier:CellIdentifier];

    if (cell == nil)
    {
        cell = [[[UITableViewCell alloc] initWithStyle:UITableViewCellStyleDefault reuseIdentifier:CellIdentifier] autorelease];
    }

    cell.textLabel.text = @"Vertical Table Rows on iPhone";

    return cell;
}
We’re almost ready to see our project running on the simulator but before we do that we must make a few small changes to the interface files. Open up the ArticleListViewController_iPhone.xib file.
In the Interface Dock you should have a View object, delete it and drag a Table View from the Object Library. We must connect the Table View’s view to our ArticleListViewController_iPhone class, control-click on File’s Owner and drag from the View outlet to Table View.
If you run your project in the iPhone simulator (or a device) you should see this:
Don’t worry, that’s expected as we haven’t finished wiring up our interface. Jump over to the MainWindow_iPhone.xib file for a second and open up the Interface Dock. Expand the Navigation Controller and select the Root View Controller.
In the Menu Bar go to View\Utilities\Show Identity Inspector (or use the Alt + Command + 3 shortcut). Making sure the Root View Controller is selected, change the class to ArticleListViewController_iPhone.
There’s one last thing we need to do to make things work. Still under the Utilities Pane, switch over to the Attributes Inspector by going over to View\Utilities\Show Attributes Inspector (or use the Alt + Command + 4 shortcut). With the Root View Controller selected change the NIB Name to ArticleListViewController_iPhone.
Go ahead and run the project, this is what you should see:
Yay! Things are working just as we expected. Don’t worry about the “Root View Controller” title on the navigation bar, we are going to add a custom image to it later.
You might find this a lot of work, but if you scroll back you’ll see how little work we’ve done and how, with just a couple of lines of code, we are now well on our way to having a universal Navigation-Based Application.
As you gain practice and understanding of View Controllers and how the connect with their interface files, this will become a walk in the park and something you’ll be able to do in just a couple of minutes.
Great, moving on!


