PaintCode Tutorial: Custom Progress Bar
In this second part of our PaintCode tutorial series, learn how to make a custom progress bar drawn with Core Graphics – but without having to write any code! By Felipe Laso-Marsetti.
Adding the Control Frame
Remember – any time you want to be able to easily resize an element that you create in PaintCode, you should put that element inside a frame, and set up PaintCode so it knows how to resize the element as you resize its parent frame.
There are three steps to do this:
- Group: Put any elements you want resized by a parent frame into a group
- Frame: Draw a frame, and make sure all those elements are inside. Set the Apply only to entirely enclosed shapes setting to make sure it only covers what’s inside.
- Springs and Struts: Set up the springs and struts for each element to indicate how you’d like the element to resize as the frame’s bounds change.
Go up to the top toolbar and select the Frame tool. Draw a frame around the green bar, as shown below:

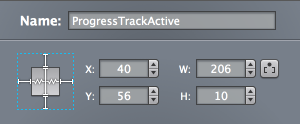
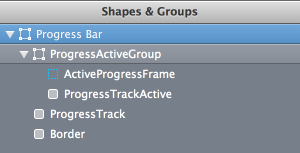
Rename the frame to ActiveProgressFrame and group it with the ProgressTrackActive round rect (select both and click Group in the toolbar). Rename this group to ProgressActiveGroup.
Select ActiveProgressFrame again and check the box that says Apply only to entirely enclosed shapes. This will make the frame only affect the ProgressTrackActive bar, because ProgressTrackActive is the only element within the group that is inside the frame’s boundaries.
In order to keep the active bar centered horizontally, the active bar must retain the same height but be resizable horizontally.
To do this, select ProgressTrackActive and click on the right and bottom springs to make those dimensions static. Click on the center horizontal straight bar to change it to a spring, as shown in the screenshot below:
Test the settings you modified by selecting the ActiveProgressFrame and dragging the right transform handles to the right. The green bar should stretch as your resize the frame. If you drag a corner transform handle up or down, note that the green bar does not stretch vertically, but rather hugs the border of the frame.
Now you need a frame around the whole progress bar, so that you can make the entire progress bar resize as well as its frame changes. First, put everything in a group by selecting all elements (including the group you created already) and click Group in the toolbar. Name the new group Progress Bar. Your new group should look like the image below:
Select the Frame tool and drag a frame around the whole progress bar. Move the frame into the Progress Bar group and name your new frame ProgressIndicatorFrame. Check the box next to Apply only to entirely closed shapes. If you forgot why you’re doing this, check the three steps listed earlier in this section.
Select ProgressActiveGroup. As before, you want this frame to resize horizontally, but not vertically, in order to preserve the centering of the control’s elements.
Click the horizontal bar in the springs/struts settings to turn it into a spring. You also want the progress track to remain locked to the left, top, and right edges of the frame, so ensure that only the bottom bar is a spring. The image below illustrates what your frame resizing settings should look like:

Modify the resizing frame elements of ProgressTrack and Border shapes in the same manner.
Now it’s time to test it out! Select the ProgressIndicatorFrame and drag the transform handles around — your progress bar will resize horizontally, but your vertical dimension remains the same.
Select the ProgressTrackActive shape and click on the variable width button; it’s the small one with two square brackets and dot, immediately to the right of the Width attribute.

Save your changes so you don’t lose any of your precious work. You’re now ready to hook up your control in your app.
Adding The Progress Control to Your App
In Xcode, open either the starter project you downloaded above, or your finished project from Part 1 of this series. Once the project is open, expand the Classes > Views group.
Your task is to create a subclass for the progress bar just as you did in Part 1 for the button. This time, however, you will subclass UIProgressView so the progress bar you designed in PaintCode will work just like the standard iOS progress view control.
Right-click the Views group and select New\File…. Select the iOS\Cocoa Touch\Objective-C class template. Name the class ProgressView, and make it a subclass of UIProgressView.
Open ProgressView.m, delete the code block for initWithFrame: and uncomment drawRect:. Here’s what the file should look like at this point:
#import "ProgressView.h"

@implementation ProgressView

- (void)drawRect:(CGRect)rect
{
    // Drawing code
}

@end
Okay — your project is now ready for the code that PaintCode created for you.
Go back to PaintCode and make sure the code view is visible at the bottom; if not, select View > Code from the menu. Set the platform to iOS > Objective-C, the OS version to iOS 5+, origin to Default Origin, and memory management to ARC, as shown in the image below:
![]()
Now copy and paste all of the code from PaintCode’s code view into drawRect:. This code is long, but don’t worry it’s all been pregenerated for you!
    //// General Declarations
CGColorSpaceRef colorSpace = CGColorSpaceCreateDeviceRGB();
CGContextRef context = UIGraphicsGetCurrentContext();

//// Color Declarations
UIColor* fillColor = [UIColor colorWithRed: 0.416 green: 0.416 blue: 0.416 alpha: 1];
UIColor* strokeColor = [UIColor colorWithRed: 0.322 green: 0.322 blue: 0.322 alpha: 1];
UIColor* shadowColor2 = [UIColor colorWithRed: 0.2 green: 0.2 blue: 0.2 alpha: 1];
UIColor* shadowColor3 = [UIColor colorWithRed: 0.671 green: 0.671 blue: 0.671 alpha: 1];
UIColor* fillColor2 = [UIColor colorWithRed: 0.247 green: 0.247 blue: 0.247 alpha: 1];
UIColor* strokeColor2 = [UIColor colorWithRed: 0.188 green: 0.188 blue: 0.188 alpha: 1];
UIColor* color = [UIColor colorWithRed: 0 green: 0.886 blue: 0 alpha: 1];

//// Gradient Declarations
NSArray* outerRectGradientColors = [NSArray arrayWithObjects:
    (id)strokeColor.CGColor,
    (id)fillColor.CGColor, nil];
CGFloat outerRectGradientLocations[] = {0, 1};
CGGradientRef outerRectGradient = CGGradientCreateWithColors(colorSpace, (__bridge CFArrayRef)outerRectGradientColors, outerRectGradientLocations);
NSArray* gradientColors = [NSArray arrayWithObjects:
    (id)strokeColor2.CGColor,
    (id)fillColor2.CGColor, nil];
CGFloat gradientLocations[] = {0, 1};
CGGradientRef gradient = CGGradientCreateWithColors(colorSpace, (__bridge CFArrayRef)gradientColors, gradientLocations);

//// Shadow Declarations
UIColor* darkShadow = shadowColor2;
CGSize darkShadowOffset = CGSizeMake(3.1, 3.1);
CGFloat darkShadowBlurRadius = 5;
UIColor* lightShadow = shadowColor3;
CGSize lightShadowOffset = CGSizeMake(3.1, 3.1);
CGFloat lightShadowBlurRadius = 5;

//// Frames
CGRect progressIndicatorFrame = CGRectMake(-1, 0, 321, 47);

//// Subframes
CGRect group = CGRectMake(CGRectGetMinX(progressIndicatorFrame) + 10, CGRectGetMinY(progressIndicatorFrame) + 9, CGRectGetWidth(progressIndicatorFrame) - 25, 20);
CGRect activeProgressFrame = CGRectMake(CGRectGetMinX(group) + floor(CGRectGetWidth(group) * 0.00000 + 0.5), CGRectGetMinY(group) + floor(CGRectGetHeight(group) * 0.00000 + 0.5), floor(CGRectGetWidth(group) * 1.00000 + 0.5) - floor(CGRectGetWidth(group) * 0.00000 + 0.5), floor(CGRectGetHeight(group) * 1.00000 + 0.5) - floor(CGRectGetHeight(group) * 0.00000 + 0.5));


//// Abstracted Attributes
CGRect progressTrackActiveRect = CGRectMake(CGRectGetMinX(activeProgressFrame) + 4, CGRectGetMinY(activeProgressFrame) + 5, CGRectGetWidth(activeProgressFrame) - 8, 10);


//// Progress Bar
{
    //// Border Drawing
    CGRect borderRect = CGRectMake(CGRectGetMinX(progressIndicatorFrame) + 2, CGRectGetMinY(progressIndicatorFrame) + 3, CGRectGetWidth(progressIndicatorFrame) - 5, 34);
    UIBezierPath* borderPath = [UIBezierPath bezierPathWithRoundedRect: borderRect cornerRadius: 4];
    CGContextSaveGState(context);
    CGContextSetShadowWithColor(context, darkShadowOffset, darkShadowBlurRadius, darkShadow.CGColor);
    CGContextBeginTransparencyLayer(context, NULL);
    [borderPath addClip];
    CGContextDrawLinearGradient(context, outerRectGradient,
        CGPointMake(CGRectGetMidX(borderRect), CGRectGetMinY(borderRect)),
        CGPointMake(CGRectGetMidX(borderRect), CGRectGetMaxY(borderRect)),
        0);
    CGContextEndTransparencyLayer(context);

    ////// Border Inner Shadow
    CGRect borderBorderRect = CGRectInset([borderPath bounds], -lightShadowBlurRadius, -lightShadowBlurRadius);
    borderBorderRect = CGRectOffset(borderBorderRect, -lightShadowOffset.width, -lightShadowOffset.height);
    borderBorderRect = CGRectInset(CGRectUnion(borderBorderRect, [borderPath bounds]), -1, -1);

    UIBezierPath* borderNegativePath = [UIBezierPath bezierPathWithRect: borderBorderRect];
    [borderNegativePath appendPath: borderPath];
    borderNegativePath.usesEvenOddFillRule = YES;

    CGContextSaveGState(context);
    {
        CGFloat xOffset = lightShadowOffset.width + round(borderBorderRect.size.width);
        CGFloat yOffset = lightShadowOffset.height;
        CGContextSetShadowWithColor(context,
            CGSizeMake(xOffset + copysign(0.1, xOffset), yOffset + copysign(0.1, yOffset)),
            lightShadowBlurRadius,
            lightShadow.CGColor);

        [borderPath addClip];
        CGAffineTransform transform = CGAffineTransformMakeTranslation(-round(borderBorderRect.size.width), 0);
        [borderNegativePath applyTransform: transform];
        [[UIColor grayColor] setFill];
        [borderNegativePath fill];
    }
    CGContextRestoreGState(context);

    CGContextRestoreGState(context);


    //// ProgressTrack Drawing
    CGRect progressTrackRect = CGRectMake(CGRectGetMinX(progressIndicatorFrame) + 12, CGRectGetMinY(progressIndicatorFrame) + 12, CGRectGetWidth(progressIndicatorFrame) - 29, 14);
    UIBezierPath* progressTrackPath = [UIBezierPath bezierPathWithRoundedRect: progressTrackRect cornerRadius: 7];
    CGContextSaveGState(context);
    CGContextSetShadowWithColor(context, lightShadowOffset, lightShadowBlurRadius, lightShadow.CGColor);
    CGContextBeginTransparencyLayer(context, NULL);
    [progressTrackPath addClip];
    CGContextDrawLinearGradient(context, gradient,
        CGPointMake(CGRectGetMidX(progressTrackRect), CGRectGetMinY(progressTrackRect)),
        CGPointMake(CGRectGetMidX(progressTrackRect), CGRectGetMaxY(progressTrackRect)),
        0);
    CGContextEndTransparencyLayer(context);

    ////// ProgressTrack Inner Shadow
    CGRect progressTrackBorderRect = CGRectInset([progressTrackPath bounds], -darkShadowBlurRadius, -darkShadowBlurRadius);
    progressTrackBorderRect = CGRectOffset(progressTrackBorderRect, -darkShadowOffset.width, -darkShadowOffset.height);
    progressTrackBorderRect = CGRectInset(CGRectUnion(progressTrackBorderRect, [progressTrackPath bounds]), -1, -1);

    UIBezierPath* progressTrackNegativePath = [UIBezierPath bezierPathWithRect: progressTrackBorderRect];
    [progressTrackNegativePath appendPath: progressTrackPath];
    progressTrackNegativePath.usesEvenOddFillRule = YES;

    CGContextSaveGState(context);
    {
        CGFloat xOffset = darkShadowOffset.width + round(progressTrackBorderRect.size.width);
        CGFloat yOffset = darkShadowOffset.height;
        CGContextSetShadowWithColor(context,
            CGSizeMake(xOffset + copysign(0.1, xOffset), yOffset + copysign(0.1, yOffset)),
            darkShadowBlurRadius,
            darkShadow.CGColor);

        [progressTrackPath addClip];
        CGAffineTransform transform = CGAffineTransformMakeTranslation(-round(progressTrackBorderRect.size.width), 0);
        [progressTrackNegativePath applyTransform: transform];
        [[UIColor grayColor] setFill];
        [progressTrackNegativePath fill];
    }
    CGContextRestoreGState(context);

    CGContextRestoreGState(context);


    //// Group
    {
        //// ProgressTrackActive Drawing
        UIBezierPath* progressTrackActivePath = [UIBezierPath bezierPathWithRoundedRect: progressTrackActiveRect cornerRadius: 5];
        [color setFill];
        [progressTrackActivePath fill];
    }
}


//// Cleanup
CGGradientRelease(outerRectGradient);
CGGradientRelease(gradient);
CGColorSpaceRelease(colorSpace);
Note: Your code might be slightly different than this due to how you drew things in PaintCode, but should still be OK.
Note: Your code might be slightly different than this due to how you drew things in PaintCode, but should still be OK.
You can easily see how much work PaintCode does for you. Could you imagine coding all that by hand? If you’re a fan of pixel-pushing, go for it — but most of us like to save time and get on to coding more interesting things! :]
At the top of the method are declarations for colors, gradients, and shadows. The frame declarations follow on next. Make note of the progressTrackActiveRect variable in the //// Abstracted Attributes section. This will be used later on to control the progress of the green bar via the progress property, similar to how a regular UIProgressView works.
Next there’s the long Progress Bar section of code that’s in charge of drawing the border, progress track and active rect, and after that another section to manage the ProgressActiveGroup. At the very end of the code block you’ll find a few cleanup methods.
Note: This tutorial won’t go into depth on the Core Graphics used to draw the controls. The main reason for using PaintCode is to design some really amazing UI controls without mucking about with Core Graphics libraries. This frees you up to spend time on developing and testing other areas of your app, instead of spending it on pixel pushing.
However, a little bit of Core Graphics knowledge will go a long way if you want to understand the code that PaintCode generates for you so you can tweak it. To learn more about Core Graphics, check out our epic 7-part Core Graphics tutorial series!