Storyboards Tutorial in iOS 7: Part 1
Storyboards tutorial to get you started with designing user interfaces for your iPhone apps on iOS 7. By Matthijs Hollemans.
Prototype cells
Prototype cells allow you to easily design a custom layout for your table view cells directly from within the storyboard editor.
The Table View Controller comes with a blank prototype cell. Click on that cell to select it and in the Attributes inspector set the Style option to Subtitle. This immediately changes the appearance of the cell to include two labels.
If you’ve used table views before and created your own cells by hand, you may recognize this as the UITableViewCellStyleSubtitle style. With prototype cells you can either pick one of the built-in cell styles as you just did, or create your own custom design (which you’ll do shortly).
Set the Accessory attribute to Disclosure Indicator and in the Identifier field type PlayerCell. All prototype cells are still regular UITableViewCell objects and therefore should have a reuse identifier.

Run the app, and… nothing has changed. That’s not so strange: you still have to make a data source for the table so it will know what rows to display.
Add a new file to the project. Choose the Objective-C class template. Name the class PlayersViewController and make it a subclass of UITableViewController. The With XIB for user interface option should be unchecked because you already have the design of this view controller in the storyboard. No nibs today!

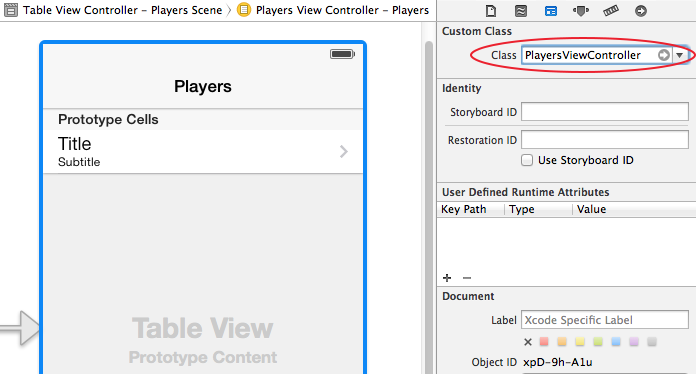
Go back to the storyboard and select the Table View Controller (make sure you select the actual view controller and not one of the views inside it). In the Identity inspector, set its Class to PlayersViewController. That is the essential step for hooking up a scene from the storyboard with your own view controller subclass. Don’t forget this or your class won’t be used!
From now on when you run the app that table view controller from the storyboard is an instance of the PlayersViewController class.
Add a mutable array property to PlayersViewController.h:
#import <UIKit/UIKit.h>

@interface PlayersViewController : UITableViewController

@property (nonatomic, strong) NSMutableArray *players;

@end
This array will contain the main data model for the app, an array that contains Player objects. Add a new file to the project using the Objective-C class template. Name it Player, subclass of NSObject.
Change Player.h to the following:
@interface Player : NSObject

@property (nonatomic, copy) NSString *name;
@property (nonatomic, copy) NSString *game;
@property (nonatomic, assign) int rating;

@end
There’s nothing special going on here. Player is simply a container object for these three properties: the name of the player, the game he’s playing, and a rating of 1 to 5 stars.
You’ll make the array and some test Player objects in the App Delegate and then assign it to the PlayersViewController’s players property.
In AppDelegate.m, add an #import for the Player and PlayersViewController classes at the top of the file, and add a new instance variable named _players:
#import "AppDelegate.h"
#import "Player.h"
#import "PlayersViewController.h"

@implementation AppDelegate
{
    NSMutableArray *_players;
}

// Rest of file...
Then change the application:didFinishLaunchingWithOptions: method to:
- (BOOL)application:(UIApplication *)application didFinishLaunchingWithOptions:(NSDictionary *)launchOptions
{
    _players = [NSMutableArray arrayWithCapacity:20];

    Player *player = [[Player alloc] init];
    player.name = @"Bill Evans";
    player.game = @"Tic-Tac-Toe";
    player.rating = 4;
    [_players addObject:player];

    player = [[Player alloc] init];
    player.name = @"Oscar Peterson";
    player.game = @"Spin the Bottle";
    player.rating = 5;
    [_players addObject:player];

    player = [[Player alloc] init];
    player.name = @"Dave Brubeck";
    player.game = @"Texas Hold’em Poker";
    player.rating = 2;
    [_players addObject:player];

    UITabBarController *tabBarController = (UITabBarController *)self.window.rootViewController;
    UINavigationController *navigationController = [tabBarController viewControllers][0];
    PlayersViewController *playersViewController = [navigationController viewControllers][0];
    playersViewController.players = _players;

    return YES;
}
This simply creates some Player objects and adds them to the _players array. But then it does the following:
UITabBarController *tabBarController = (UITabBarController *)self.window.rootViewController;
UINavigationController *navigationController = [tabBarController viewControllers][0];
PlayersViewController *playersViewController = [navigationController viewControllers][0];
playersViewController.players = _players;
Yikes, what is that?! You want to assign the _players array to the players property of PlayersViewController so it can use this array for its data source. But the app delegate doesn’t know anything about PlayersViewController yet, so it will have to dig through the storyboard to find it.
Note: This is one of the limitations of storyboards. With nibs you always had a reference to the App Delegate in your MainWindow.xib and you could make connections from your top-level view controllers to outlets on the App Delegate. That is currently not possible with storyboards. You cannot make references to the app delegate from your top-level view controllers. That’s unfortunate, but you can always get those references programmatically, which is what you do here.
Note: This is one of the limitations of storyboards. With nibs you always had a reference to the App Delegate in your MainWindow.xib and you could make connections from your top-level view controllers to outlets on the App Delegate. That is currently not possible with storyboards. You cannot make references to the app delegate from your top-level view controllers. That’s unfortunate, but you can always get those references programmatically, which is what you do here.
Let’s take it step-by-step:
UITabBarController *tabBarController = (UITabBarController *)self.window.rootViewController;
You know that the storyboard’s initial view controller is a Tab Bar Controller, so you can look up the window’s rootViewController and cast it to UITabBarController.
The PlayersViewController sits inside a navigation controller in the first tab, so you first look up that UINavigationController object,
UINavigationController *navigationController = [tabBarController viewControllers][0];
and then ask it for its root view controller, which is the PlayersViewController that you are looking for:
PlayersViewController *playersViewController = [navigationController viewControllers][0];
It takes a bit of effort to dig through the storyboard to get the view controller you want, but that’s the way to do it. Of course, if you change the order of the tabs, or change the app so that it no longer has a Tab Bar Controller at the root, then you will have to revise this logic as well.
Now that you have an array full of Player objects, you can continue building the data source for PlayersViewController. Open up PlayersViewController.m and add an import at the top:
#import "Player.h"
Change the table view data source methods to the following:
- (NSInteger)numberOfSectionsInTableView:(UITableView *)tableView
{
    return 1;
}

- (NSInteger)tableView:(UITableView *)tableView numberOfRowsInSection:(NSInteger)section
{
    return [self.players count];
}
The real work happens in cellForRowAtIndexPath. Previously, this method typically looked something like this:
- (UITableViewCell *)tableView:(UITableView *)tableView cellForRowAtIndexPath:(NSIndexPath *)indexPath
{
    static NSString *CellIdentifier = @"Cell";

    UITableViewCell *cell = [tableView dequeueReusableCellWithIdentifier:CellIdentifier];
    if (cell == nil) {
        cell = [[UITableViewCell alloc] initWithStyle:UITableViewCellStyleDefault
                                      reuseIdentifier:CellIdentifier];
    }

    // Configure the cell...
    return cell;
}
You would ask the table view to dequeue a cell and if that returned nil because there were no free cells to reuse, you would create a new instance of the cell class. That is no doubt how you’ve been writing your own table view code all this time. Well, no longer!
Replace that method with:
- (UITableViewCell *)tableView:(UITableView *)tableView cellForRowAtIndexPath:(NSIndexPath *)indexPath
{
    UITableViewCell *cell = [tableView dequeueReusableCellWithIdentifier:@"PlayerCell"];

    Player *player = (self.players)[indexPath.row];
    cell.textLabel.text = player.name;
    cell.detailTextLabel.text = player.game;

    return cell;
}
That looks a lot simpler! The only thing you need to do to get a new cell is:
UITableViewCell *cell = [tableView dequeueReusableCellWithIdentifier:@"PlayerCell"];
If there is no existing cell that can be recycled, this will automatically make a new copy of the prototype cell and return it to you. All you need to do is supply the re-use identifier that you set on the prototype cell in the storyboard editor, in this case PlayerCell. Don’t forget to set that identifier, or this little scheme won’t work!
Run the app, and lo and behold, the table view has players in it:

It just takes one line of code to use these newfangled prototype cells. I think that’s just great!
Note: In this app you’re using only one prototype cell but if your table needs to display different kinds of cells then you can simply add additional prototype cells to the storyboard. You can either duplicate the existing cell to make a new one, or increment the value of the Table View’s Prototype Cells attribute. Be sure to give each cell its own re-use identifier, though.