OpenGL ES Transformations with Gestures
Learn all about OpenGL ES Transformations by making a 3D, gesture-based model viewer. By Ricardo Rendon Cepeda.
A Quick Math Lesson: Quaternions
Before you move onto the last transformation—rotation—you need to know a bit about quaternions. This lesson will thankfully be pretty quick, though, since GLKit provides an excellent math library to deal with quaternions.
Quaternions are a complex mathematical system with many applications, but for this tutorial you’ll only be concerned with their spatial rotation properties. The main advantage of quaternions in this respect is that they don’t suffer from gimbal lock, unlike Euler angles.
Euler angles are a common representation for rotations, usually in (x,y,z) form. When rotating an object in this space, there are many opportunities for two axes to align with each other. In these cases, one degree of freedom is lost since any change to either of the aligned axes applies the same rotation to the object being transformed—that is, the two axes become one. That is a gimbal lock, and it will cause unexpected results and jittery animations.
A gimbal lock, from Wikipedia.

A gimbal lock, from Wikipedia.
One reason to prefer Euler angles to quaternions is that they are intrinsically easier to represent and to read. However, GLKQuaternion simplifies the complexity of quaternions and reduces a rotation to four simple steps:
- Create a quaternion that represents a rotation around an axis.
- For each (x,y,z) axis, multiply the resulting quaternion against a master quaternion.
- Derive the 4×4 matrix that performs an (x,y,z) rotation based on a quaternion.
- Calculate the product of the resulting matrix with the main model-view matrix.
You’ll be implementing these four simple steps shortly. :]
Quaternions and Euler angles are very deep subjects, so check out these summaries from CH Robotics if you wish to learn more: Understanding Euler Angles and Understanding Quaternions.
The Rotation Transformation: Overview
In this tutorial, you’ll use two different types of gesture recognizers to control your rotations: two-finger pan and rotation. The reason for this is that your iOS device doesn’t have a single gesture recognizer that reports three different types of values, one for each (x,y,z) axis. Think about the ones you’ve covered so far:
- Pinch produces a single float, perfect for a uniform scale across all three (x,y,z) axes.
- One-finger pan produces two values corresponding to movement along the x-axis and the y-axis, just like your translation implementation.
No gesture can accurately represent rotation in 3D space. Therefore, you must define your own rule for this transformation.
Rotation about the z-axis is very straightforward and intuitive with the rotation gesture, but rotation about the x-axis and/or y-axis is slightly more complicated. Thankfully, the two-finger pan gesture reports movement along both of these axes. With a little more effort, you can use it to represent a rotation.
Let’s start with the easier one first. :]
Z-Axis Rotation With the Rotation Gesture
Open Transformations.m and add the following variables inside your @interface extension:
// Rotation
GLKVector3      _rotationStart;
GLKQuaternion   _rotationEnd;
This is slightly different than your previous implementations for scale and translation, but it makes sense given your new knowledge of quaternions. Before moving on, add the following variable just below:
// Vectors
GLKVector3      _front;
As mentioned before, your quaternions will represent a rotation around an axis. This axis is actually a vector, since it specifies a direction—it’s not along z, it’s either front-facing or back-facing.
Complete the vector’s implementation by initializing it inside initWithDepth:Scale:Translation:Rotation: with the following line:
// Vectors
_front = GLKVector3Make(0.0f, 0.0f, 1.0f);
As you can see, the vector is front-facing because its direction is towards the screen.
Note: Previously, I mentioned that in OpenGL ES, negative z-values go into the screen. This is because OpenGL ES uses a right-handed coordinate system. GLKit, on the other hand (pun intended), uses the more conventional left-handed coordinate system.
Left-handed and right-handed coordinate systems, from Learn OpenGL ES
Left-handed and right-handed coordinate systems, from Learn OpenGL ES
Next, add the following lines to initWithDepth:Scale:Translation:Rotation:, right after the code you just added above:
r.z = GLKMathDegreesToRadians(r.z);
_rotationEnd = GLKQuaternionIdentity;
_rotationEnd = GLKQuaternionMultiply(GLKQuaternionMakeWithAngleAndVector3Axis(-r.z, _front), _rotationEnd);
These lines perform the first two steps of the quaternion rotation described earlier:
- You create a quaternion that represents a rotation around an axis by using
GLKQuaternionMakeWithAngleAndVector3Axis(). - You multiply the resulting quaternion against a master quaternion using
GLKQuaternionMultiply().
All calculations are performed with radians, hence the call to GLKMathDegreesToRadians(). With quaternions, a positive angle performs a counterclockwise rotation, so you send in the negative value of your angle: -r.z.
To complete the initial setup, add the following line to getModelViewMatrix, right after you create modelViewMatrix:
GLKMatrix4 quaternionMatrix = GLKMatrix4MakeWithQuaternion(_rotationEnd);
Then, add the following line to your matrix calculations, after the translation and before the scale:
modelViewMatrix = GLKMatrix4Multiply(modelViewMatrix, quaternionMatrix);
These two lines perform the last two steps of the quaternion rotation described earlier:
- You derive the 4×4 matrix that performs an (x,y,z) rotation based on a quaternion, using
GLKMatrix4MakeWithQuaternion(). - You calculate the product of the resulting matrix with the main model-view matrix using
GLKMatrix4Multiply().
Note: The order of your transformations is not arbitrary. Imagine the following instructions given to two different people:
See the difference below:
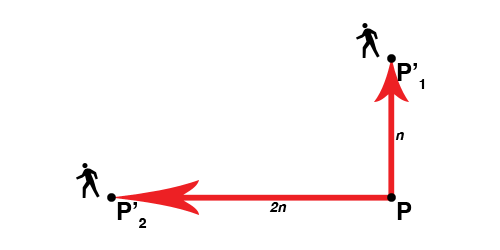
Even though the instructions have the same steps, the two people end up at different points, P’1 and P’2. This is because Person 1 first walks (translation), then turns (rotation), then grows (scale), thus ending n paces in front of point P. With the other order, Person 2 first grows, then turns, then walks, thus taking giant-sized steps towards the left and ending 2n paces to the left of point P.
- Starting from point
P: takensteps forward; turn to your left; then pretend to be a giant twice your size. - Starting from point
P: pretend to be a giant twice your size; turn to your left; then takensteps forward.
Note: The order of your transformations is not arbitrary. Imagine the following instructions given to two different people:
- Starting from point
P: takensteps forward; turn to your left; then pretend to be a giant twice your size. - Starting from point
P: pretend to be a giant twice your size; turn to your left; then takensteps forward.
See the difference below:
Even though the instructions have the same steps, the two people end up at different points, P’1 and P’2. This is because Person 1 first walks (translation), then turns (rotation), then grows (scale), thus ending n paces in front of point P. With the other order, Person 2 first grows, then turns, then walks, thus taking giant-sized steps towards the left and ending 2n paces to the left of point P.
Open MainViewController.m and test your new code by changing the z-axis initialization angle of self.transformations to 180.0 inside viewDidLoad:
self.transformations = [[Transformations alloc] initWithDepth:5.0f Scale:2.0f Translation:GLKVector2Make(0.0f, 0.0f) Rotation:GLKVector3Make(0.0f, 0.0f, 180.0f)];
Build and run! You’ve caught your starship in the middle of a barrel roll.

After you’ve verified that this worked, revert the change, since you would rather have your app launch with the starship properly oriented.
The next step is to implement the rotation with your rotation gesture. Open Transformations.m and add the following lines to rotate:withMultiplier::
float dz = r.z - _rotationStart.z;
_rotationStart = GLKVector3Make(r.x, r.y, r.z);
_rotationEnd = GLKQuaternionMultiply(GLKQuaternionMakeWithAngleAndVector3Axis(-dz, _front), _rotationEnd);
This is a combination of your initialization code and your translation implementation. dz represents the rate of change of the current rotation about the z-axis. Then you simply update _rotationStart and _rotationEnd to reflect the new start and end positions, respectively.
There is no need to convert r.z to radians this time, since the rotation gesture’s values are already in radians. r.x and r.y will be passed along as 0.0, so you don’t need to worry about them too much—for now.
As you know, a new rotation gesture always begins with a starting value of 0.0. Therefore, all new rotations will be relative to this zero angle, regardless of your model’s actual orientation. Consequently, the value assigned to _rotationStart for every new rotation gesture will always be an angle of zero for each axis.
Add the following line to start:
_rotationStart = GLKVector3Make(0.0f, 0.0f, 0.0f);
To finalize this transformation implementation, open MainViewController.m and locate your rotation: function. Replace the NSLog() statement with the following:
[self.transformations rotate:GLKVector3Make(0.0f, 0.0f, rotation) withMultiplier:1.0f];
Since a full rotation gesture perfectly spans 360 degrees, there is no need to implement a multiplier here, but you’ll find it very useful in the next section.
Lastly, since your calculations are expecting radians, change the preceding line:
float rotation = GLKMathRadiansToDegrees([sender rotation]);
To this:
float rotation = [sender rotation];
Build and run! You can now do a full barrel roll. :D
