Core Graphics Tutorial: Patterns
Learn how to use Core Graphics to draw patterns in a performant way. By Michael Katz.
Using Masking Patterns
Masking patterns define their color information outside the pattern cell draw method. This allows you to change up the pattern color to suit your needs.
Here’s an example of a masking pattern that has no color associated with it:

With the pattern in place, you can now apply color. The first example below shows a blue color applied to the mask, and the second displays an orange color:

Now, you’ll change the pattern you’ve been working with to a masking pattern.
Delete the code from drawPattern where you set fill and stroke colors and draw the path and replace it with the following:
context.fillPath()
This reverts the code back to filling the path.
Replace pattern with the following:
guard let pattern = CGPattern(
  info: nil,
  bounds: CGRect(x: 0, y: 0, width: 20, height: 20),
  matrix: transform,
  xStep: 25,
  yStep: 25,
  tiling: .constantSpacing,
  isColored: false,
  callbacks: &callbacks)
else { return }
This sets isColored to false, changing your pattern to a masking pattern. You’ve also increased the vertical and horizontal spacing to 25. Now, you need to provide the color space information for your pattern.
Replace the existing patternSpace assignment with the following:
let baseSpace = CGColorSpaceCreateDeviceRGB()
guard let patternSpace = CGColorSpace(patternBaseSpace: baseSpace)
else { return }
Here, you get a reference to a standard device-dependent RGB color space. You then change your pattern color space to this value instead of the previous nil value.
Below that, replace the lines where you create alpha and set the context fill pattern with the following:
let fillColor: [CGFloat] = [0.0, 1.0, 1.0, 1.0]
context.setFillPattern(pattern, colorComponents: fillColor)
This creates a color applied underneath the mask when filling out the pattern.
Run the playground. Your pattern’s color updates to reflect the cyan color setting that you configured outside the draw method:

Stroking and Filling the Masking Pattern
Now, it’s time to stroke and fill a masking pattern. It’s like stroking a colored pattern.
Replace the line context.fillPath() in drawPattern with the following:
context.setStrokeColor(UIColor.darkGray.cgColor)
context.drawPath(using: .fillStroke)
Although you set the stroke color inside draw(_:), your pattern color is still set outside the method.
Run the playground to see the stroked pattern:

You’ve now built up experience with different pattern configurations and with masking patterns. You can begin building out the pattern you’ll need for Recall.
Creating the Game Pattern
Add the following code to the top of the playground:
extension CGPath {
  // 1
  static func triangle(in rect: CGRect) -> CGPath {
    let path = CGMutablePath()
    // 2
    let top = CGPoint(x: rect.width / 2, y: 0)
    let bottomLeft = CGPoint(x: 0, y: rect.height)
    let bottomRight = CGPoint(x: rect.width, y: rect.height)
    // 3
    path.addLines(between: [top, bottomLeft, bottomRight])
    // 4
    path.closeSubpath()
    return path
  }
}
Going through the code, step by step:
- Extend
CGPathto create a triangular path. - Specify the three points that make up the triangle.
- Add lines between the points.
- Close the path.
Then inside PatternView, add the following empty enum:
enum Constants {
  static let patternSize: CGFloat = 30.0
  static let patternRepeatCount: CGFloat = 2
}
These represent the constants you’ll use when setting up your pattern. patternSize defines the pattern cell size, and patternRepeatCount defines the number of pattern cells in the pattern view.
Drawing a Triangle
Add the following after the Constants definition:
let drawTriangle: CGPatternDrawPatternCallback = { _, context in
  let trianglePath = CGPath.triangle(in:
    CGRect(
      x: 0,
      y: 0,
      width: Constants.patternSize,
      height: Constants.patternSize))
  context.addPath(trianglePath)
  context.fillPath()
}
This defines a new callback for drawing your triangular pattern. In it, you call CGPath.triangle(in:) to return a path representing the triangle. Then you add this path to the context before filling it.
Note that the closure doesn’t specify a fill color, so it can be a masking pattern.
In draw(_:), change callbacks to the following:
var callbacks = CGPatternCallbacks(
  version: 0,
  drawPattern: drawTriangle,
  releaseInfo: nil)
You’re now using the triangle drawing callback.
Drawing Repeating Triangles as a Pattern
Delete drawPattern, as it’s no longer necessary. One can only go around in circles for so long. :]
Also, in draw(_:), replace the code that assigns transform and pattern with the following:
// 1
let patternStepX = rect.width / Constants.patternRepeatCount
let patternStepY = rect.height / Constants.patternRepeatCount
// 2
let patternOffsetX = (patternStepX - Constants.patternSize) / 2.0
let patternOffsetY = (patternStepY - Constants.patternSize) / 2.0
// 3
let transform = CGAffineTransform(
  translationX: patternOffsetX,
  y: patternOffsetY)
// 4
guard let pattern = CGPattern(
  info: nil,
  bounds: CGRect(
    x: 0,
    y: 0,
    width: Constants.patternSize,
    height: Constants.patternSize),
  matrix: transform,
  xStep: patternStepX,
  yStep: patternStepY,
  tiling: .constantSpacing,
  isColored: false,
  callbacks: &callbacks)
else { return }
Here’s what that code does, step by step:
- Calculate the horizontal and vertical step size using the view’s width and height, as well as the number of pattern cells in a view.
- Work out the dimensions to horizontally and vertically center a pattern cell within its bounds.
- Set up a
CGAffineTransformtranslation based on the centering variables you defined. - Create the pattern object based on your calculated parameters.
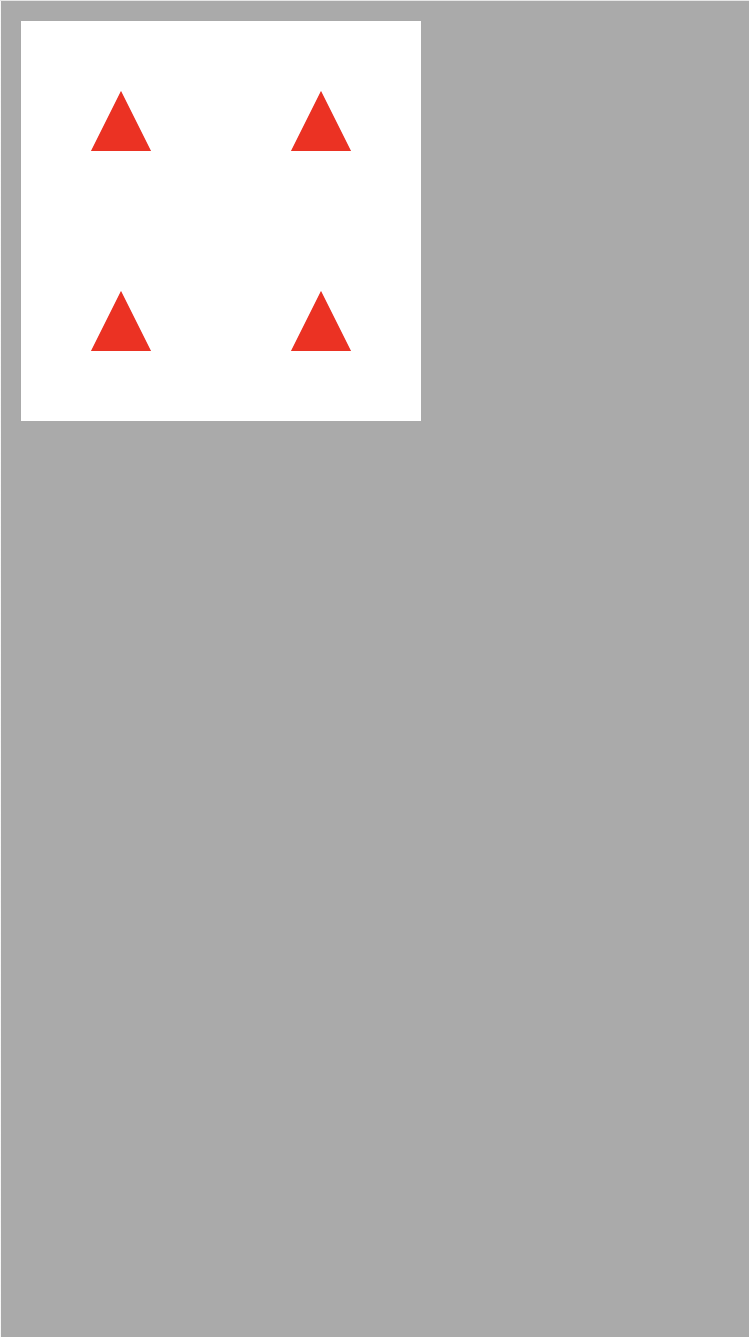
Run the playground. You will see four triangles, each centered both vertically and horizontally within their bounds:
You’ll next get your background colors to more closely match the Recall app.
In MyViewController, change the background color setup in loadView() as follows:
view.backgroundColor = .lightGray
Next, go to PatternView and change the context fill setup in draw(_:) as follows:
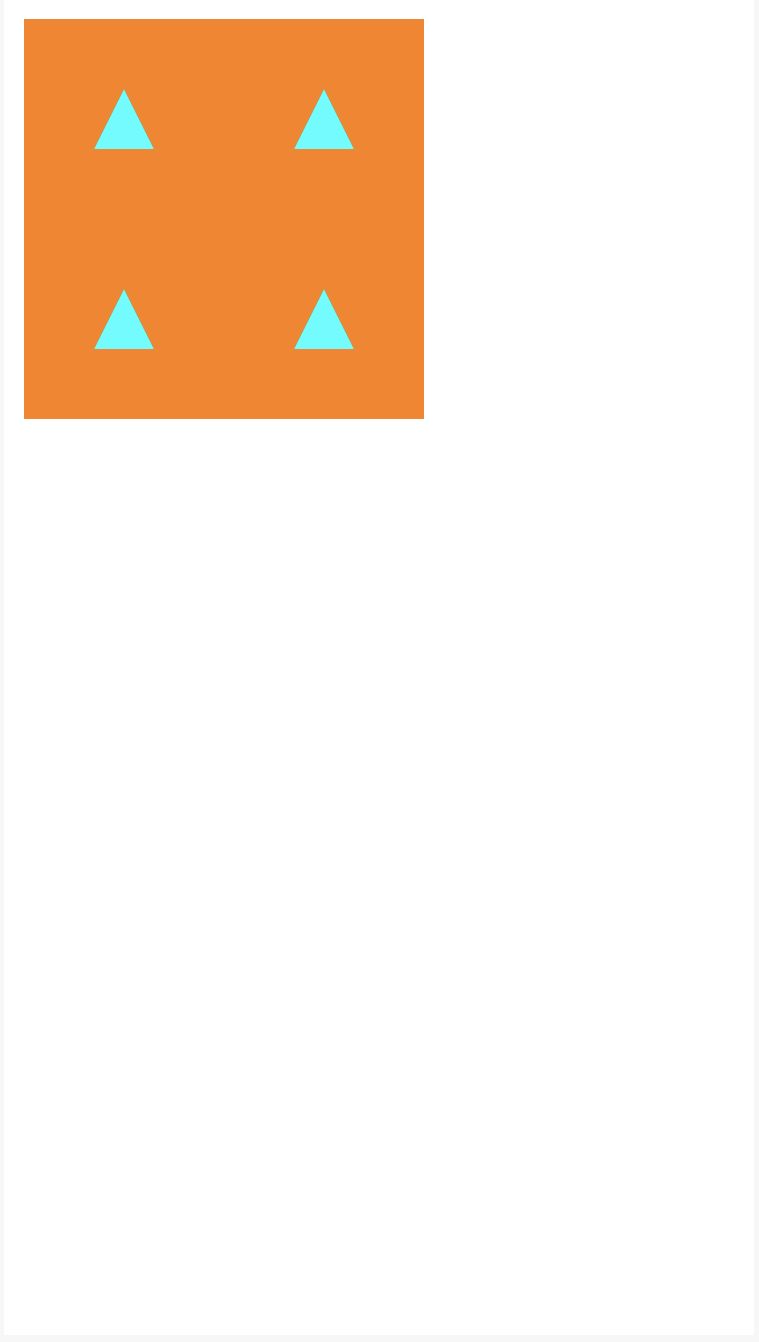
UIColor.white.setFill()
Run the playground. Your main view’s background should now be gray with a white background for your pattern view:

Customizing the Pattern View
Now that you have the basic pattern displaying correctly, you can make changes to control the pattern direction.
Add the following enumeration near the top of PatternView after Constants:
enum PatternDirection: CaseIterable {
  case left
  case top
  case right
  case bottom
}
This represents the different directions the triangle can point. They match the directions in your starter app.
Add the following properties to PatternView:
var fillColor: [CGFloat] = [1.0, 0.0, 0.0, 1.0]
var direction: PatternDirection = .top
This represents the color you’ll apply to the masking pattern and the pattern direction. The class sets a default color of red (the four array components represent red, green, blue and alpha) and the default direction of top.
Delete the local fillColor declaration found near the bottom of draw(_:). This will ensure that you use the instance property instead.
Replace transform with the following:
// 1
var transform: CGAffineTransform
// 2
switch direction {
case .top:
  transform = .identity
case .right:
  transform = CGAffineTransform(rotationAngle: 0.5 * .pi)
case .bottom:
  transform = CGAffineTransform(rotationAngle: .pi)
case .left:
  transform = CGAffineTransform(rotationAngle: 1.5 * .pi)
}
// 3
transform = transform.translatedBy(x: patternOffsetX, y: patternOffsetY)
Here’s what just happened:
- Declare a
CGAffineTransformvariable for your pattern transform. - Assign the transform to the identity matrix if the pattern direction is
top. Otherwise, the transform is a rotation based on the direction. For example, if the pattern points right, then the rotation is π / 2 radians or 90º clockwise. - Apply a
CGAffineTransformtranslation to center the pattern cell within its bounds.
Run the playground. Your triangles are red, based on your default pattern fill color: