Core Graphics Tutorial: Patterns
Learn how to use Core Graphics to draw patterns in a performant way. By Michael Katz.
Drawing a Black Circle in the Pattern Cell
Add the following property inside the top of PatternView:
let drawPattern: CGPatternDrawPatternCallback = { _, context in
  context.addArc(
    center: CGPoint(x: 20, y: 20),
    radius: 10.0,
    startAngle: 0,
    endAngle: 2.0 * .pi,
    clockwise: false)
  context.setFillColor(UIColor.black.cgColor)
  context.fillPath()
}
The code above draws a circular path in the graphics context and fills it with black color.
This represents your pattern cell’s drawing method, which is of the type CGPatternDrawPatternCallback. This is a closure with two arguments:
- A pointer to private data associated with the pattern. You’re not using private data, so you use an unnamed parameter here.
- The graphics
contextused in drawing your pattern cell.
Add the following code to the end of draw(_:):
var callbacks = CGPatternCallbacks(
  version: 0,
  drawPattern: drawPattern,
  releaseInfo: nil)
CGPatternCallbacks is a structure for holding the callbacks used to draw a pattern. There are two types of callback — one for the pattern, which you’ve made already, and one for cleaning up and releasing any private data, which you aren’t using. You would typically set up a release callback if you’re using private data in the pattern. Since you don’t use private data in your draw method, you pass nil for this callback.
Creating the Pattern
To create the pattern, add the following right after the code above:
guard let pattern = CGPattern(
  info: nil,
  bounds: CGRect(x: 0, y: 0, width: 20, height: 20),
  matrix: .identity,
  xStep: 50,
  yStep: 50,
  tiling: .constantSpacing,
  isColored: true,
  callbacks: &callbacks)
else { return }
This creates a pattern object. In the code above, you pass in the following parameters:
-
info: A pointer to any private data you want to use in your pattern callbacks. You pass in
nilhere since you’re not using any. - bounds: The pattern cell’s bounding box.
- matrix: A matrix that represents the transform to apply. You pass in the identity matrix, as you’re not applying any transforms.
- xStep: The horizontal spacing between pattern cells.
- yStep: The vertical spacing between pattern cells.
- tiling: The technique Core Graphics should use to account for differences between user space units and device pixels.
-
isColored: Whether the pattern cell draw method applies color. You’re setting this to
truesince your draw method sets a color. - callbacks: A pointer to the structure that holds the pattern callbacks.
Add the following code right after the pattern assignment:
var alpha: CGFloat = 1.0
context.setFillPattern(pattern, colorComponents: &alpha)
context.fill(rect)
The code above sets the fill pattern for the graphics context. For colored patterns, you must also pass in an alpha value to specify the pattern opacity. The pattern draw method provides the color. Finally, the code paints the view’s frame area with the pattern.
Run the playground by pressing Shift-Command-Return. Your pattern isn’t showing up. Strange. What’s going on?
Setting the Pattern’s Color Space
You need to provide Core Graphics with information about your pattern’s color space so it knows how to handle pattern colors. Color space specifies how to interpret a color value for display.
Add the following before the alpha declaration:
// 1
guard let patternSpace = CGColorSpace(patternBaseSpace: nil)
else { return }
// 2
context.setFillColorSpace(patternSpace)
Here’s what the code does:
- Create a pattern color space. The base space parameter should be
nilfor colored patterns. This delegates the coloring to your pattern cell draw method. - Set the fill color space to your defined pattern color space.
Run the playground. Yes! You should now see a circular black pattern:

Next, you’ll learn more about configuring patterns.
Configuring the Pattern
In your playground, change the spacing parameters that set up pattern as follows:
xStep: 30,
yStep: 30,
Run the playground. Note that the circular dots appear to be much closer to each other:

This makes sense, as you’ve shrunk the step size between pattern cells.
Now, change the spacing parameters as follows:
xStep: 20,
yStep: 20,
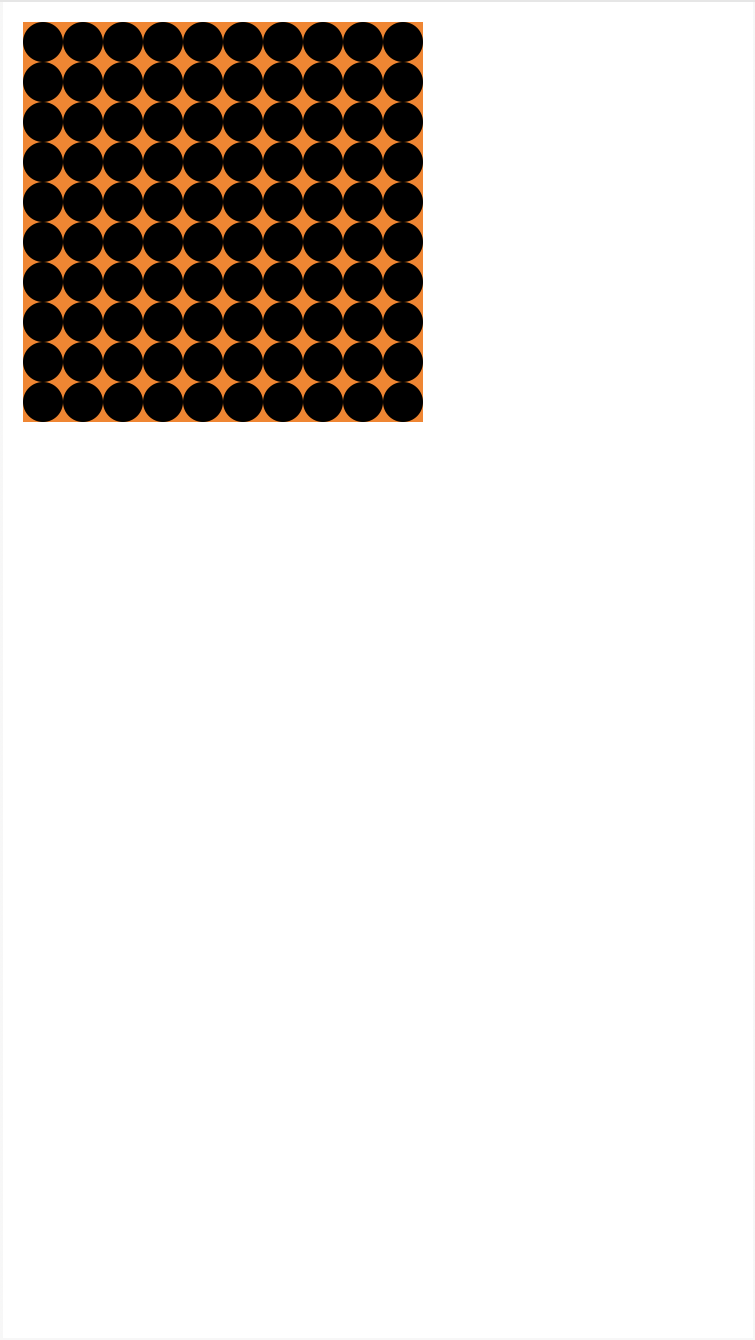
Run the playground. Your circles have turned into quarters:

Changing the Centers of the Circles
To understand why, note that your draw method returns a circle with a radius of 10 centered at (20, 20). The pattern’s horizontal and vertical displacement is 20. The cell’s bounding box is 20×20 at origin (0,0). This results in a repeating quarter-circle that starts at the lower right edge.
Change drawPattern that draws the circle (context.addArc) to the following:
context.addArc(
  center: CGPoint(x: 10, y: 10),
  radius: 10.0,
  startAngle: 0,
  endAngle: 2.0 * .pi,
  clockwise: false)
You’ve changed the center point to be (10, 10) rather than (20, 20).
Run the playground. You’re back to whole circles due to the shift in the circle’s center:
The pattern cell bounds also match up perfectly with the circle, resulting in each cell abutting the others.
Applying a Transformation to the Pattern
You can transform your pattern in many interesting ways. Inside draw(_:), replace pattern with the following:
// 1
let transform = CGAffineTransform(translationX: 5, y: 5)
// 2
guard let pattern = CGPattern(
  info: nil,
  bounds: CGRect(x: 0, y: 0, width: 20, height: 20),
  matrix: transform,
  xStep: 20,
  yStep: 20,
  tiling: .constantSpacing,
  isColored: true,
  callbacks: &callbacks)
else { return }
You’ve modified the pattern by passing it a transformation matrix. Here’s a closer look:
- Create an affine transformation matrix that represents a translation.
- Configure the pattern to use this transformation by passing it in
matrix.
Run the playground. Note how the pattern shifted to the right and downward to match the translation you defined:

Besides translating your pattern, you can also scale and rotate the pattern cells. You’ll see how to rotate the pattern later when you build the pattern for the game app.
Adding Fill and Stroke to the Pattern
Here’s how to fill and stroke a colored pattern. In drawPattern replace the lines where you set the fill color and fill the path with the following:
context.setFillColor(UIColor.yellow.cgColor)
context.setStrokeColor(UIColor.darkGray.cgColor)
context.drawPath(using: .fillStroke)
Here, you change the fill color to yellow and set the stroke color. You then call drawPath(using:) with the option that fills and strokes the path.
Run your playground and check that the pattern now shows your new fill color and stroke:

Thus far, you’ve worked with colored patterns and defined the colors in the pattern draw method. In the finished game, you’ll have to create patterns with different colors. You probably realize that writing a draw method for each color isn’t the way to go. This is where masking patterns come into play.