What’s New in Unity 5: Unity 2D Deep Dive
Learn about the new features introduced for Unity 2D games in Unity 5, such as effectors, audio mixers, and more! By Brian Moakley.
Level the Playing Field
While your game is certainly fun, there’s no way for you to lose. The missiles fly right through your ship and those buildings are more like mirages than actual obstacles.
Open ShipController.cs in MonoDevelop and add the following instance variables to the class:
private SpriteRenderer spriteRenderer;
private ParticleSystem explosion;
Since you need the ship to explode dramatically, you’ll need to access both the SpriteRenderer and ParticleSystem components. Previously, you could just access them via the component accessor variables, but with Unity 5, it’s all about exercising your typing skills.
In Start(), add the following:
explosion = GetComponent<ParticleSystem>();
spriteRenderer = GetComponent<SpriteRenderer>();
This gives you the ability to access the components in your code. Next, add the following method:
void OnTriggerEnter2D(Collider2D collider) {
    if (isAlive && collider.gameObject.tag != "Barrier") {
        shipRigidbody.velocity = Vector3.zero;
        spriteRenderer.enabled = false;
        explosion.Play();
        isAlive = false;
    }
}
Since all the collisions use triggers, you use OnTriggerEnter2D. First, you check if the player is alive and that the trigger is not a barrier. If the player is not alive, you set the player’s velocity to zero. This is so the resulting explosion remains fixed in space.
Next, you disable the SpriteRenderer to effectively hide the ship from view. Then you start the explosion particle system to indicate that the ship has gone boom. Finally, you mark the player dead.
Save the script and switch back to Unity. Run the scene and fire while moving the spaceship.

Uh oh. While your ship collides with both missiles and buildings, it will also collide with its own bullets! How embarrassing for the aliens. But for you, it’s just another problem to solve.
This behavior can be problematic, especially when you fire and move at the same time. To fix this, select bullet in the Prefab folder.
As you did earlier, choose Add Layer from the Layer dropdown in the Inspector to create a new layer. Name the new layer Bullet, then assign this new layer to the bullet prefab.
Finally, select Edit\Project Settings\ Physics 2D, and you’ll see a whole bunch of physics options. You’re interested in the chart at the bottom that indicates whether layers can interact with each other.
Deselect the checkbox at the intersection of Spaceship and Bullet to indicate that physics objects on these layers shouldn’t collide. This isn’t new to Unity 5, but it’s certainly worth mentioning.

Now, you can fire at will without the fear of blowing up.
Symphony of Destruction
By now the game runs and plays pretty well, except that there’s one thing holding it back from being the coolest thing you’ve ever made. Where’s the sound? Oh, that’s right, there isn’t any. It’s time to fix that.
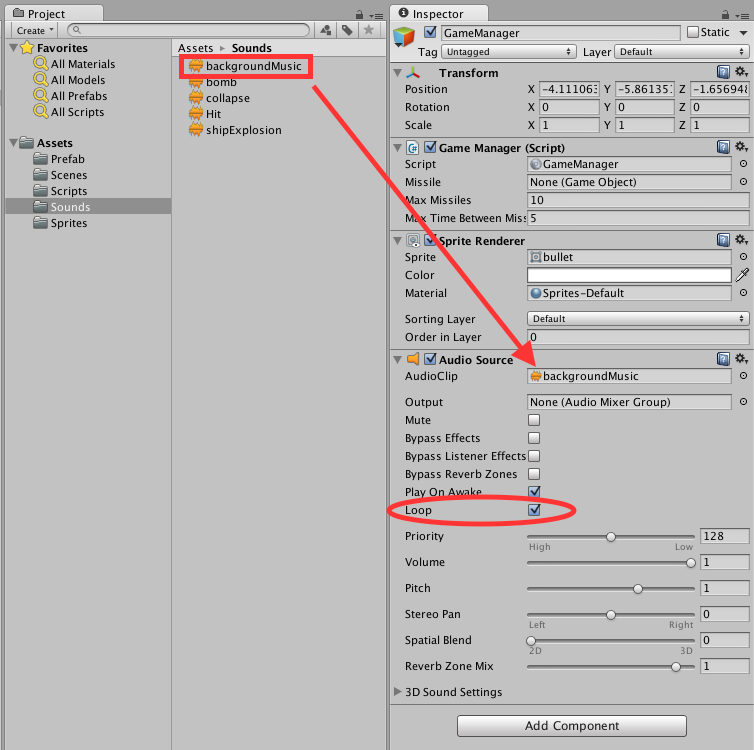
First, add a little background music. Select GameManager in the Hierarchy and add an Audio Source component to it. From the Sounds folder, drag the backgroundMusic clip to the Audio Source’s AudioClip field. Check the Loop checkbox.
When you run the scene, you should hear the music.
Now, for some sound effects. The Audio Sources are already added to the necessary objects, and their AudioClips are in place, so you just have to call them.
First, add a sound for when a building collapses. In the Scripts folder, find Building.cs and open it in MonoDevelop.
Add the following instance variable to the Building class:
private AudioSource collapseSound;
You’ll use collapseSound to store a reference to the building’s AudioSource component. The buildings included in the starter project already have their AudioSources added.
Next add the following to Start():
collapseSound = GetComponent<AudioSource>();
This gets a reference to the AudioSource so you can call it in code.
Next, replace the contents of Update() with the following:
if (isDestroyed && onScreen()) {
    transform.position = new Vector3( transform.position.x,
                                      transform.position.y - Time.deltaTime * speed,
                                      transform.position.z);
    if (!collapseSound.isPlaying) {
        collapseSound.Play();
    }
} else if (isDestroyed && !onScreen()) {
    collapseSound.Stop();
}
If the building is on screen and designated as destroyed, this code checks to see if collapseSound is playing. If not, it starts playing, and then it moves the building off-screen.
Save the script and go back to Unity. Run the scene and when you destroy a building, you should hear the collapse sound.
Next, open ShipController.cs in MonoDevelop, and add the following instance variable to the class:
public SoundManager soundManager;
Inside Update(), add the following line just above the line that calls Instantiate:
soundManager.DropBomb();
Now add the following line to OnTriggerEnter2D(), just before setting shipRigidbody.velocity:
soundManager.ExplodeShip();
That should add a nice sound when the ship explodes.
Finally, Save the script and return to Unity, and select Spaceship in the Hierarchy. You’ll now see a Sound Manager field. Drag the SoundManager GameObject from the Hierarchy and into the Sound Manager field.

Now run the scene. Your bombs should now make sounds and when your ship explodes, you at least go out with a sound effect.
Finally, it’s time to add some sound when the bomb explodes. From the Scripts folder, open Bullet.cs in MonoDevelop. As you’ve done before, add an instance variable to store a component reference:
private SoundManager soundManager;
To initialize soundManager, add the following code to Start():
GameObject gameObject = GameObject.Find("SoundManager");
soundManager = gameObject.GetComponent<SoundManager>();
Since the Bullet component only exists on a prefab, you cannot assign the SoundManager GameObject directly from the scene in Unity. Instead, you have to get a hold of the reference by searching the scene for the GameObject named “SoundManager.”
Now play the explosion sound by adding the following line to OnTriggerEnter2D(), just after the call to explosion.Play():
soundManager.HitBuilding();
Save the script and return to Unity. Run the scene and take out some buildings — your bullets should now explode with vibrance.
Unity 5’s Audio Mixer
While the sounds work well enough, some are a little loud and others are too soft. In previous versions of Unity, you’d have to adjust the level of each AudioSource, whereas with Unity 5, you can adjust them from one central location, an Audio Mixer.
You can have several mixers in your project, and a full introduction to Unity’s awesome new sound features deserves its own tutorial.
However, creating them to adjust base audio levels is easy enough to explain here without dragging on.
Select your Sounds folder, then right-click it and select Create\Audio Mixer. Name the new object Game Mixer.
To view the mixer, double-click it or select Window\Audio Mixer to bring up the panel below:

By default, all mixers start with one group known as the Master group, where you can apply effects to all audio sources at once.
You can also think of groups as channels. For example, each group has an attenuation effect applied to it that allows you to change the group’s volume, even while the game is in progress.
One of the great things about the mixer is that changes made while playing the game in the editor will be saved when you stop playing. This lets you tweak audio until it’s perfect without writing down the changes so that you can redo them when you stop.
You’re going to add a few groups. Click the plus sign in the Groups to create a new group, and name it Music. Then click the plus sign button again and create a group named Sound Effects. Most likely, your groups look like those shown below:

New groups are added as children of the currently selected group; the Music group was still selected when you created the second new group, so it became a child of Music. This wasn’t really the desired effect, although it’s an important behavior to know.
To fix, simply drag the Sound Effects group out of Music and into Master to re-parent it. Now select the Sound Effects group and add a new subgroup named Collapsing Buildings. You should now see three mixers:

Now you need to assign a mixer group to each of the AudioSources in your scene. First, select GameManager in the Hierarchy, then look at its Audio Source component in the Inspector. Click the open circle to the right of the Output field to bring up the Select AudioMixerGroup dialog, and choose Music inside the dialog.

You need to direct the audio output of each of the building to the Collapsing Buildings group.
Select BuildingA in the Hierarchy and then shift-click BuildingH to select all buildings at once (BuildingA, BuildingB, BuildingC, BuildingD, BuildingE, BuildingF, BuildingG, and BuildingH). This trick allows you to edit common fields for all of the selected objects simultaneously.
In the Inspector, set the Output field of the Audio Source component to Collapsing Buildings.
Finally, set the output of the SoundManager‘s AudioSource to the Sound Effects group.
Now run your scene. Your mixer will come to life.

To change the levels, click the Edit in Play Mode button at the top of the Audio Mixer panel. Keep in mind that you’ll only see this button while your scene plays. Once you press the button you can alter the levels. If you lower the volume of one group, it will lower the volume of all sub-groups as well.

Underneath the volume control are three buttons. The S button means Solo; it silences all the other tracks so you can adjust the current one without distraction.
The M button stands for Mute and allows you to silence only that track. The B button stands for Bypass, and it allows you to ignore any audio effects you’ve added to the track.
To add effects to a group, simply click the Add… button to provide a bunch of effects. To try it out, click the Add… button underneath the Collapsing Buildings channel and add the Echo effect.

Now blast a building to smithereens to hear the effect.
At this point, feel free to play your game and continue to perfect the sound. In the GameManager, temporarily set the Max Missiles value to 0 so you can focus on the audio without fear of death.
You’ve only scratched the surface of Unity’s new Audio Mixer. You can also do things like hide groups and save them as Views to help you focus on different editing tasks, and take Snapshots to save different groups of settings — either for comparison or just for different situations. For more information, check out Unity’s video tutorials.