What’s New in Unity 5: Unity 2D Deep Dive
Learn about the new features introduced for Unity 2D games in Unity 5, such as effectors, audio mixers, and more! By Brian Moakley.
Implement Your Defenses
Let’s face it … if you have an alien spaceship threating your city, you want it to leave. This is no time for diplomacy, so the best way to deal with the extraterrestrial menace is hit it with a barrage of missile fire.
I’ve already created the missile with associated particle systems for you. Your job is to make it fly. There are plenty ways to do this, but Unity 5 has made an even easier way to do it.
From the Prefab folder, drag a missile into the scene. Place it near the buildings so you can see it take-off.
The missile is actually a Saturn 5 rocket that I downloaded from opengameart.org from IsometricRobot.
To make this missile fly, you’ll add some force, and not just a little force, but a whole lot of force. Unity makes this possible with its introduction of the Constant Force 2D component, which does exactly what you expect: It continuously applies a specific amount of force.
With missile selected in the Hierarchy, add a Constant Force 2D component.
You have three options:
- Force: takes a value and applies it relative to world coordinates
- Relative Force: defines a force applied relative to the object’s local coordinate system
- Torque: force that’s used to create angular movement
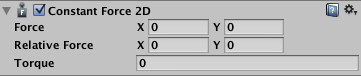
With the missile still selected, in the Constant Force 2D component, set the Force’s Y value to 20. Click Apply at the top of the Inspector to save this change back to the prefab.

Now run the scene and just try not laugh. The missile flies upwards but when it hits the Top Barrier, it bounces back down, flies back up, and keeps bouncing. Evidentially, the laws of physics mean nothing to the missiles.
It should pass right through it because the Top Barrier should only affect the Ship.

Select Spaceship in the Hierarchy and in the Layers dropdown, select Add New Layer.

The Inspector will now display the Tags and Layers dialog. In the Layers section, add a new layer by typing Spaceship in the User Layer 8 field.

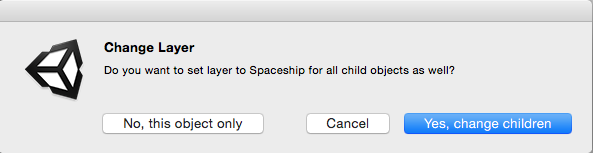
Select Spaceship in the Hierarchy, and in the Layer dropdown choose Spaceship.

You’ll get a prompt to apply this layer to the spaceship’s children as well. Click Yes, change children. This means that the Layer value will apply to any of this object’s child GameObjects, too.
Next, select Top Barrier in the Hierarchy. In its Area Effector 2D component, click the Collider Mask. Uncheck everything but Spaceship. (The fastest way to do that is to first choose Nothing, and then choose Spaceship.)

Now, the effector will only work on the ship. Run the scene. The missile flies up and out while the ship remains trapped.

A single missile is a sufficient warning shot, but if you want to take down the alien invader you’ll need a bigger fire show. A GameManager object has already been created for you to help with this.
Select the GameManager in the Hierarchy, and you’ll see a few fields.

The Missile field stores a reference to the missile prefab the Game Manager uses when it creates missiles at runtime. From your Prefab folder, drag missile into this field.
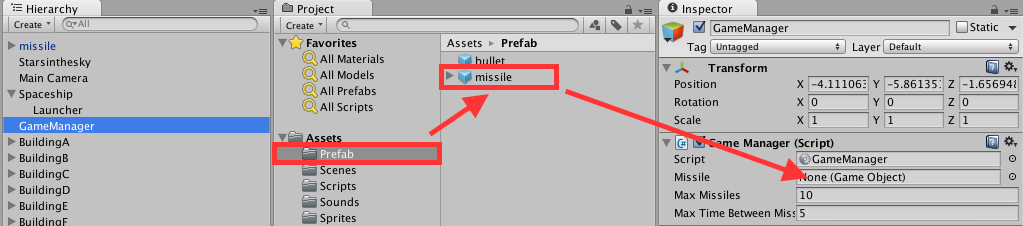
The Max Missiles field determines how many missiles display on the screen at one time. The default is 10 but feel free to increase it if you’re feeling a little sadistic; 10 is a little conservative when you’re dealing with an unknown intelligence.
Finally, Max Time Between Missiles is the total amount of time that you want to pass between each missile launch. The default value is 5 seconds, but again, if you’re craving punishment for the aliens, go ahead and lower the value.
With the missiles in place, select missile in the Hierarchy and delete it from your scene.
Run the scene. Right away, things get interesting. Sure, you have missiles flying every which way, but the aliens are somehow unscathed.
There’s no collision detection, so the invaders are effectively immune from your puny offensive measures.

Also, if you keep watching, you’ll notice that some missiles curve from the right and left. Are the operators drunk or is something wrong in the code?

The missiles are spawned inside the area effector, which then pushes them out while their constant force pushes them up.
You can easily set the Collider Mask on the area effectors to ignore the missiles like you did for the Top Barrier, but in this case, leave it as is — it’s a happy accident. It provides a degree of random difficulty so the player must account for the missiles that fly vertically as well as randomly from left to right.
Bombs Away!
While missiles are cool, what’s even cooler is blowing them up. For this task, the alien ship is equipped with a launcher that takes a bullet. Look in your Prefab folder and drag the bullet to your scene. Since the missiles fly up you want your bullet to fly down.
Add a Constant Force 2D component to the bullet, and set its Force’s Y value to -20. Click Apply at the top of the Inspector so all instances of the bullet acquire the new component. Then, delete the bullet from your scene.

Preparing the bullet is not enough because you need a mechanism from which to fire.
Open ShipController.cs in MonoDevelop. Add the following instance variables:
public GameObject launcher;
public GameObject bullet;
private bool isAlive = true;
launcher stores the origin point of the bullet. By using a GameObject, you can visually determine where you want to fire the bullet. bullet contains a reference to the bullet’s prefab. Finally, isAlive is a simple flag that indicates whether the player is alive or dead.
Next, at the bottom of Update(), add the following:
if (Input.GetKeyDown(KeyCode.Space))  {
    if (isAlive) {
        Instantiate(bullet,launcher.transform.position, Quaternion.identity);
    }
}
With this code, the spaceship drops a bomb every time the player presses the space bar — that is, if the spaceship hasn’t been destroyed.
Save the script in MonoDevelop and return back to Unity. Select Spaceship in the Hierarchy, and in the Ship Controller (Script) component in the Inspector, you’ll now see the Launcher and Bullet fields.
The spaceship has a child GameObject named Launcher. Drag this child object to the spaceship’s Launcher field. Also, drag bullet to the spaceship’s Bullet field from the Prefab folder.

Run the scene and let chaos ensue!
