What’s New in Unity 5: Unity 2D Deep Dive
Learn about the new features introduced for Unity 2D games in Unity 5, such as effectors, audio mixers, and more! By Brian Moakley.
Sign up/Sign in
With a free Kodeco account you can download source code, track your progress, bookmark, personalise your learner profile and more!
Create accountAlready a member of Kodeco? Sign in
Sign up/Sign in
With a free Kodeco account you can download source code, track your progress, bookmark, personalise your learner profile and more!
Create accountAlready a member of Kodeco? Sign in
Contents
What’s New in Unity 5: Unity 2D Deep Dive
40 mins
Recently at this year’s GDC, Unity Technologies dropped an exciting bomb on the audience.
Not only was the latest and greatest version of Unity 5 released, but all the professional version features were now available for free!
Unity 5 also brought forth a wealth of new features from the Physical Shaders to the Physics Engine and so on. In fact, we’ve covered the updates in our What’s New in Unity 5: Quick Summary.
Unfortunately, the only way to find out about the changes to Unity 2D was to dig through extensive release notes. To make matters worse, some of the more subtle yet impactful changes were buried deep, so if your project failed to properly migrate, you were stuck with a broken game.
In this tutorial, you’re going to learn about the new features, and you’ll see why you should be at the edge of your seat over this update. As you work through the tutorial you’ll learn about the following:
- Changes in Component Access
- Physics Effectors
- Adding Constant Force
- Audio Mixer
You’ll learn about these features by completing a game. This game isn’t about saving the world; it’s about destroying it.
Note: This tutorial assumes you are familiar with the basics of making Unity 2D games, and want to get up-to-date with the latest changes. If you are new to Unity 2D, check out Chris LaPollo’s Getting Started with Unity 2D tutorial series first.
Getting Started
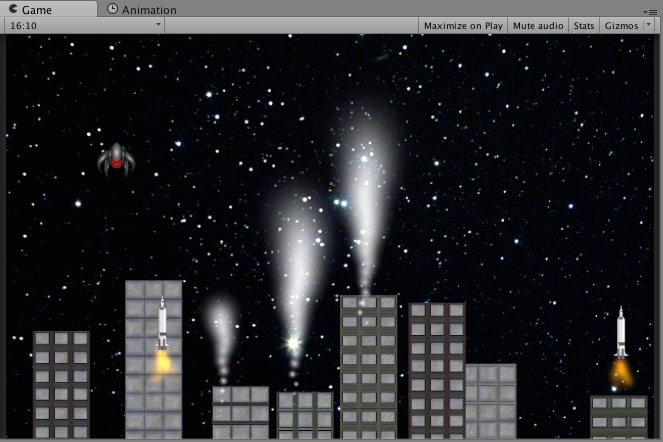
Before you delve into the nitty and the gritty, download the starter project. Unzip it and open StarterProject\Assets\Scenes\Main.unity in Unity. You should see something that looks like the following:
The scene is set for tragic and utter destruction; the camera is already set up and a starry night background is in place. The foreground contains buildings in pristine shape, and they are composed of a few sprites taken from opengameart.org.
How tranquil.
This particular set is produced by an artist named hc. Each of the buildings consists of individual sprites placed on a sorting layer named City. Within the buildings are three smoking particle systems each so that as the buildings takes damage they emit more and more smoke.
And what better to inflict damage on your peaceful city than an aggressive attack from outer space?
You can’t have an alien invasion without a fear-inducing alien spacecraft, which has already been added to your project – the bug-like ship at the top of your screen. This is another asset from opengamerart.org created by C-TOY called Spaceships Drakir.
The object of the game is to fly your spaceship over the buildings and bomb them into oblivion. After a few hits, a building will begin to smoke. As you continue to hit the building, more smoke will emit from it until the entire building crumbles.
Sounds easy, eh?
Well, no one likes to just take the bombing and move on with life — unless it’s good news at a gamer developers’ conference — so the population of the city defends itself with plenty of anti-spaceship missiles.
To win, your ship must dodge all the missiles and destroy every last building. And when the city is nothing but a smoking mass of rubble, you can land at the ruins of city hall and announce that you’ve come in peace.
All of the particle systems and most of the necessary scripts have been written for you. Your job is to finish the game by using some of Unity 5’s latest and greatest features.
Use the Force!
Run the game and you’ll see that nothing much is happening. An alien ship hangs low over a bored skyline. It won’t even make the 11 o’clock news. Time to spice things up.
First, select Spaceship in the Hierarchy and add a New Script component to it. Make it a C Sharp script named ShipController.
Remember how to add a new script?
[spoiler] Here’s one way to add a script.
- Click the Add Component button in the Inspector.
- In the dialog that appears, start typing New Script in the text field. You should see the component appear in the results.
- Click the New Script result to add it.
- For the script name, enter ShipController.
- Ensure the Language value is C Sharp.
- Click Create and Add.
[/spoiler]
Double-click ShipController.cs to launch it in MonoDevelop. Just inside the opening brace of the class, add the following two variables:
private Rigidbody2D shipRigidbody;
private float force = 150.0f;
The shipRigidBody
holds a reference to a Rigidbody 2D component and the force
variable holds the value of how much force you’ll use to move the ship.
You might wonder why you need a variable to hold the Rigidbody 2D component. After all, in previous versions of Unity, all you needed to access the component was to use the variable accessor, rigidbody2D
. If there was a rigidbody attached to the object, it would be populated. If there wasn’t an object, it’d be null.
Here’s the first big change in Unity 5.
In a nutshell, Unity developers felt these accessors were too inconsistent. Accessors were provided for some components but not for others. There was no logic to explain whether a component had an accessor or not.
More importantly, these accessors created dependencies throughout the various subsystems, so in order to keep development flexible, Unity junked of all the accessors except for transforms. This means you have to now create variables for all your components except transforms.
Unfortunately, Unity appears to be using the older names, so if you do decide to name your variables after the accessors, you’ll get a warning that your local variable is hiding an inherited one.
To learn more about the reasoning behind this change, check out Unity’s excellent blog post about API Changes to automatic script updating.
Now, add the following to Start()
:
shipRigidbody = GetComponent<Rigidbody2D>();
Prepare yourself to do that frequently from now on.
Finally, add the following to Update()
:
if (Input.GetKeyDown(KeyCode.RightArrow)) {
shipRigidbody.AddForce(new Vector2(force, 0));
}
if (Input.GetKeyDown(KeyCode.LeftArrow)) {
shipRigidbody.AddForce(new Vector2(-force, 0));
}
if (Input.GetKeyDown(KeyCode.UpArrow)) {
shipRigidbody.AddForce(new Vector2(0, force));
}
if (Input.GetKeyDown(KeyCode.DownArrow)) {
shipRigidbody.AddForce(new Vector2(0, -force));
}
The gives your ship some rudimentary controls.
Run the scene. Your ship flies great except for when it passes beyond the edges of screen, and at that point it’s gone baby gone. Time to add some invisible walls.
None Shall Pass the Invisible Wall
Invisible walls are necessary to keep the player in the game, but at the same time they can also affect the gameplay. Which leads to a laundry list of questions about how they should behave:
- Should the wall stop all momentum?
- Should it be flexible like a rubber wall that bounces the player back into play?
- Or, should flying to the left bring the player out on the right?
For the sake of this tutorial, you’ll implement the middle option as it has a side effect of increasing the challenge.
Before Unity 5, walls required a whole lot of code to make the bounce both fluid and natural. With Unity 5, all you need to do is add a new component called an effector.
Right-click in the Hierarchy and from the drop-down, select Create Empty. Do this twice more so that you have three empty GameObjects.
The purpose of these walls will bounce the player back into the play field. You will create three of them. One is for the top and the other two are for the sides. This will keep they player in the play area. You could put one for the bottom of the screen, but the buildings will ultimately stop the player. A problem does occur when the player has destroyed all the building. In which case, they will fly through the ground. To fix this, you can add a box collider that can explode the player. Feel free to add it once you have completed the tutorial.
Select the first empty GameObject you created. Single-click its name in the Hierarchy and rename it Top Barrier. In the Inspector, set its Position to the following: X: 2.3 Y: 8.21 Z:0. For its Scale, assign the following values: X: 48.27 Y: 2.33 Z: 2.33.
These are the base units used by Unity. In 3D space, a single unit in Unity corresponds to one meter in reality. With Unity 2D, you can correspond units to actual pixels. To learn more about this, check out Chris LaPallo’s tutorial, Unity 4.3 2D Tutorial: Getting Started under the section, Fix Your Camera’s Projection.
In this case, you are setting the position and scale of the area that will bounce the user back out.
Next, in the Tag dropdown, select Add Tag.
The Tags and Layers dialog should appear with the Tags section expanded. Click the plus sign, then add the name: Barrier. This will be important later in the tutorial when you work with collisions.
Once you’ve added the new tag, select Top Barrier in the Hierarchy and from the Tag dropdown, select Barrier. It should look like the following:
In the Hierarchy, select the second empty GameObject you created, probably named GameObject 1. Change its name to Left Barrier.
In the Inspector, set its Position to X: -14.68 Y: 1.23 Z: 0. and set its Scale to X: 2.33 Y: 30.17 Z: 2.33. From the Tag dropdown, select Barrier.
Select the third empty GameObject you created, most likely called GameObject 2, and rename it Right Barrier. In the Inspector, set its Position to X: 15.6 Y: 1.23 Z: 0 and its Scale to X: 2.33 Y: 30.17 Z: 2.33. From the Tag dropdown, select Barrier.
Congratulations! You’ve just erected barriers. Except, well, they don’t do much of anything. To bounce the player back, you’ll use an effector.
Effecting Things With Effectors
In Unity 5, an effector is a way to apply force to Sprites. You have four kinds of effectors available to you.
- Surface Effector: Applies a force along the surface of a collider, allowing you to create things like moving surfaces.
- Point Effector: Defines a point that can either attract or repel by using a force.
- Area Effector: Applies directional forces within a specific area.
- Platform Effector: Helps you create platformer-style platforms, complete with options for one-way collisions and settings to control the friction and bounciness of the platform’s edges.
Unity has provided an image that nicely highlights everything you can do with the effectors:
For your barriers, you’ll use an area effector, so that when the ship flies into the effector it’ll essentially push the ship back out.
In order for the effector to work, the corresponding GameObject needs to have a collider attached to it. The collider must be a trigger, and the collider must be marked to be Used By Effector. If those conditions aren’t met the effector won’t work, but at least Unity will let you know.
To do this, select Top Barrier in the Hierarchy, and first add a Box Collider 2D component to it. In the Inspector, check the collider’s Is Trigger and Used By Effector options. Next, add an Area Effector 2D to it. Your Top Barrier should look like the following:
Note: You’ll notice that the area effector has a whole bunch of options, and I bet you’d like to learn about them briefly.
Collider Mask determines what layers will be affected when objects enter the area. For now, keep Everything selected.
Force Direction determines the degree direction of the force. The value ranges from -359.99 to 359.99, which really just defines a circle moving in either a clockwise or counter-clockwise direction. As the image below shows, zero points to the right and positive values move counter-clockwise along the circle; negative values move clockwise.
Force Magnitude allows you to set the strength of this area’s force, while Force Variation lets you define a range to provide some randomization to the force for each collision.
The Drag and Angular Drag options allow you to further customize the area’s effects. In fact, you could use only drag values and no force values to create an area that slows any objects that enter.
Force Target determines at what point on the object the force gets applied. When set to RigidBody, forces apply to the object’s center of mass, whereas setting it to Collider applies forces at the point of collision.
Now back to creating this game.
With Top Barrier selected, set its Force Direction to be 270. This means the force will push downwards. Next, set the Force Magnitude to 45. This will push the ship down, but not so hard that the player loses control.
Run the scene and fly up. You’ll find you are knocked back down when you hit the ceiling.
Now do the same for both the Left Barrier and the Right Barrier. If you need a hint, check the following spoiler.
[spoiler]First, select the Left Barrier. Add a Box Collider 2D component to it and an Area Effector 2D component. For the Box Collider 2D, check both Is Trigger and Used By Effector. Next, in the Area Effector 2D component, set the Force Direction to 0 and the Force Magnitude to 45.
Next, select the Right Barrier. Add a Box Collider 2D component to it and an Area Effector 2D component. For the Box Collider 2D, check both Is Trigger and Used By Effector. Next, in the Area Effector 2D component, set the Force Direction to 180 and the Force Magnitude to 45.[/spoiler]
Now run the scene. Your ship is now unable to leave the frame. Time to blow some stuff up.
Implement Your Defenses
Let’s face it … if you have an alien spaceship threating your city, you want it to leave. This is no time for diplomacy, so the best way to deal with the extraterrestrial menace is hit it with a barrage of missile fire.
I’ve already created the missile with associated particle systems for you. Your job is to make it fly. There are plenty ways to do this, but Unity 5 has made an even easier way to do it.
From the Prefab folder, drag a missile into the scene. Place it near the buildings so you can see it take-off.
The missile is actually a Saturn 5 rocket that I downloaded from opengameart.org from IsometricRobot.
To make this missile fly, you’ll add some force, and not just a little force, but a whole lot of force. Unity makes this possible with its introduction of the Constant Force 2D component, which does exactly what you expect: It continuously applies a specific amount of force.
With missile selected in the Hierarchy, add a Constant Force 2D component.
You have three options:
- Force: takes a value and applies it relative to world coordinates
- Relative Force: defines a force applied relative to the object’s local coordinate system
- Torque: force that’s used to create angular movement
With the missile still selected, in the Constant Force 2D component, set the Force’s Y value to 20. Click Apply at the top of the Inspector to save this change back to the prefab.
Now run the scene and just try not laugh. The missile flies upwards but when it hits the Top Barrier, it bounces back down, flies back up, and keeps bouncing. Evidentially, the laws of physics mean nothing to the missiles.
It should pass right through it because the Top Barrier should only affect the Ship.
Select Spaceship in the Hierarchy and in the Layers dropdown, select Add New Layer.
The Inspector will now display the Tags and Layers dialog. In the Layers section, add a new layer by typing Spaceship in the User Layer 8 field.
Select Spaceship in the Hierarchy, and in the Layer dropdown choose Spaceship.
You’ll get a prompt to apply this layer to the spaceship’s children as well. Click Yes, change children. This means that the Layer value will apply to any of this object’s child GameObjects, too.
Next, select Top Barrier in the Hierarchy. In its Area Effector 2D component, click the Collider Mask. Uncheck everything but Spaceship. (The fastest way to do that is to first choose Nothing, and then choose Spaceship.)
Now, the effector will only work on the ship. Run the scene. The missile flies up and out while the ship remains trapped.
A single missile is a sufficient warning shot, but if you want to take down the alien invader you’ll need a bigger fire show. A GameManager object has already been created for you to help with this.
Select the GameManager in the Hierarchy, and you’ll see a few fields.
The Missile field stores a reference to the missile prefab the Game Manager uses when it creates missiles at runtime. From your Prefab folder, drag missile into this field.
The Max Missiles field determines how many missiles display on the screen at one time. The default is 10 but feel free to increase it if you’re feeling a little sadistic; 10 is a little conservative when you’re dealing with an unknown intelligence.
Finally, Max Time Between Missiles is the total amount of time that you want to pass between each missile launch. The default value is 5 seconds, but again, if you’re craving punishment for the aliens, go ahead and lower the value.
With the missiles in place, select missile in the Hierarchy and delete it from your scene.
Run the scene. Right away, things get interesting. Sure, you have missiles flying every which way, but the aliens are somehow unscathed.
There’s no collision detection, so the invaders are effectively immune from your puny offensive measures.
Also, if you keep watching, you’ll notice that some missiles curve from the right and left. Are the operators drunk or is something wrong in the code?
The missiles are spawned inside the area effector, which then pushes them out while their constant force pushes them up.
You can easily set the Collider Mask on the area effectors to ignore the missiles like you did for the Top Barrier, but in this case, leave it as is — it’s a happy accident. It provides a degree of random difficulty so the player must account for the missiles that fly vertically as well as randomly from left to right.
Bombs Away!
While missiles are cool, what’s even cooler is blowing them up. For this task, the alien ship is equipped with a launcher that takes a bullet. Look in your Prefab folder and drag the bullet to your scene. Since the missiles fly up you want your bullet to fly down.
Add a Constant Force 2D component to the bullet, and set its Force’s Y value to -20. Click Apply at the top of the Inspector so all instances of the bullet acquire the new component. Then, delete the bullet from your scene.
Preparing the bullet is not enough because you need a mechanism from which to fire.
Open ShipController.cs in MonoDevelop. Add the following instance variables:
public GameObject launcher;
public GameObject bullet;
private bool isAlive = true;
launcher
stores the origin point of the bullet. By using a GameObject, you can visually determine where you want to fire the bullet. bullet
contains a reference to the bullet’s prefab. Finally, isAlive
is a simple flag that indicates whether the player is alive or dead.
Next, at the bottom of Update()
, add the following:
if (Input.GetKeyDown(KeyCode.Space)) {
if (isAlive) {
Instantiate(bullet,launcher.transform.position, Quaternion.identity);
}
}
With this code, the spaceship drops a bomb every time the player presses the space bar — that is, if the spaceship hasn’t been destroyed.
Save the script in MonoDevelop and return back to Unity. Select Spaceship in the Hierarchy, and in the Ship Controller (Script) component in the Inspector, you’ll now see the Launcher and Bullet fields.
The spaceship has a child GameObject named Launcher. Drag this child object to the spaceship’s Launcher field. Also, drag bullet to the spaceship’s Bullet field from the Prefab folder.
Run the scene and let chaos ensue!
Level the Playing Field
While your game is certainly fun, there’s no way for you to lose. The missiles fly right through your ship and those buildings are more like mirages than actual obstacles.
Open ShipController.cs in MonoDevelop and add the following instance variables to the class:
private SpriteRenderer spriteRenderer;
private ParticleSystem explosion;
Since you need the ship to explode dramatically, you’ll need to access both the SpriteRenderer and ParticleSystem components. Previously, you could just access them via the component accessor variables, but with Unity 5, it’s all about exercising your typing skills.
In Start()
, add the following:
explosion = GetComponent<ParticleSystem>();
spriteRenderer = GetComponent<SpriteRenderer>();
This gives you the ability to access the components in your code. Next, add the following method:
void OnTriggerEnter2D(Collider2D collider) {
if (isAlive && collider.gameObject.tag != "Barrier") {
shipRigidbody.velocity = Vector3.zero;
spriteRenderer.enabled = false;
explosion.Play();
isAlive = false;
}
}
Since all the collisions use triggers, you use OnTriggerEnter2D
. First, you check if the player is alive and that the trigger is not a barrier. If the player is not alive, you set the player’s velocity to zero. This is so the resulting explosion remains fixed in space.
Next, you disable the SpriteRenderer to effectively hide the ship from view. Then you start the explosion particle system to indicate that the ship has gone boom. Finally, you mark the player dead.
Save the script and switch back to Unity. Run the scene and fire while moving the spaceship.
Uh oh. While your ship collides with both missiles and buildings, it will also collide with its own bullets! How embarrassing for the aliens. But for you, it’s just another problem to solve.
This behavior can be problematic, especially when you fire and move at the same time. To fix this, select bullet in the Prefab folder.
As you did earlier, choose Add Layer from the Layer dropdown in the Inspector to create a new layer. Name the new layer Bullet, then assign this new layer to the bullet prefab.
Finally, select Edit\Project Settings\ Physics 2D, and you’ll see a whole bunch of physics options. You’re interested in the chart at the bottom that indicates whether layers can interact with each other.
Deselect the checkbox at the intersection of Spaceship and Bullet to indicate that physics objects on these layers shouldn’t collide. This isn’t new to Unity 5, but it’s certainly worth mentioning.
Now, you can fire at will without the fear of blowing up.
Symphony of Destruction
By now the game runs and plays pretty well, except that there’s one thing holding it back from being the coolest thing you’ve ever made. Where’s the sound? Oh, that’s right, there isn’t any. It’s time to fix that.
First, add a little background music. Select GameManager in the Hierarchy and add an Audio Source component to it. From the Sounds folder, drag the backgroundMusic clip to the Audio Source’s AudioClip field. Check the Loop checkbox.
When you run the scene, you should hear the music.
Now, for some sound effects. The Audio Sources are already added to the necessary objects, and their AudioClips are in place, so you just have to call them.
First, add a sound for when a building collapses. In the Scripts folder, find Building.cs and open it in MonoDevelop.
Add the following instance variable to the Building
class:
private AudioSource collapseSound;
You’ll use collapseSound
to store a reference to the building’s AudioSource
component. The buildings included in the starter project already have their AudioSource
s added.
Next add the following to Start()
:
collapseSound = GetComponent<AudioSource>();
This gets a reference to the AudioSource
so you can call it in code.
Next, replace the contents of Update()
with the following:
if (isDestroyed && onScreen()) {
transform.position = new Vector3( transform.position.x,
transform.position.y - Time.deltaTime * speed,
transform.position.z);
if (!collapseSound.isPlaying) {
collapseSound.Play();
}
} else if (isDestroyed && !onScreen()) {
collapseSound.Stop();
}
If the building is on screen and designated as destroyed, this code checks to see if collapseSound
is playing. If not, it starts playing, and then it moves the building off-screen.
Save the script and go back to Unity. Run the scene and when you destroy a building, you should hear the collapse sound.
Next, open ShipController.cs in MonoDevelop, and add the following instance variable to the class:
public SoundManager soundManager;
Inside Update()
, add the following line just above the line that calls Instantiate
:
soundManager.DropBomb();
Now add the following line to OnTriggerEnter2D()
, just before setting shipRigidbody.velocity
:
soundManager.ExplodeShip();
That should add a nice sound when the ship explodes.
Finally, Save the script and return to Unity, and select Spaceship in the Hierarchy. You’ll now see a Sound Manager field. Drag the SoundManager GameObject from the Hierarchy and into the Sound Manager field.
Now run the scene. Your bombs should now make sounds and when your ship explodes, you at least go out with a sound effect.
Finally, it’s time to add some sound when the bomb explodes. From the Scripts folder, open Bullet.cs in MonoDevelop. As you’ve done before, add an instance variable to store a component reference:
private SoundManager soundManager;
To initialize soundManager
, add the following code to Start()
:
GameObject gameObject = GameObject.Find("SoundManager");
soundManager = gameObject.GetComponent<SoundManager>();
Since the Bullet
component only exists on a prefab, you cannot assign the SoundManager GameObject directly from the scene in Unity. Instead, you have to get a hold of the reference by searching the scene for the GameObject named “SoundManager.”
Now play the explosion sound by adding the following line to OnTriggerEnter2D()
, just after the call to explosion.Play()
:
soundManager.HitBuilding();
Save the script and return to Unity. Run the scene and take out some buildings — your bullets should now explode with vibrance.
Unity 5’s Audio Mixer
While the sounds work well enough, some are a little loud and others are too soft. In previous versions of Unity, you’d have to adjust the level of each AudioSource, whereas with Unity 5, you can adjust them from one central location, an Audio Mixer.
You can have several mixers in your project, and a full introduction to Unity’s awesome new sound features deserves its own tutorial.
However, creating them to adjust base audio levels is easy enough to explain here without dragging on.
Select your Sounds folder, then right-click it and select Create\Audio Mixer. Name the new object Game Mixer.
To view the mixer, double-click it or select Window\Audio Mixer to bring up the panel below:
By default, all mixers start with one group known as the Master group, where you can apply effects to all audio sources at once.
You can also think of groups as channels. For example, each group has an attenuation effect applied to it that allows you to change the group’s volume, even while the game is in progress.
One of the great things about the mixer is that changes made while playing the game in the editor will be saved when you stop playing. This lets you tweak audio until it’s perfect without writing down the changes so that you can redo them when you stop.
You’re going to add a few groups. Click the plus sign in the Groups to create a new group, and name it Music. Then click the plus sign button again and create a group named Sound Effects. Most likely, your groups look like those shown below:
New groups are added as children of the currently selected group; the Music group was still selected when you created the second new group, so it became a child of Music. This wasn’t really the desired effect, although it’s an important behavior to know.
To fix, simply drag the Sound Effects group out of Music and into Master to re-parent it. Now select the Sound Effects group and add a new subgroup named Collapsing Buildings. You should now see three mixers:
Now you need to assign a mixer group to each of the AudioSources in your scene. First, select GameManager in the Hierarchy, then look at its Audio Source component in the Inspector. Click the open circle to the right of the Output field to bring up the Select AudioMixerGroup dialog, and choose Music inside the dialog.
You need to direct the audio output of each of the building to the Collapsing Buildings group.
Select BuildingA in the Hierarchy and then shift-click BuildingH to select all buildings at once (BuildingA, BuildingB, BuildingC, BuildingD, BuildingE, BuildingF, BuildingG, and BuildingH). This trick allows you to edit common fields for all of the selected objects simultaneously.
In the Inspector, set the Output field of the Audio Source component to Collapsing Buildings.
Finally, set the output of the SoundManager‘s AudioSource to the Sound Effects group.
Now run your scene. Your mixer will come to life.
To change the levels, click the Edit in Play Mode button at the top of the Audio Mixer panel. Keep in mind that you’ll only see this button while your scene plays. Once you press the button you can alter the levels. If you lower the volume of one group, it will lower the volume of all sub-groups as well.
Underneath the volume control are three buttons. The S button means Solo; it silences all the other tracks so you can adjust the current one without distraction.
The M button stands for Mute and allows you to silence only that track. The B button stands for Bypass, and it allows you to ignore any audio effects you’ve added to the track.
To add effects to a group, simply click the Add… button to provide a bunch of effects. To try it out, click the Add… button underneath the Collapsing Buildings channel and add the Echo effect.
Now blast a building to smithereens to hear the effect.
At this point, feel free to play your game and continue to perfect the sound. In the GameManager, temporarily set the Max Missiles value to 0 so you can focus on the audio without fear of death.
You’ve only scratched the surface of Unity’s new Audio Mixer. You can also do things like hide groups and save them as Views to help you focus on different editing tasks, and take Snapshots to save different groups of settings — either for comparison or just for different situations. For more information, check out Unity’s video tutorials.
Where to Go From Here
Download the final project here.
Unity 5 offers a whole host of new features. To learn more about what Unity now has to offer, check out our What’s New in Unity 5 article.
Unity also offers a wealth of free tutorials specifically for Unity 5 and even free live training.
PushyPixels also presents weekly free videos about creating a variety of games for Unity.
Finally, keep checking back here for upcoming video and written tutorials specifically on Unity 5. Take advantage of the forums below to ask questions, bounce ideas off other developers and share what’s working for you in Unity 5.
I hope you enjoy working with Unity as much as we do. Remember, when you make your games, share them with us so we can check them out. Have fun!
All videos. All books.
One low price.
A Kodeco subscription is the best way to learn and master mobile development — plans start at just $19.99/month! Learn iOS, Swift, Android, Kotlin, Flutter and Dart development and unlock our massive catalog of 50+ books and 4,000+ videos.
Learn more