ProBuilder Tutorial: Rapid Prototyping in Unity
ProBuilder is a Unity in-editor prototyping tool that has everything you need to block out your level and create new game worlds in the blink of an eye. This tutorial will teach you the basics of how to use it. By Mauro Fuentes.
Have you ever wondered how professional developers start building complex and astonishing video game worlds? Have you ever dreamed of creating one of your own? Dream no more! Unity has got you covered: ProBuilder is here.
ProBuilder is a Unity in-editor prototyping tool that has everything you need to block out your level and create new game worlds in the blink of an eye. And this tutorial will teach you the basics about it.
When you finish reading, you’ll understand the core concepts of prototyping. You’ll also know how to:
- Install the API and understand its user interface
- Create basic shapes
- Perform basic 3D operations
- Use procedural shapes
- Apply vertex color to your objects to convey certain characteristics
This tutorial requires Unity 2020 or later.
This tutorial requires Unity 2020 or later.
Getting Started
Download the project files by clicking the Download Materials button at the top or bottom of the tutorial. This archive contains the Starter and Final projects.
Unpack the archive and open the How to Use ProBuilder for Rapid Prototyping in Unity project in Unity. Your journey begins!
For this tutorial, you’ll only need to locate the Scenes folder. The remaining folders contain helper files, some 3D objects and materials.

Installing ProBuilder and Exploring Its GUI
First go to Window ▸ Package Manager ▸ ProBuilder. Click the ProBuilder tab so you can see its content.

Now, in the bottom right-hand corner, you’ll see a Download or Install button. Click it.

Keep in mind that ProBuilder will only be installed in your current project. When the installation finishes, close the window and you’ll be ready to go. Super easy!
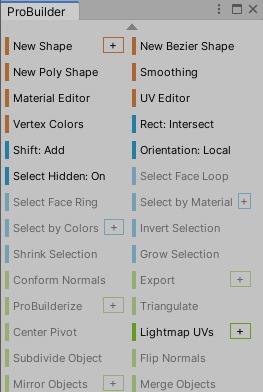
As ProBuilder is a Tool, your access point to its API (its GUI) is in Tools ▸ ProBuilder ▸ ProBuilder Window.

Welcome to the spectacular, colossal, new, super-duper, mind-blowing, supercalifragilisticexpialidocious Unity prototyping tool!
[spoiler title="Window GUI"]
Ta-da!
[/spoiler]
[spoiler title="Catto joke"]
[/spoiler]
The small window that pops up is the GUI of this new tool. For a fancier-looking version, you can right-click on the window and change the mode to Icon.

Behind Prototyping
Before continuing, you’ll pause for a moment to learn some general concepts about prototyping.
In game development, almost everything is about time. That’s why developing efficient workflows, including prototyping, is so important. In practical video game terms, prototyping is a pact.
What’s the agreement in this pact? You deliver a quick unpolished version of an object, called a Prototype, with a promise of better future versions, until you deliver the final product.
What’s the advantage of the pact? As you’re not blocking the workflow, everybody — including you — is free to focus on their tasks.
Bear in mind that your prototypes, whatever they are, must mimic or resemble the final product: the archetype.
An arche-what? To make it simple, the archetype is the “perfect”, “final”, “polished” version of something that you want to create.
For example, say you need a tree. You may waste a week making a perfect 3D model of a tall, beautiful tree, with branches, twigs, leaves, UV maps, textures… and block everybody else’s job until you finish.
Or you can say: A tree can be broken down into a green sphere for the crown and a brown cylinder for the trunk. Job done, what’s next?

If you’re in a hurry, cubes are the perfect solution — like a proto-prototyping, if you will. This is the fastest way.
For example, assume you don’t even have the time to make a proper prototype. Say you only have 30 seconds, but you need that tree… feel the urge? Make a proto-proto tree. No roots, a cube for the crown, a stretched cube for the trunk. Done! You are the Lord of the Prototypes… (without the ring, the elves, a good story, Hugo, McKellen, Viggo, swords or fun).

Learning the Basics
Now that you understand more about prototyping, it’s time to learn basics of ProBuilder so you can start creating levels right away. What differentiates pros from the rest is that they have consistent workflows and suitable methods for doing things. For this reason, it’s of the utmost importance that you learn the content of this section by heart before moving on.
Controlling Your Camera to Boost Your Productivity
Open Assets/RW/Scenes/0_Camera by double-clicking it. This is a simple scene and you only need to focus on one thing. Try to locate and navigate to the plane in the Scene tab, somehow.

In the Hierarchy tab, you’ll find a GameObject called Build a cube here. Select it. And again, find a way to navigate to it in the Scene tab.

Have you found it?
No, wait, no, stop doing that. Ah, ah… nope… nope… that’s… this tutorial is over unless you… stop panning and tilting and hard trucking your camera.
The next GIF shows what most people (including most professionals) do with their cameras. They press the right mouse button to enter fly mode and use the WASD keys to move around, like this:
Whether or not you identified with the last GIF, from now on, you’ll do it like a pro, using a consistent method.
Here are the general steps you can use to quickly and efficiently create prototypes in Unity with ProBuilder.
- Choose a base GameObject.
- Focus by pressing F or MMB (middle mouse button).
- Create a new shape (by clicking New Shape or Control-Shift-K) with the ProBuilder window.
- Parent the GameObject created.
- ReFocus by pressing F on the GameObject.
- Choose or be aware of selection mode, e.g. if this is an Object or Element.
You may be wondering why you have to do it like this. Using a process like the above is one of the shortest, fastest, tidiest ways to create an object for prototyping, and navigating in Unity.
Now, try it for yourself:
- Choose Build a cube here in Hierarchy ▸ Level Geometry. This will be your base GameObject. Select it.
- With your mouse inside the Scene tab, press F. This tells Unity to focus the scene camera on the selected object. In the case of MMB, Unity casts a ray from the Scene Camera and returns that point as focused.
- Create a New Shape. You can press the button New Shape in ProBuilder’s GUI or you can press Control-Shift-K. In either case, you’ll see an object appear in the scene.
- Put the GameObject inside a parent. Drag and drop the newly instantiated object into a parent object. In this case, the parent GameObject is Build a cube here.
- Refocus by pressing F on the newly created GameObject Cube.
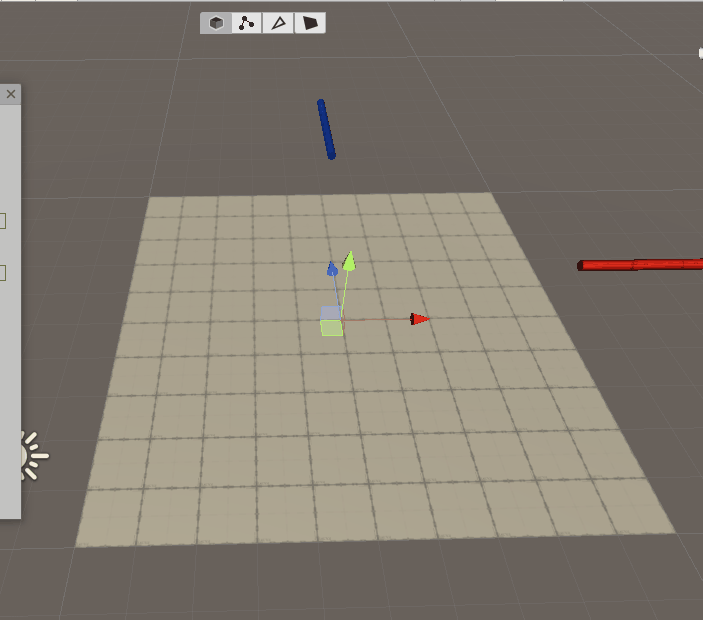
- Notice the mode the object is in. In this case, it should be Object Selection mode. From left to right the options are Object Selection mode, Vertex Selection mode, Edge Selection mode, Face Selection mode.
![]()
What do some of the steps in the list above have to do with pro camera management? Because, from now on, you’ll never ever tilt, truck or pan your camera as if you were releasing repressed anger against it. If somebody else is watching you, they’ll be pleased too.
Press Alt and LMB (left mouse button) to gently rotate your camera, Alt-RMB (right mouse button) to accurately zoom your camera, or Alt-MMB to soft dolly your camera.

Now you’re truly an object-creator-camera-manager-Unity-pro developer. And you’re ready for the next step.