How To Secure iOS User Data: Keychain Services and Biometrics with SwiftUI
Learn how to integrate keychain services and biometric authentication into a simple password-protected note-taking SwiftUI app. By Bill Morefield.
Simulating Biometric Authentication in Xcode
Fortunately, the simulator is able to simulate biometric authentication for you during testing. Your choice of simulated device determines the type of biometric authentication.
Simulating Touch ID Authentication
Select iPhone SE (2nd generation) to test Touch ID. Build and run. Tap the unlock button, and the normal unlock window will appear. If you look in the console, you’ll see an error message: No identities are enrolled.
The simulator doesn’t enroll the device in biometric authentication automatically. You have to set it up. In the simulator, select Features ▸ Touch ID ▸ Enrolled. Enter your password to unlock the note. Then tap the lock button twice. This will lock it and attempt to unlock it again. This time, you’ll see the Touch ID prompt.
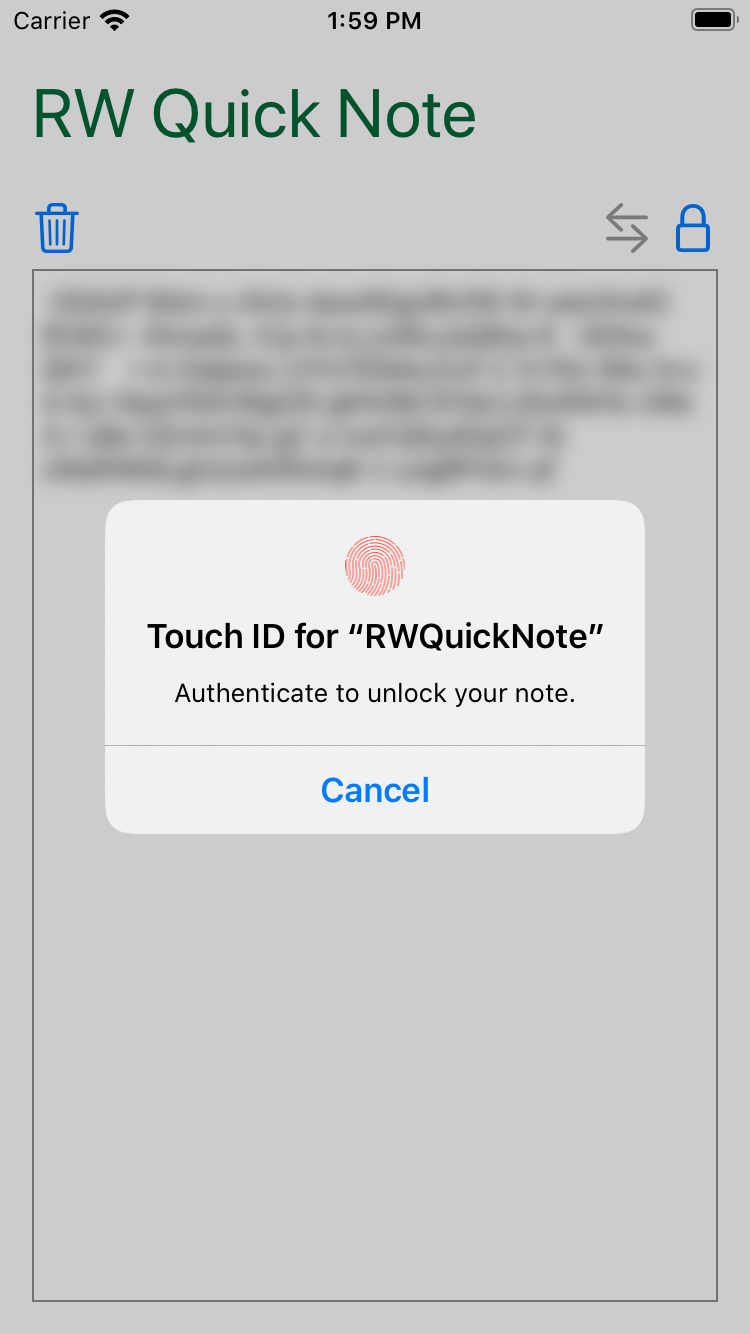
To simulate biometric authentication, you use the other options under the Features ▸ Touch ID menu. To execute a successful authentication, select Features ▸ Touch ID ▸ Matching Touch. After a moment, the authentication request will vanish, and the note will unlock.
You can also verify the behavior of a failed authentication. Tap the lock button to lock the note. Tap it again to attempt authentication. To simulate a failed authentication, select Features ▸ Touch ID ▸ Non-matching Touch. You’ll see the failed prompt appear:

Selecting either option on the prompt will fail the authentication and present the previous unlock page. Enter the password to verify that you can still unlock the note.
You can also let the user enter the device PIN as fallback. To do this, open ToolbarView.swift again. Use Command-F to find context.evaluatePolicy. Change .deviceOwnerAuthenticationWithBiometrics to .deviceOwnerAuthentication.
Now build and run. Fail the authentication, and notice that the Enter Password option has changed to Enter Passcode. Tap it, and you’ll see the simulator passcode entry. For the simulator, any passcode value will work. Enter a passcode, and the note will unlock.

Simulating Face ID Authentication
Face ID works much as Touch ID. But Face Id has one new requirement. You must add the NSFaceIDUsageDescription key to your app’s Info.plist or authorization requests will fail.
Open Info.plist. Right-click on an empty part of the page and select Add Row. Scroll through the list of keys and select Privacy – Face ID Usage Description. Double-click under the value column and enter To allow you to unlock your note without entering your password.
Now change the device to the iPhone 11 Pro, which supports Face ID. Build and run. In the simulator, select Features ▸ Face ID ▸ Enrolled. The menu name has changed to reflect the new biometric authentication method.
In the app on the simulator, choose a new password. Once you’re in the note view, tap the lock button twice. iOS prompts you to allow biometric authentication:

Tap OK. Now you’ll see the Face ID prompt. Select Features ▸ Face ID ▸ Matching Face, and you’ll see the note unlock.

Making the Authentication Method Visible to the User
Now you’ll add one more touch to let the user know the app supports biometric authentication.
In ToolbarView.swift, add the following code directly after the import statements:
func getBiometricType() -> String {
  let context = LAContext()

  _ = context.canEvaluatePolicy(
    .deviceOwnerAuthenticationWithBiometrics,
    error: nil)
  switch context.biometryType {
  case .faceID:
    return "faceid"
  case .touchID:
    // In iOS 14 and later, you can use "touchid" here
    return "lock"
  case .none:
    return "lock"
  @unknown default:
    return "lock"
  }
}
This code uses the biometryType property on context to determine the type of biometric authentication available. It returns the name of an SF Symbol to match or the current lock symbol if one isn’t known. Prior to iOS 14, there isn’t a Touch ID symbol.
Find the // Lock Icon comment and change the Image code to:
Image(systemName: noteLocked ? getBiometricType() : "lock.open")
Build and run. Now the lock button indicates that it uses Face ID for authentication!
![]()
Where to go from here?
In this tutorial, you’ve learned how to use Keychain Services and how to implement biometric authentication in a SwiftUI app. From here on, your apps will be super secure!
If you wish, you can examine the final project in the project materials. You can download it by clicking the Download Materials button at the top or bottom of this tutorial.
You might have protected the password, but the note itself is still stored in plain text in User Defaults. Check out our CryptoKit tutorial for information on securing larger amounts of data.
For other classes of keychain items, Apple’s documentation for Keychain Services should be your first stop. The process for other classes works much the same, and the documentation contains Swift examples of most of them.
For similar material from a UIKit perspective, read our article How To Secure iOS User Data: The Keychain and Biometrics — Face ID or Touch ID.
And for another perspective on Keychain, look at Keychain Services API Tutorial for Passwords in Swift.