Sign in with Apple Using Vapor 4
In this Vapor 4 tutorial, you’ll learn how to implement Sign in with Apple with an iOS companion app and a simple website. By Christian Weinberger.
Running the iOS App
Before you can build and run the iOS app, you need to fill in the URL placeholder. Navigate to WebAPI.swift and update baseURL with the URL you obtained from ngrok, e.g. https://0f1ecb8f140a.ngrok.io.
Now, you’ll add the Sign in with Apple capability to your App ID.
In Xcode, go to the SignInWithApple target and select Signing & Capabilities. Select your own team and change the bundle identifier to match your team — it must be unique. Click on + Capability and add Sign in with Apple.

Select the SignInWithApple target and run it on your device.
Signing in with Apple should work, but you’ll see an error indicating the operation can’t be completed:

This error occurs because you haven’t implemented the required code. But before moving on to the implementation, it’s important to understand the fundamentals of Sign in with Apple and how you’ll implement it.
Sign in with Apple Authentication Flow
As you can see in the starter project, your back end already has its own way of authenticating users — Bearer token authentication – in the token-protected routes.
When using third-party authentication flows, such as Sign in with Apple or Google, you still want use your own authentication tokens for your API. This provides a unified API for your clients, e.g. the iOS app. The third-party service replaces the need for a username and password.
Here’s an overview of the flow you’ll implement:
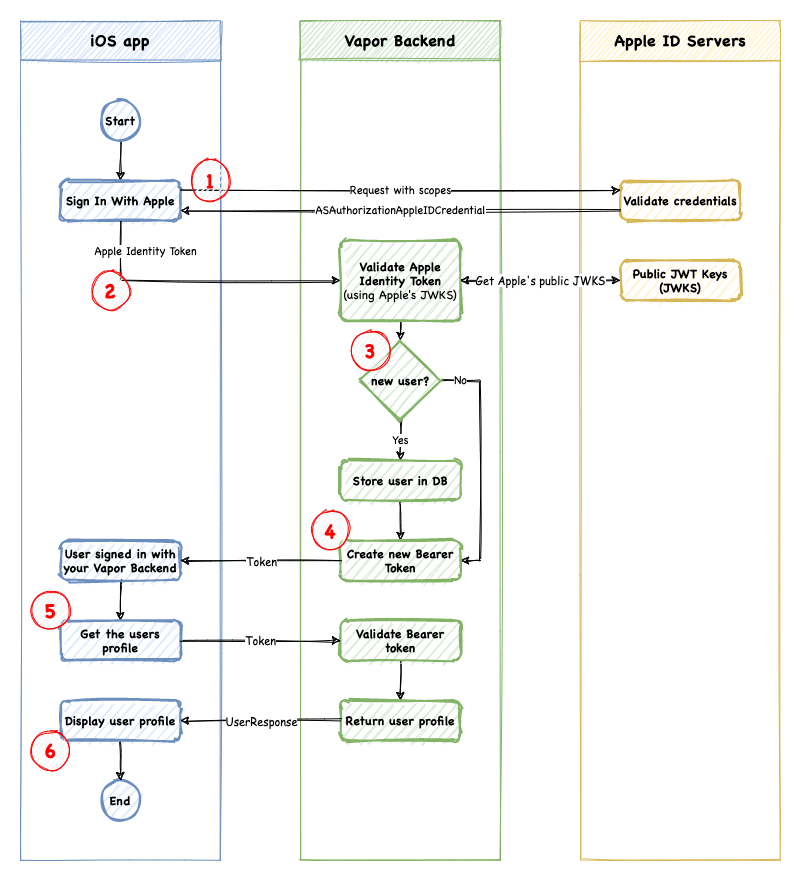
- Using
ASAuthorizationAppleIDButton, ask your users to Sign in with Apple from the iOS app. Apple will validate the credentials and provide your app with anASAuthorizationAppleIDCredential. - Take the provided Apple identity token and send it to your Vapor server for authentication. The Vapor app will validate the identity token using Apple’s public keys.
- Using the Apple identifier, you check if this is a new or existing user. If the Apple identifier is unknown, create a new user.
- Create a new Bearer token, which the app will use to authenticate the user.
- Use the Bearer token to get the user’s profile using the
GET /api/users/meendpoint, which returns 401 at the moment. - The back end will validate the token and return the profile. The app will display the profile to the user.
Remember, you’re using Sign in with Apple to authenticate a user, as shown in steps 1 and 2. However, you provide your user with your own Bearer token, which you’ll use for authentication moving forward.
Now that you know what you need to implement, it’s time to begin!
Sign in with Apple Authentication With iOS & Vapor
Go back to your Vapor project and switch to SIWAAPIController.swift in Sources/App/APIControllers. You’ll find RouteCollection with a single route defined and an empty implementation for authHandler(req:).
First, decode the request body that the iOS app will send. Replace the implementation of SIWAAPIController with the following:
struct SIWAAPIController {
  // 1
  struct SIWARequestBody: Content {
    let firstName: String?
    let lastName: String?
    let appleIdentityToken: String
  }

  func authHandler(req: Request) throws -> EventLoopFuture<UserResponse> {
    // 2
    let userBody = try req.content.decode(SIWARequestBody.self)
  }
}
With the code above you’re:
- Creating a
structfor decoding the request body. - Trying to decode the request body into the
SIWARequestBody.
Now, look at the SIWARequestBody to understand what will be sent to your endpoint:
-
appleIdentityToken, which is a JWT encoded as
String - firstName and lastName which may or may not be present
Go back to the flow chart and you’ll notice you need to validate the JWT first. Luckily, Vapor 4 has built-in functionality that does this for you. Everything you need is shipped with JWT so that you can use Request.JWT.Apple.verify(applicationIdentifier:).
Now, update authHandler(req:). Below let userBody = try req.content.decode(SIWARequestBody.self), add the following:
// 1
return req.jwt.apple.verify(
  userBody.appleIdentityToken,
  applicationIdentifier: ProjectConfig.SIWA.applicationIdentifier
).flatMap { appleIdentityToken in
  // 2
  User.findByAppleIdentifier(appleIdentityToken.subject.value, req: req)
    // 3
    .flatMap { user in
      if user == nil {
        // TODO 1: create a new user, return bearer token
      } else {
        // TODO 2: sign in existing user, return bearer token
      }
      // 4
      fatalError()
    }
}
A couple of things are happening in the code above:
- You’re using Vapor’s JWT implementation to verify the JWT-encoded Apple identity token provided by the iOS app. Note that you have to provide your iOS app’s bundle ID here. To do so, go to Product ▸ Schemes ▸ Edit Scheme in the menu bar, locate the Environment Variables section in Run ▸ Arguments and add an environment variable with the key
SIWA_APPLICATION_IDENTIFIERand the value of your bundle ID you created earlier. -
verify(_:applicationIdentifier:)returns a future type,AppleIdentityToken, that you can use to grab the Apple user identifier underAppleIdentityToken.subject.value. You’re using theappleUserIdentifierto check if a user with this identifier already exists. - If a user is not returned, register a new user and return a Bearer token; otherwise, return a Bearer token.
- The
fatalError()is here to make the code compile without errors. You’ll replace it with an actual implementation in a moment.
Registering a User
Now, you’ll create the actual method for signing up a user. You’ll need the AppleIdentityToken as well as firstName and lastName. In the AppleIdentityToken, you’ll find an email key, which you can use as well.
For testing, you can go to the Apple ID page and sign in, then revoke your app from Security ▸ Apps & Websites using Apple ID. Then, the next time you authenticate with Sign in with Apple, the email field will be included.
email , firstName and lastName are usually only provided the first time a user authenticates via Sign in with Apple. It might be a good idea to cache values on the iOS side and adjust your request body to also accept an email field, in case your server isn’t responding when the iOS app wants to authenticate for the first time.
For testing, you can go to the Apple ID page and sign in, then revoke your app from Security ▸ Apps & Websites using Apple ID. Then, the next time you authenticate with Sign in with Apple, the email field will be included.

Add this below authHandler(req:) in SIWAAPIController.swift:
// 1
static func signUp(
  appleIdentityToken: AppleIdentityToken,
  firstName: String? = nil,
  lastName: String? = nil,
  req: Request
) -> EventLoopFuture<UserResponse> {
  // 2
  guard let email = appleIdentityToken.email else {
    return req.eventLoop.makeFailedFuture(UserError.siwaEmailMissing)
  }
  // 3
  return User.assertUniqueEmail(email, req: req).flatMap {
    // 4
    let user = User(
      email: email,
      firstName: firstName,
      lastName: lastName,
      appleUserIdentifier: appleIdentityToken.subject.value
    )
    // 5
    return user.save(on: req.db)
      .flatMap {
        // 6
        guard let accessToken = try? user.createAccessToken(req: req) else {
          return req.eventLoop.future(error: Abort(.internalServerError))
        }
        // 7
        return accessToken.save(on: req.db).flatMapThrowing {
          // 8
          try .init(accessToken: accessToken, user: user)
        }
    }
  }
}
Here’s what the code above does:
- As discussed, your method takes an
appleIdentityToken,firstNameandlastNameand returns anEventLoopFuture<UserResponse>. - If no
emailis provided inappleIdentityToken, the method returns a failing future with an error (you’ll add this in a second). -
User.assertUniqueEmail(_:req:)checks for duplicates and returns a failing future, in case a user with this email already exists. - Creates a new
User. - Stores the user in your database.
- Creates a new access token for this user.
- Stores the new access token into your database.
- Returns a
UserResponsecontaining the new user and the access token.
Build and run. Your project should build without errors now.