Sign in with Apple Using Vapor 4
In this Vapor 4 tutorial, you’ll learn how to implement Sign in with Apple with an iOS companion app and a simple website. By Christian Weinberger.
Logging in a User
Before you connect the new method in your authHandler(req:), you need to add your implementation for the sign-in flow. Add this below signUp(appleIdentityToken:firstName:lastName:req:) in SIWAAPIController.swift:
// 1
static func signIn(
  appleIdentityToken: AppleIdentityToken,
  firstName: String? = nil,
  lastName: String? = nil,
  req: Request
) -> EventLoopFuture<UserResponse> {
  // 2
  User.findByAppleIdentifier(appleIdentityToken.subject.value, req: req)
    // 3
    .unwrap(or: Abort(.notFound))
    .flatMap { user -> EventLoopFuture<User> in
      // 4
      if let email = appleIdentityToken.email {
        user.email = email
        user.firstName = firstName
        user.lastName = lastName
        return user.update(on: req.db).transform(to: user)
      } else {
        return req.eventLoop.future(user)
      }
    }
    // 5
    .flatMap { user in
      guard let accessToken = try? user.createAccessToken(req: req) else {
        return req.eventLoop.future(error: Abort(.internalServerError))
      }
      return accessToken.save(on: req.db).flatMapThrowing {
        // 6
        try .init(accessToken: accessToken, user: user)
      }
  }
}
This looks similar to previous steps:
- You take the same input and produce the same output as in
signUp(appleIdentityToken:firstName:lastName:req:). - Check if a user with the provided Apple identifier (stored in
AppleIdentityToken.subject.value) exists. - If a user isn’t found, return a 404 error —
.notFound. - If the data from Apple has changed, update a user’s email, first name and last name.
- Create and save an access token for your user.
- Return a
UserResponsecontaining the user and the access token.
Finishing the Sign in with Apple Authentication Handler
You’ve now finished both implementations for registering and logging in a user using Sign in with Apple. Next, you’ll invoke the new methods. Replace the closure for the final flatMap in authHandler(req:) with the following:
if user == nil {
  // 1
  return SIWAAPIController.signUp(
    appleIdentityToken: appleIdentityToken,
    firstName: userBody.firstName,
    lastName: userBody.lastName,
    req: req
  )
} else {
  return SIWAAPIController.signIn(
    appleIdentityToken: appleIdentityToken,
    firstName: userBody.firstName,
    lastName: userBody.lastName,
    req: req
  )
  // 3
}
To complete this function’s implementation, you:
- Call
signUp(appleIdentityToken:firstName:lastName:req:)if no user is found. - If a user is found, invoke
signIn(appleIdentityToken:firstName:lastName:req:)instead. - Remove
fatalError()as you no longer need it
You’ve now implemented authHandler(req:), which is already registered to POST /api/auth/siwa. Build and run your Vapor app to ensure it’s running the latest code.
Connecting the iOS App to Your Back End
To test if your implementation works, you’ll connect the iOS app to your back end. So navigate to your iOS project and open WebAPI.swift.
Go to authorizeUsingSIWA(identityToken:email:firstName:lastName:completion:) and remove the current implementation. Replace it with the following to create a SIWAAuthRequestBody:
// 1
guard let identityToken = identityToken else {
  completion(.failure(WebAPIError.identityTokenMissing))
  return
}

// 2
guard let identityTokenString = String(data: identityToken, encoding: .utf8) else {
  completion(.failure(WebAPIError.unableToDecodeIdentityToken))
  return
}

// 3
let body = SIWAAuthRequestBody(
  firstName: firstName,
  lastName: lastName,
  appleIdentityToken: identityTokenString
)

// 4
guard let jsonBody = try? JSONEncoder().encode(body) else {
  completion(.failure(WebAPIError.unableToEncodeJSONData))
  return
}
With the request body above, you’re:
- Checking the response for an
identityToken, and if it’s not there, returning an error. - Converting the
identityTokeninto aStringand returning an error if the decoding fails. - Initializing the
SIWAAuthRequestBody. - Encoding
SIWAAuthRequestBodyinto JSON and returning an error if the encoding fails.
Now, you’ll create the request. Similar to the implementation for getting a user’s profile, you’ll use URLSession and URLRequest for this. Append this to your method body:
// 1
let session = URLSession.shared
let url = URL(string: "\(baseURL)/api/auth/siwa")!
var request = URLRequest(url: url)
request.httpMethod = "POST"
request.setValue("application/json", forHTTPHeaderField: "Content-Type")

// 2
session.uploadTask(with: request, from: jsonBody) { (data, response, error) in
  // 3
  do {
    let userResponse: UserResponse =
      try parseResponse(response, data: data, error: error)
    // 4
    accessToken = userResponse.accessToken

    // 5
    completion(.success(userResponse.user))
  } catch {
    completion(.failure(error))
  }
}.resume()
Here’s what’s going on with the code above:
- It creates a
URLSessionand aURLRequestwithurl,httpMethodand a properContent-Type. -
URLSessionsends the request to your back end. - It tries to parse the response into a
UserResponsemodel. - The
accessTokenis stored statically so it’s available for any subsequent calls togetProfile(completion:). - It then returns either the user profile or an error.
Make sure your Vapor app is running. Then run your iOS app as well and test Sign in with Apple again.

You did it! You implemented Sign in with Apple using an iOS app and a Vapor back end.

Sign in with Apple Authentication on Web
Now, it’s time to implement Sign in with Apple on the web.
Sign in with Apple Web Authentication Flow
Before you jump in to the implementation, take a quick look at the Sign in with Apple web authentication flow below:
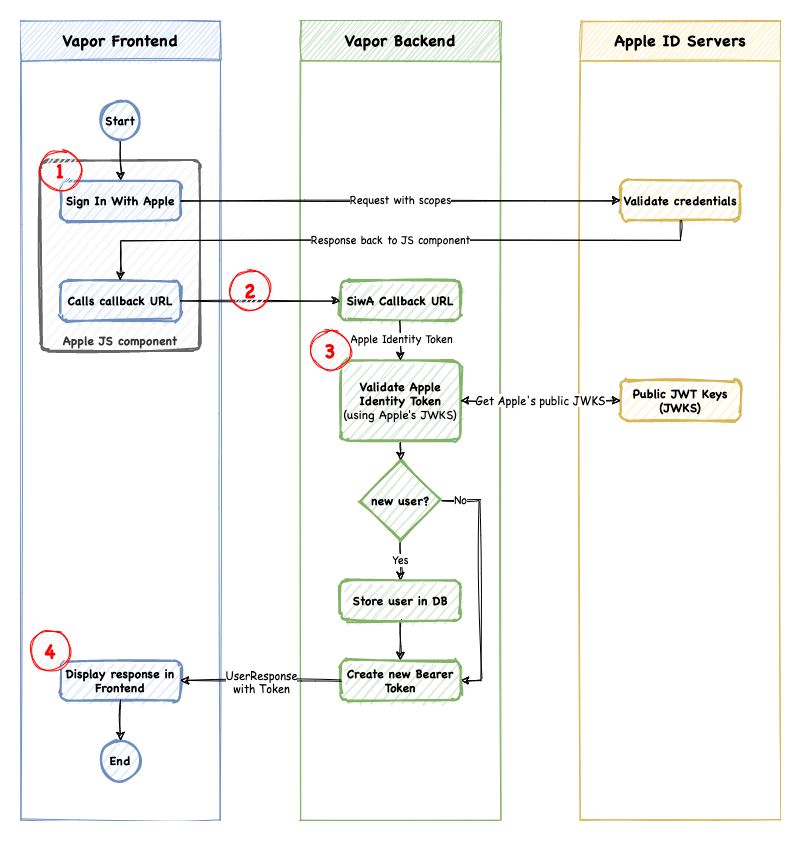
Apple provides a JavaScript component to render a Sign in with Apple button, and it also handles the authentication. You’re providing a callback URL, which Apple will call once the authentication flow is complete.
- You’ll use the Sign in with Apple JavaScript component provided by Apple. Initialize it with
scope,clientID,redirectURLandstate. The sign-in process is completely wrapped and managed by Apple. - Upon successful sign in, Apple will call your callback URL from its JavaScript component. It includes anything you need to validate the authenticity, like the Apple identity token.
- From now on, the flow is mostly the same as it was in your previous implementation.
- Once completed, you’ll return a
UserResponseto the front end and the JSON response will render in the browser.
Implementing the Leaf Template

In Vapor, you can use Leaf as a templating engine to render your front end. It’s already configured in configure.swift, and there’s a prepared Leaf template for you as well. You’ll find it at Resources/Views/Auth/siwa.leaf:
<!DOCTYPE html>

<html>
<head>
  <meta charset="utf-8">
  <meta name="viewport" content="width=device-width, initial-scale=1">
  <!-- 1 -->
  <style>
      \#appleid-signin {
          width: 240px;
          height: 40px;
      }
      \#appleid-signin:hover {
          cursor: pointer;
      }
      \#appleid-signin > div {
          outline: none;
      }
  </style>
</head>
<body>
  <!-- 2 -->
  <script type="text/javascript" src="https://appleid.cdn-apple.com/appleauth/static/jsapi/appleid/1/en_US/appleid.auth.js"></script>
  <div id="appleid-signin" data-color="black" data-border="false" data-type="sign in"></div>
  <!-- 3 -->
  <script type="text/javascript">
    AppleID.auth.init({
      clientId : '#(clientID)',
      scope : '#(scope)',
      redirectURI : '#(redirectURL)',
      state : '#(state)',
      usePopup : false
    });
  </script>
</body>
</html>
This template contains everything you need to display the Sign in with Apple button:
- CSS: There customizes the appearance of the Sign in with Apple button. There are problems with rendering it properly unless you provide a fixed width or height. There are also some cosmetic changes to ensure a proper hover state and to get rid of the outline.
- JavaScript: This is the implementation, as outlined by Apple in its documentation. Apple’s CDN (Content Delivery Network) loads and renders the JavaScript.
-
Leaf variables: For Sign in with Apple, you provide information, such as
clientID,scope,redirectURLandstate. You provide these in your context when you render your Leaf template.